


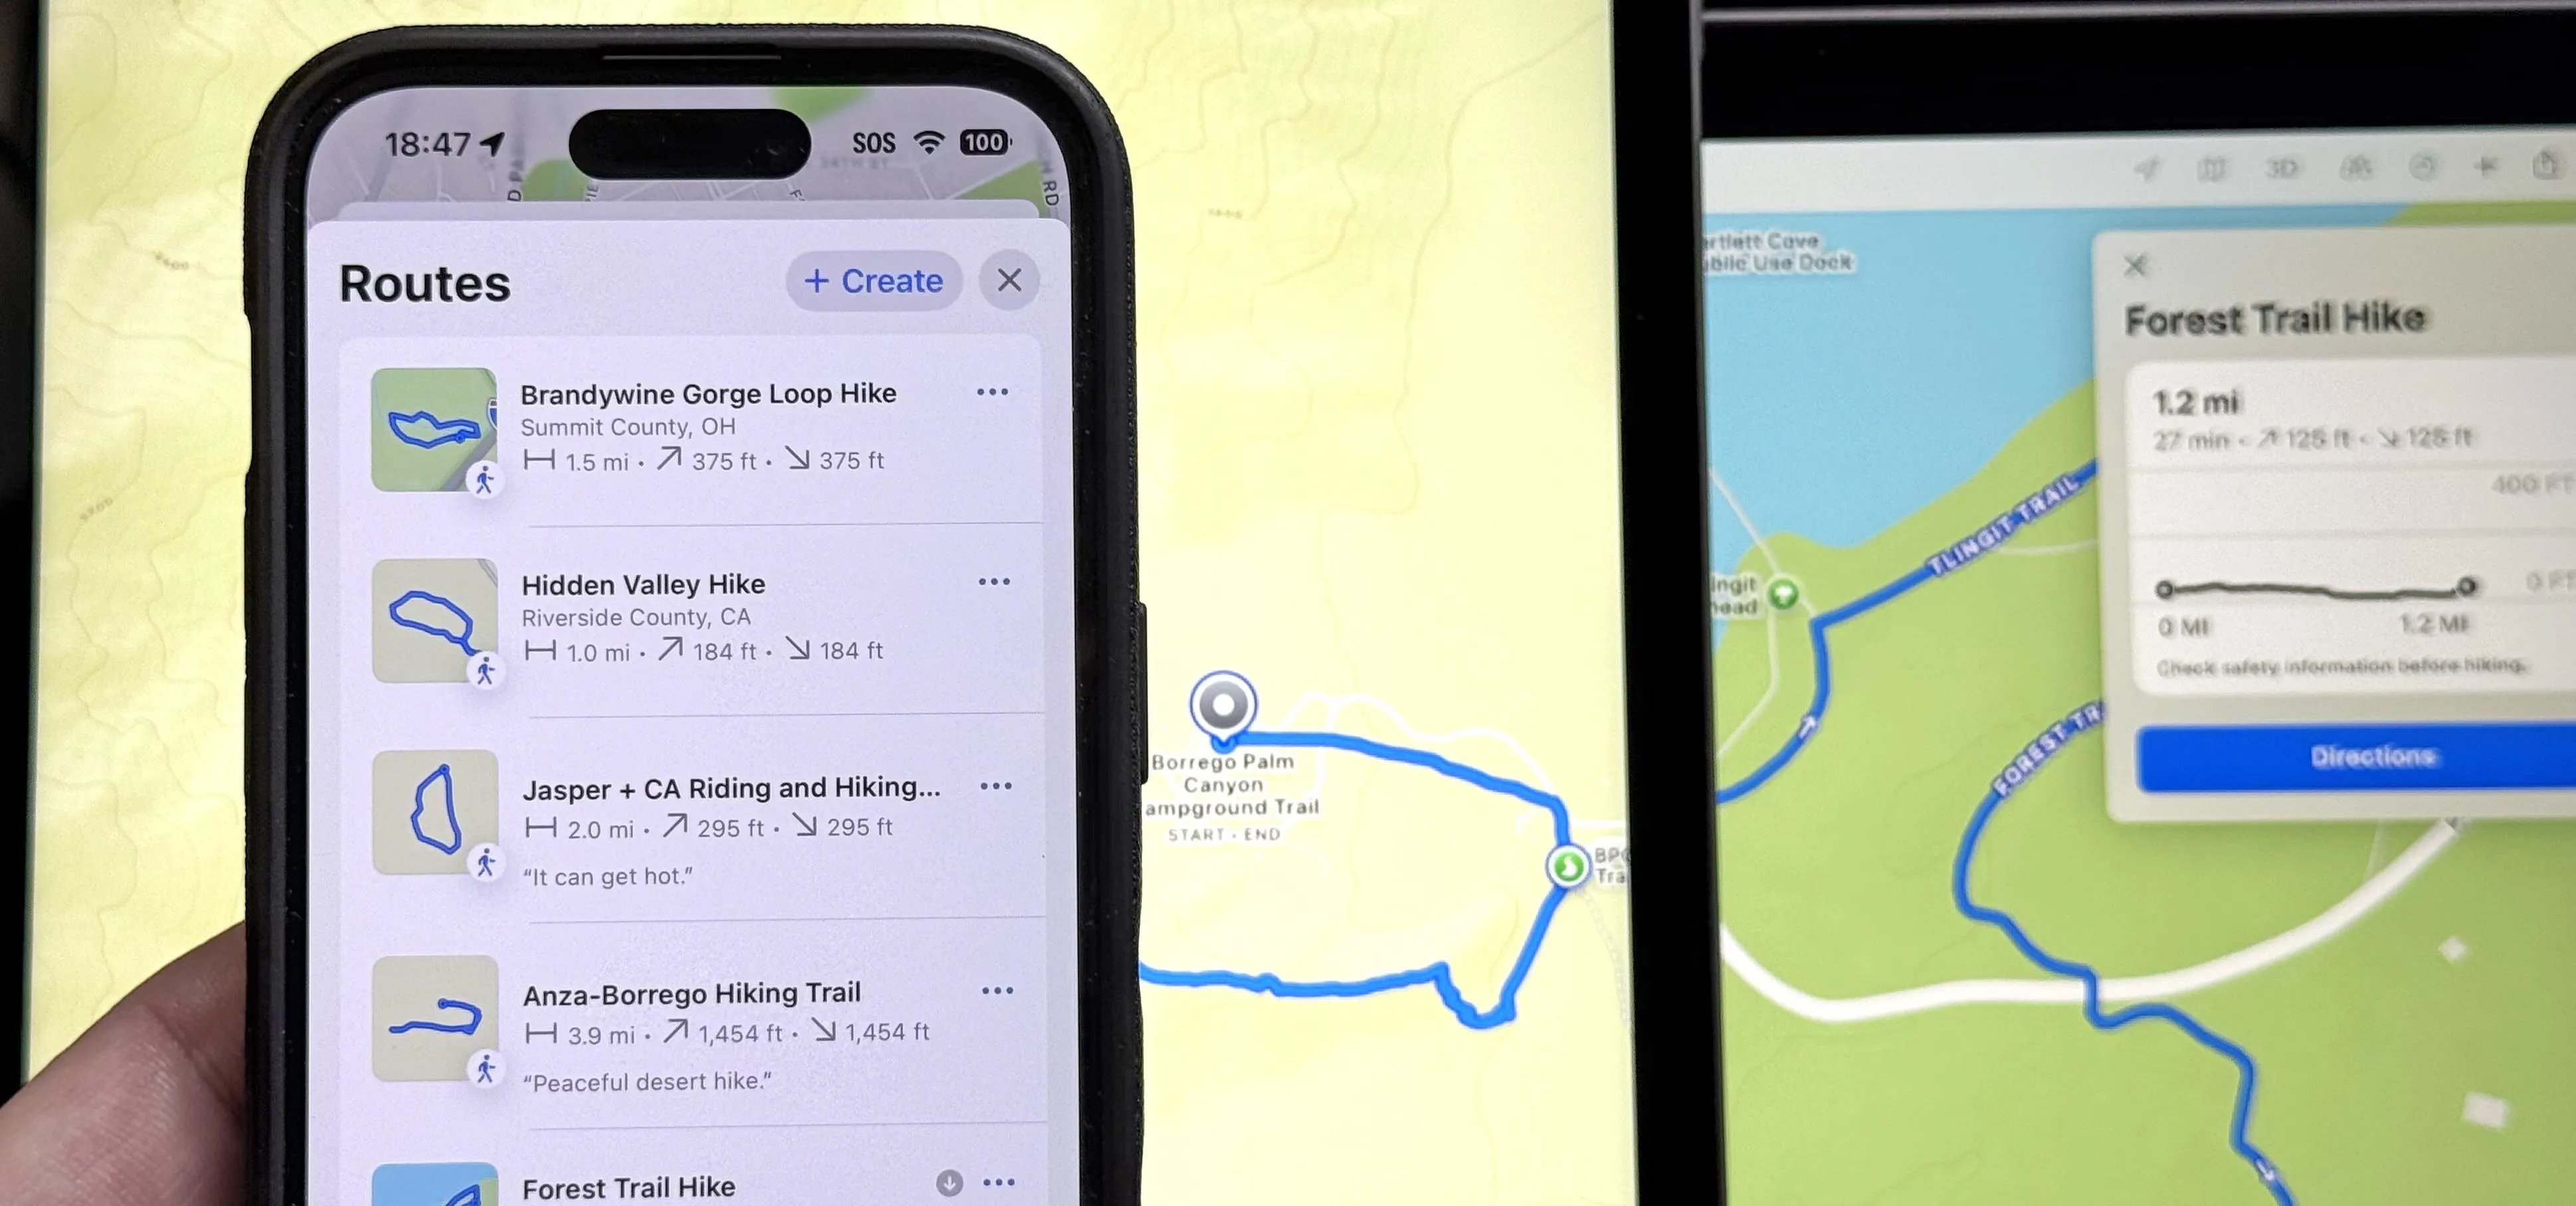
Apple Maps keeps getting better and better for all the hikers in the world. With iOS 18, iPadOS 18, or macOS Sequoia 15, you can access thousands of detailed trail maps within U.S. national parks and topographic views, but you can also create your own walking and hiking routes.
Custom walking and hiking routes, available on iPhone, iPad, and Mac since Sept. 16, work anywhere you want. It could be for hikes in state or local parks, walks around town, or any path you'd like to remember. You can give your routes custom names, add notes, label them one-way, out-and-back, or closed-loop hikes, and more. On an iPhone or iPad, you can also download custom routes for offline use when you don't have cellular and Wi-Fi connections.
Step 1: Start a Custom Route
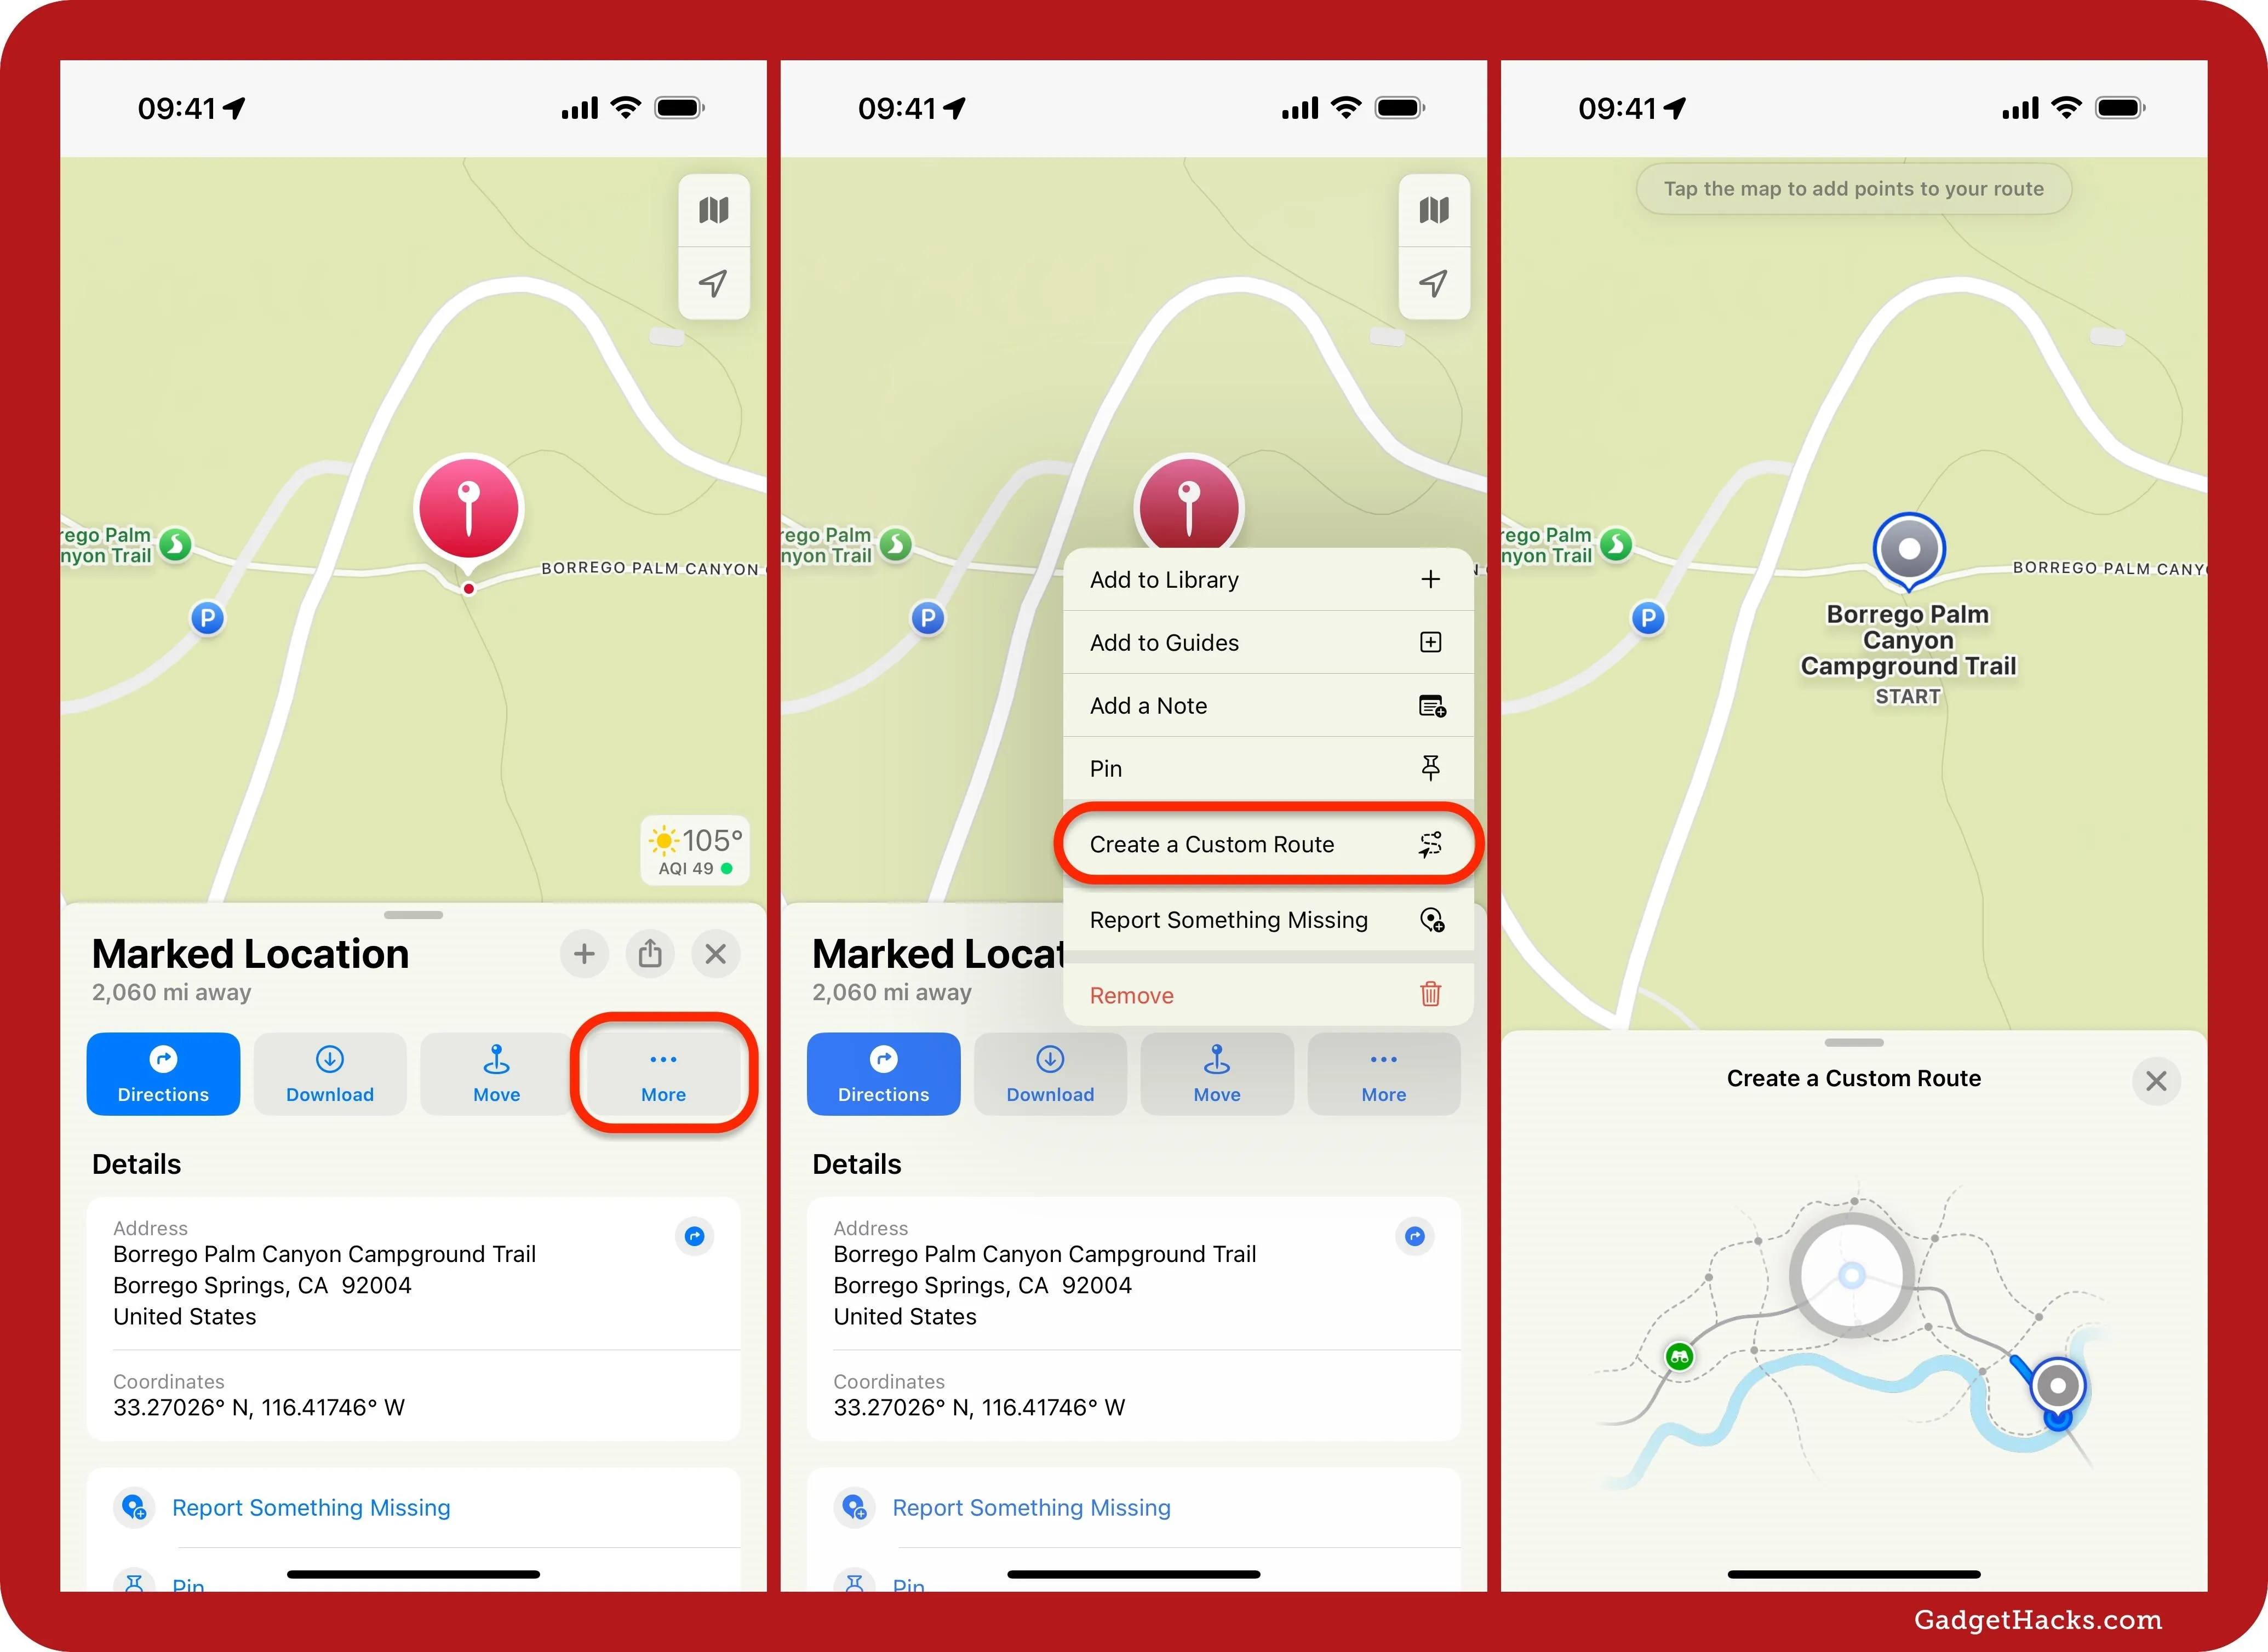
There are multiple ways to get started. First, you can mark a location on the map for the start of the route, hit the More (•••) button on the place card, and choose Create a Custom Route.
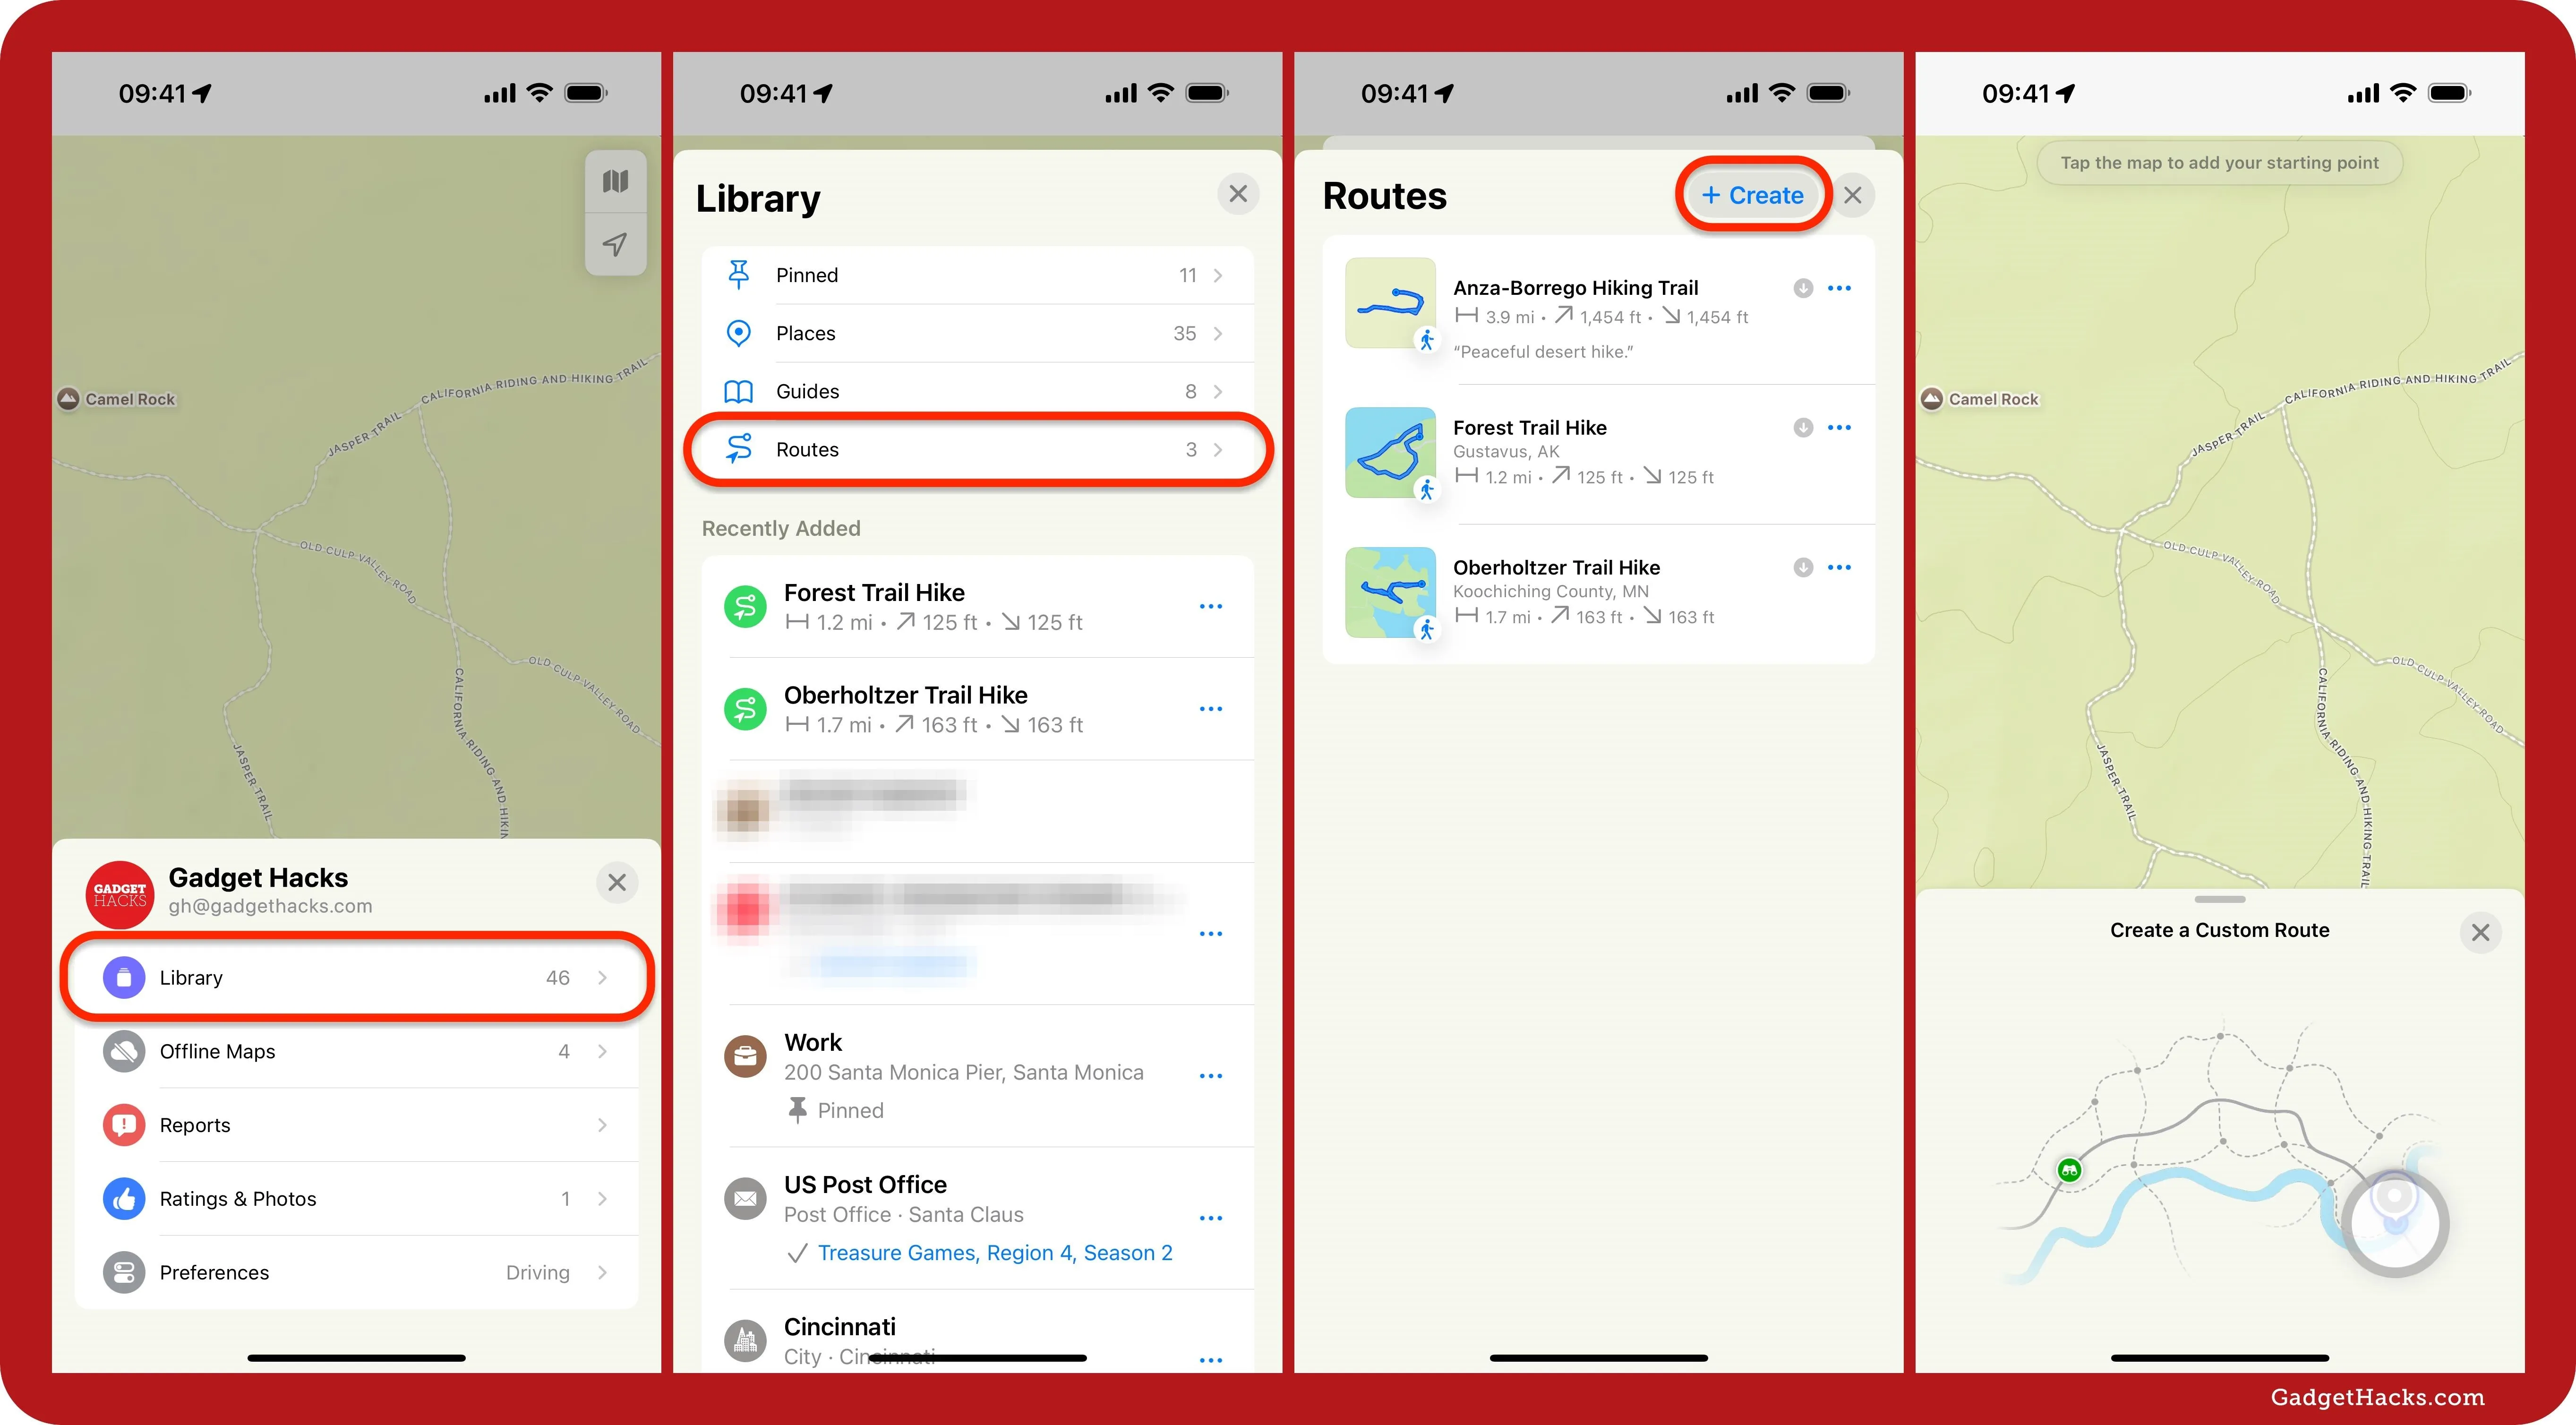
Second, you can find the area on the map where you want your route, tap or click your profile picture, and then choose Library. On iOS and iPadOS, your profile picture is on the search card. On macOS, it's in the top corner of the Maps app. Alternatively, you can tap or click [#] Places • [#] Guides • [#] Routes under Library on the search card or side panel. Next, select Routes and hit the + Create button to open up the route creator.
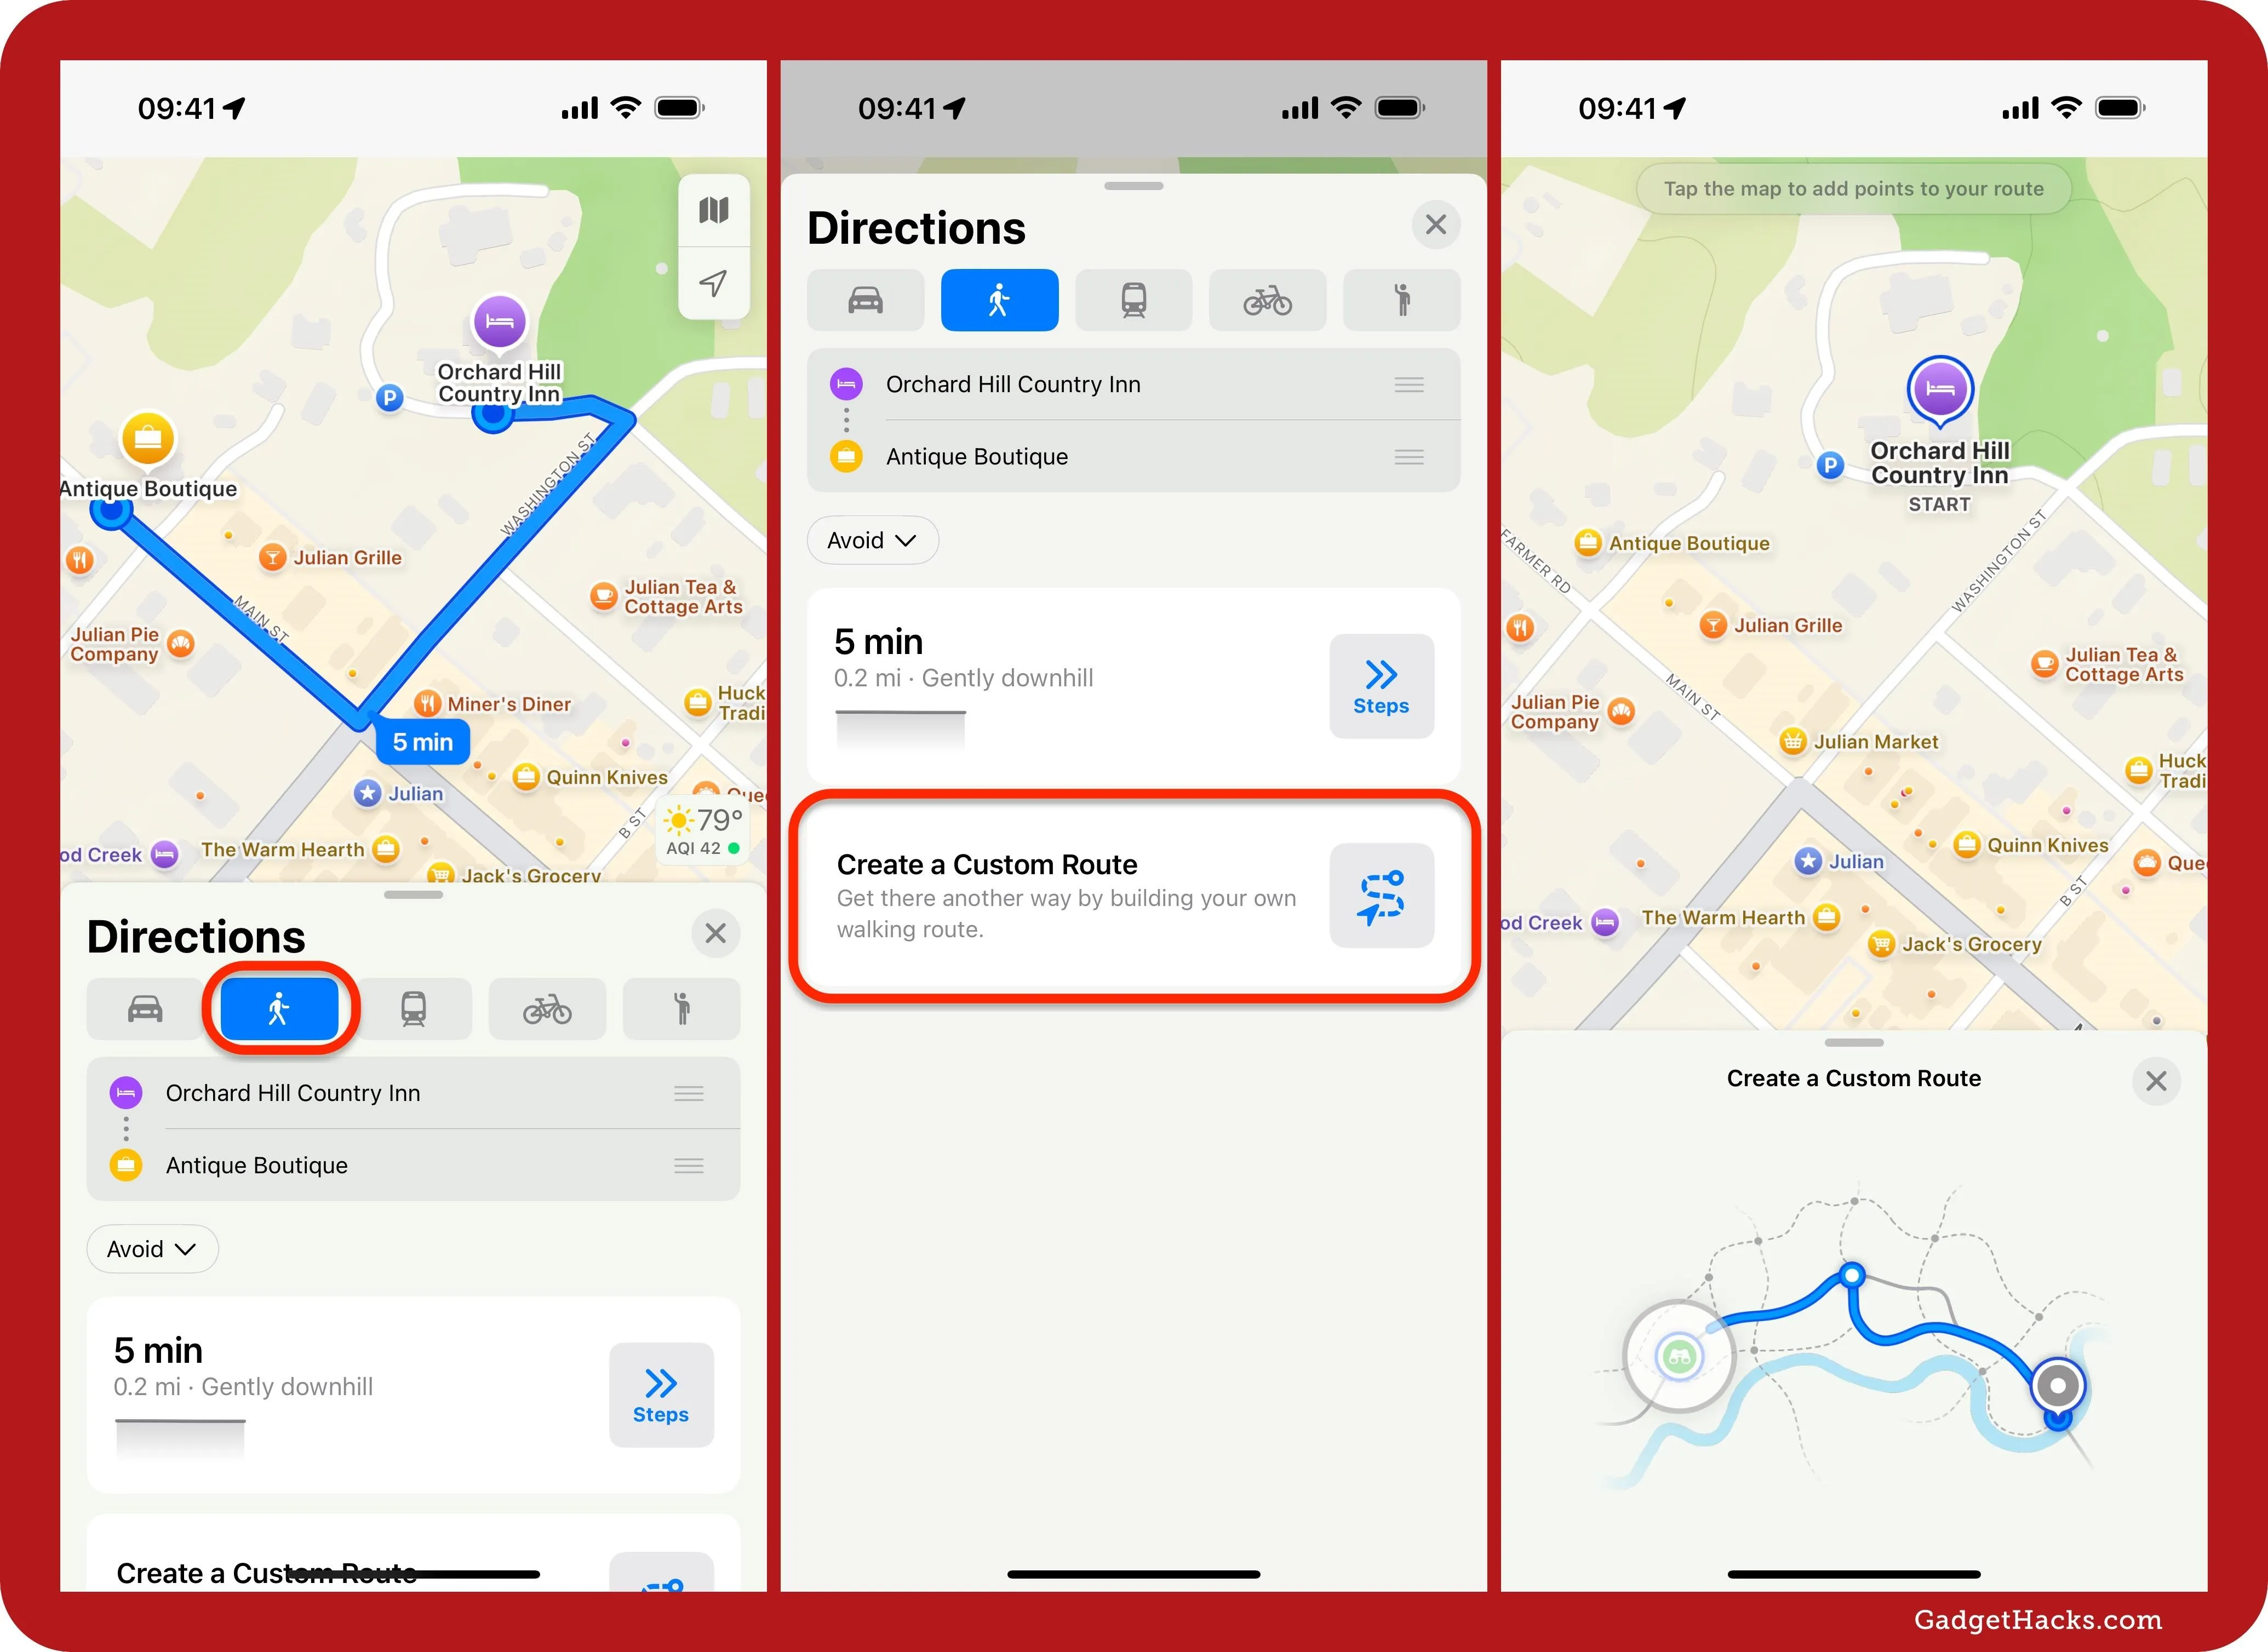
Third, you can start walking directions from one point to another. Below the list of available routes, tap or click the Create a Custom Route button.
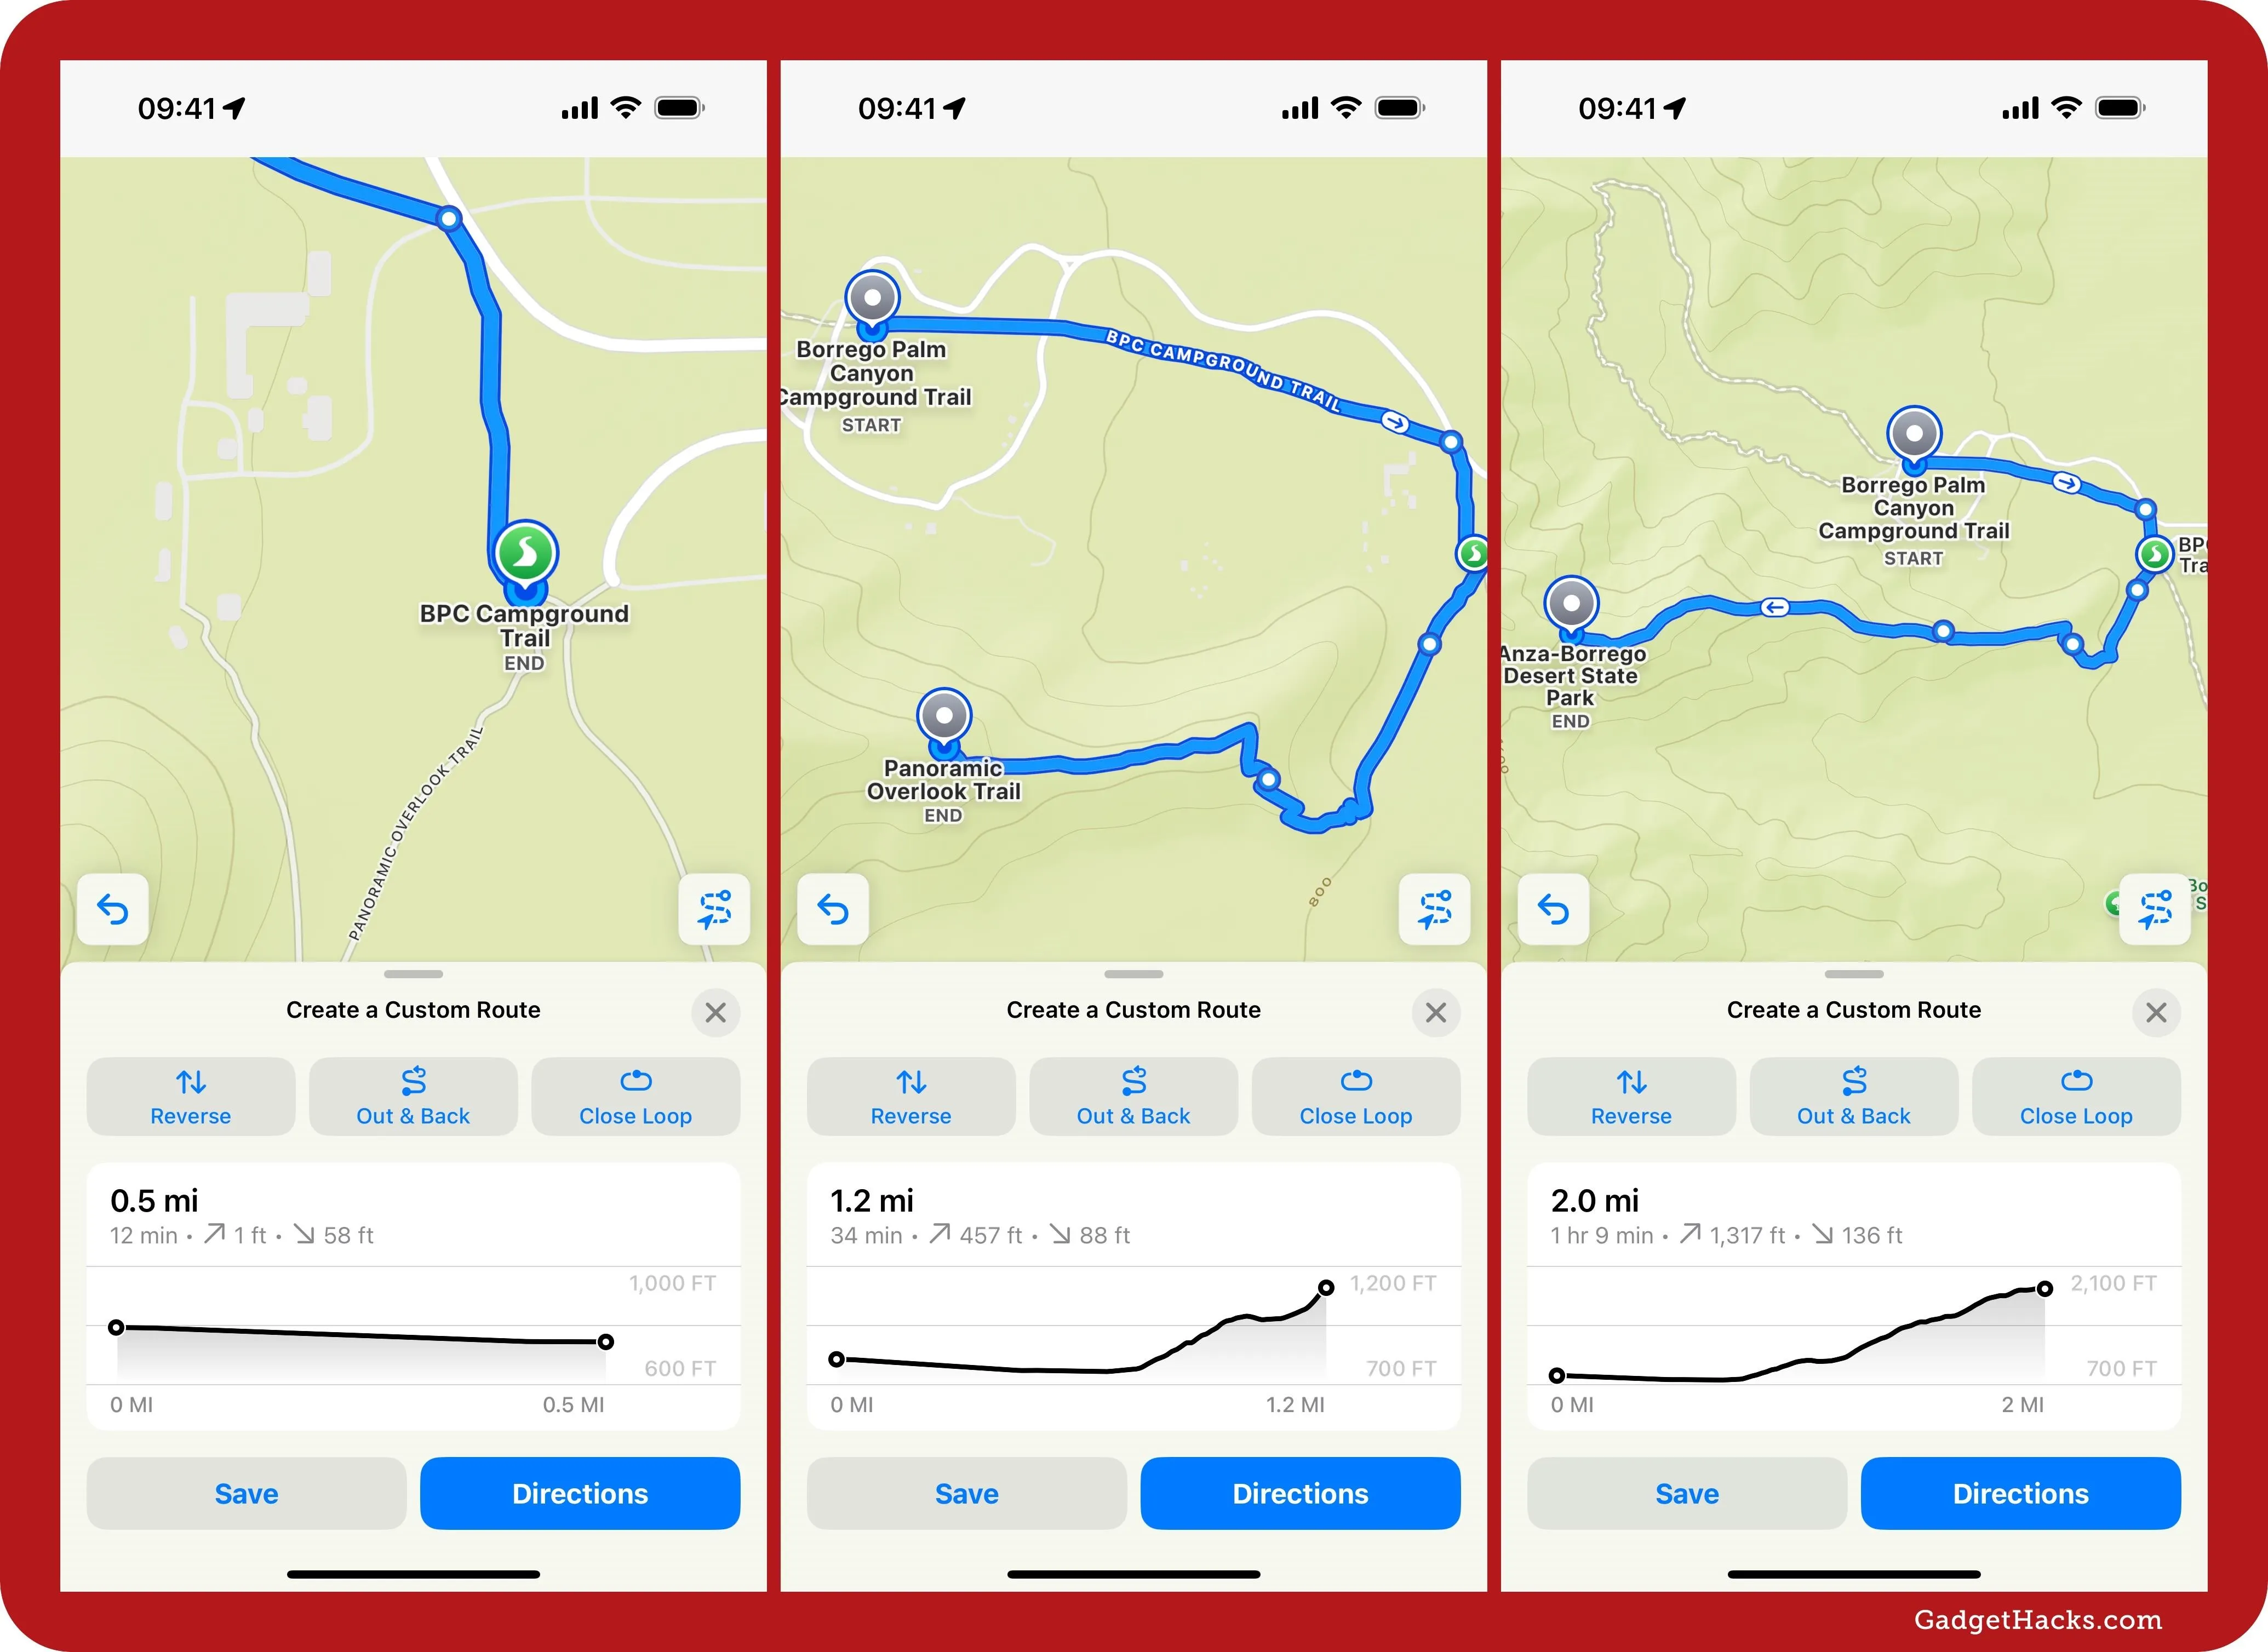
Step 2: Mark Your Points
You already have your starting point if you began from a marked location or walking directions, but you'll need to make one if you began from the Places Library. To mark points, tap or click where you want them until you've ended up at the end of your custom route. Points can be roads, paths, businesses, landmarks, and other locations. You can hit the Undo button to undo points or the Path button to view the whole route as it currently is.
Step 3: Choose Routing Options
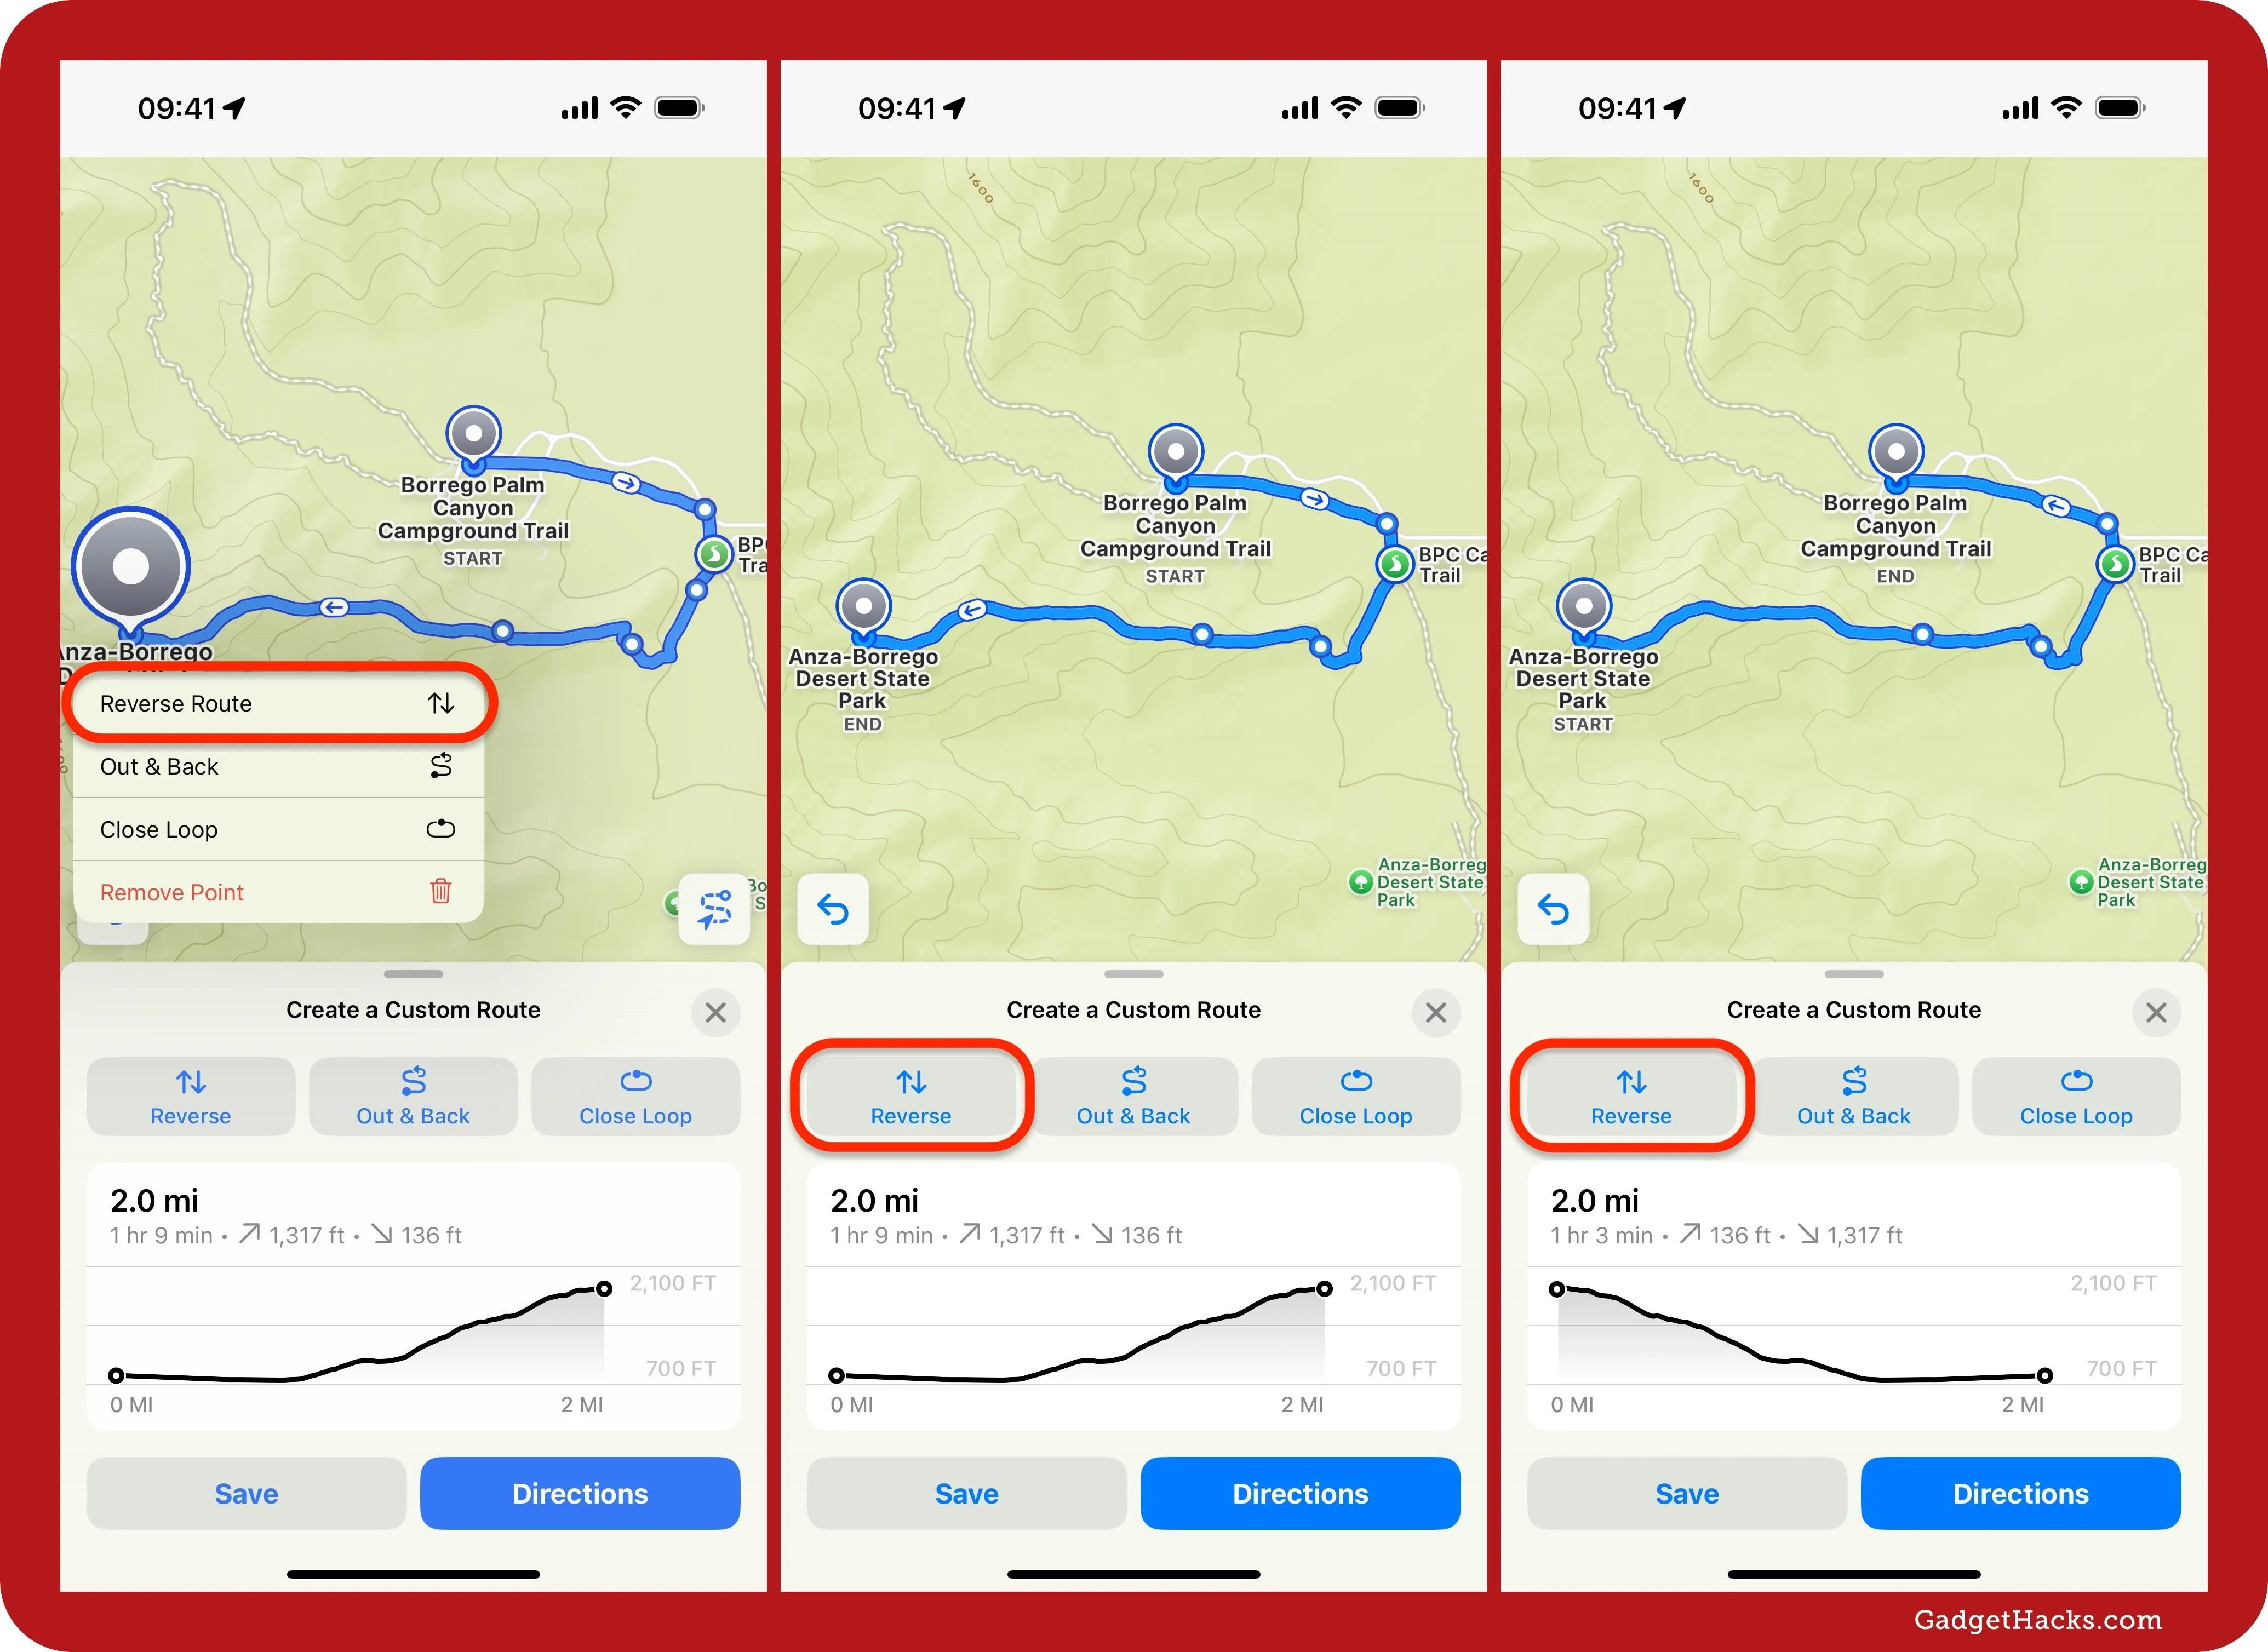
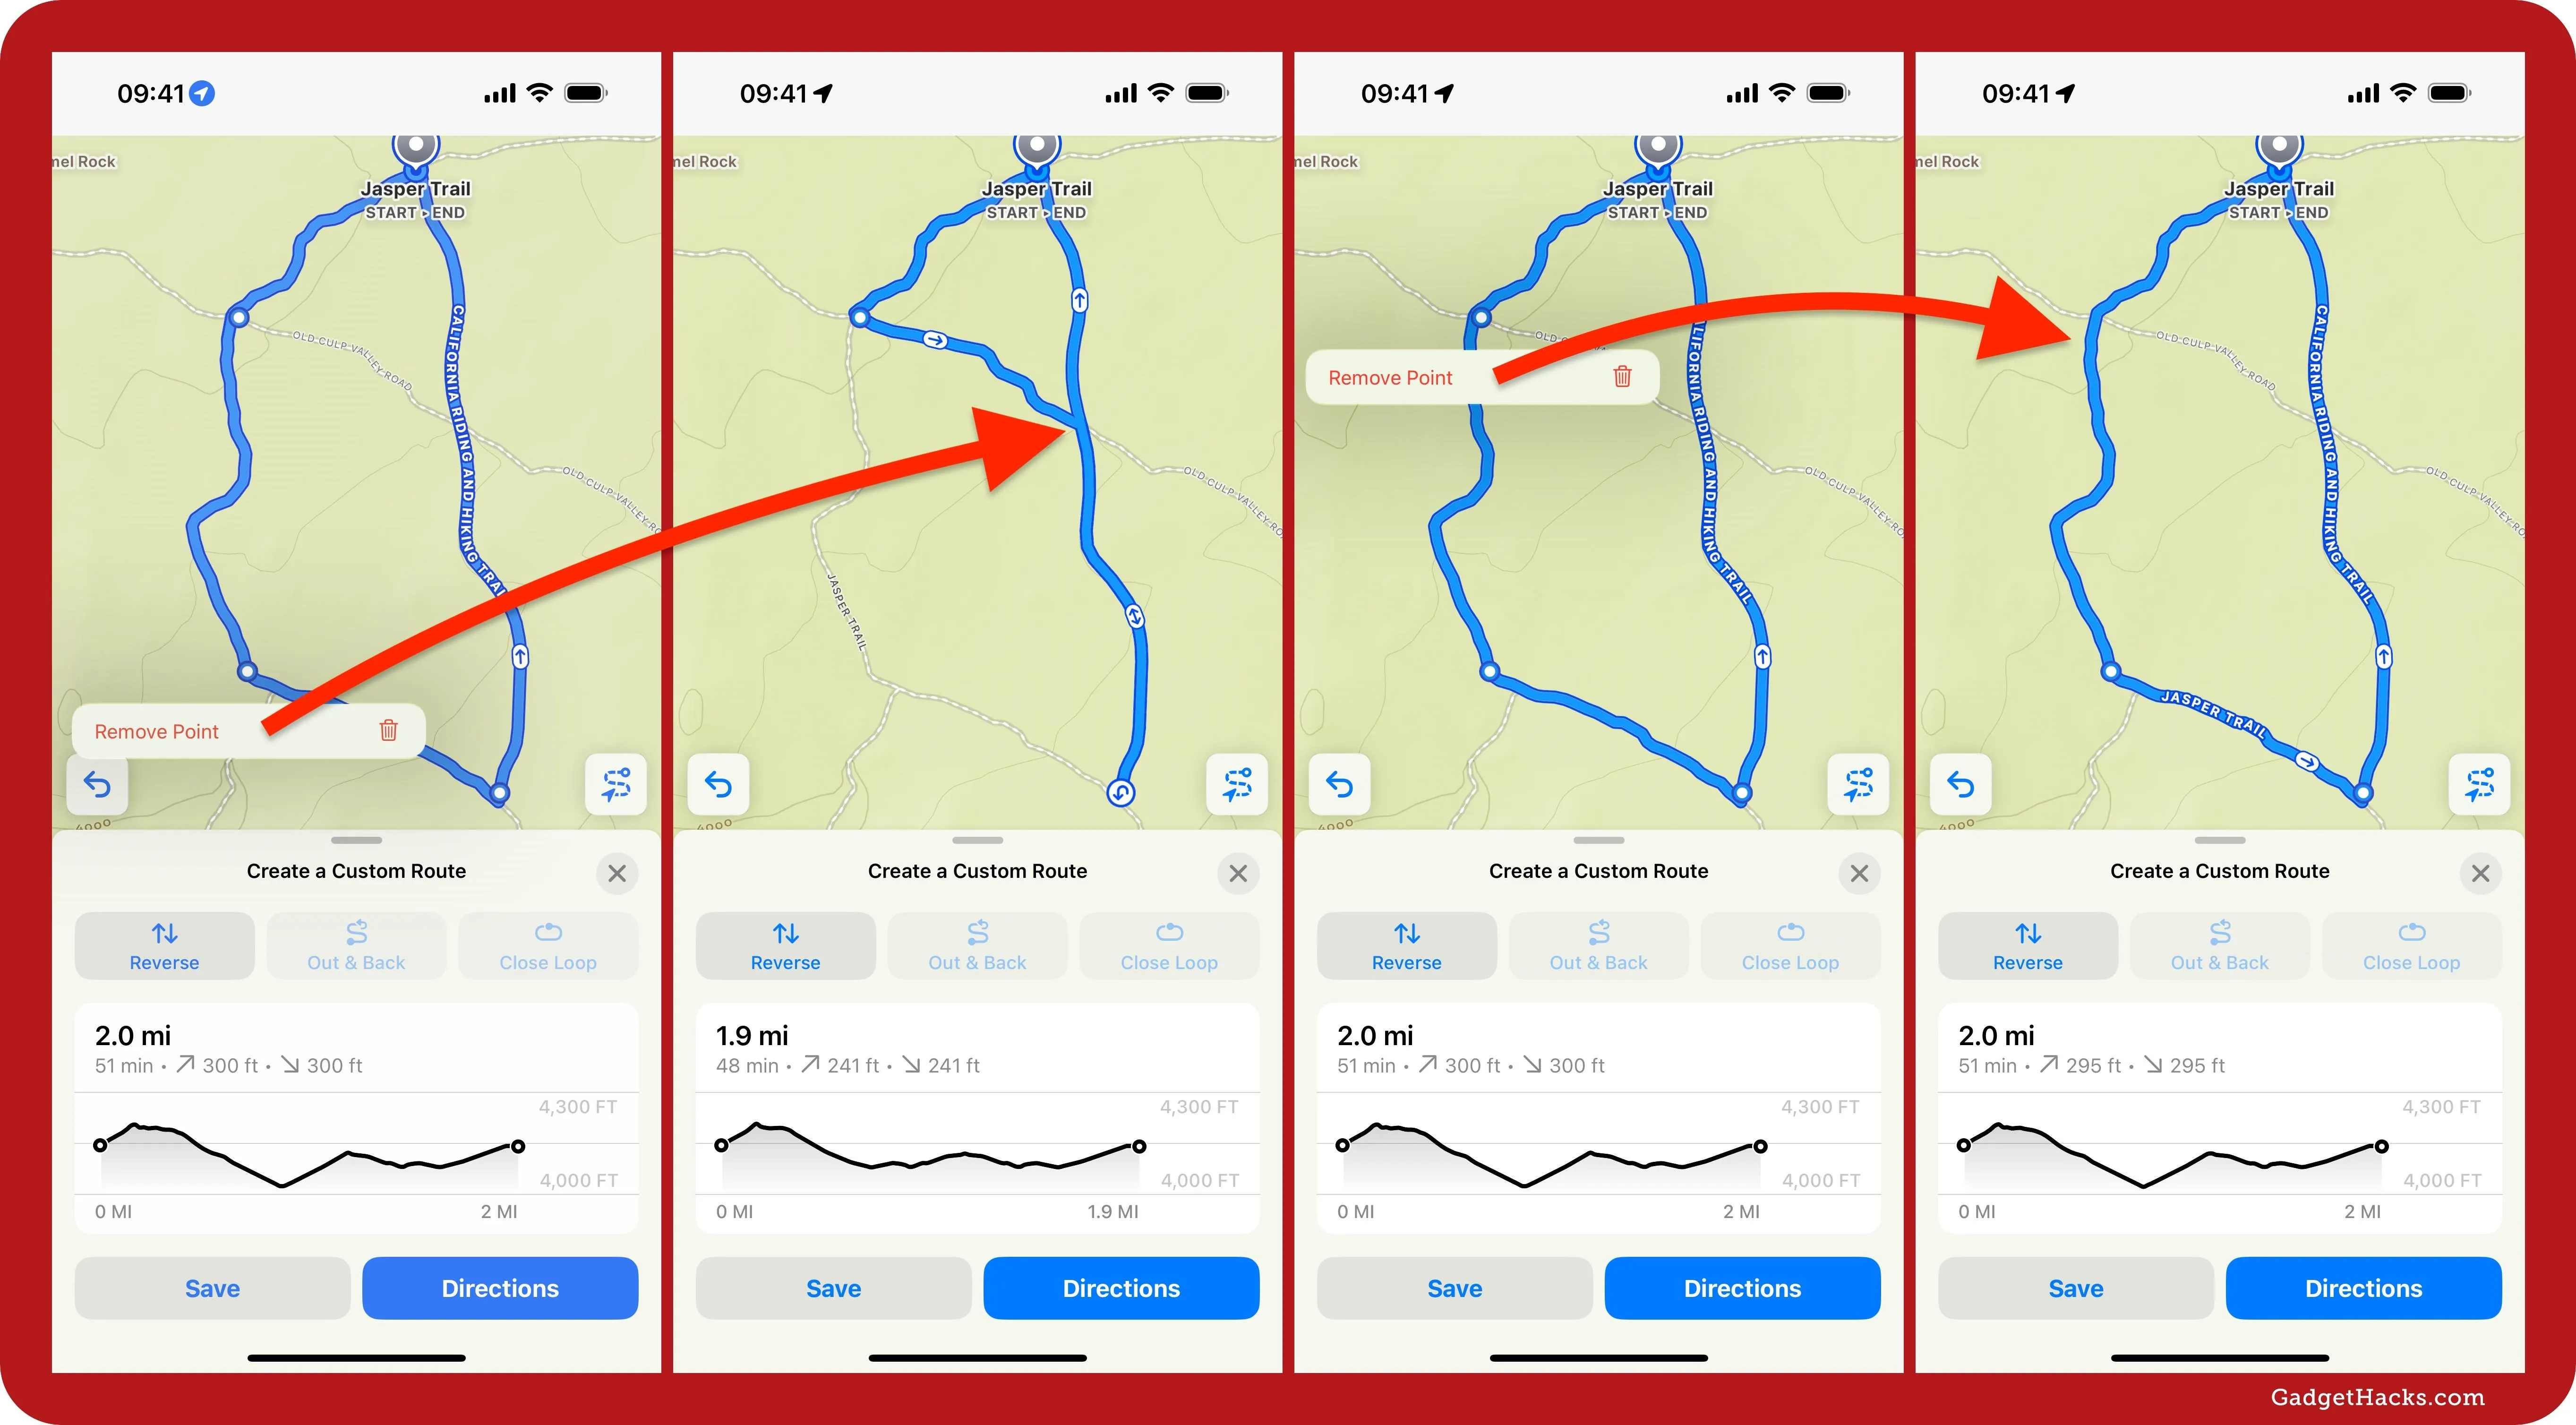
Once you plan your route, you can do a few things to customize it further. For one, you can reverse the route; tap or click a start or end point on the path, then hit Reverse Route or use the Reverse button on the editing panel. You'll notice the start and end points switch positions, the directional arrows on the path change, and the elevation chart flip horizontally.
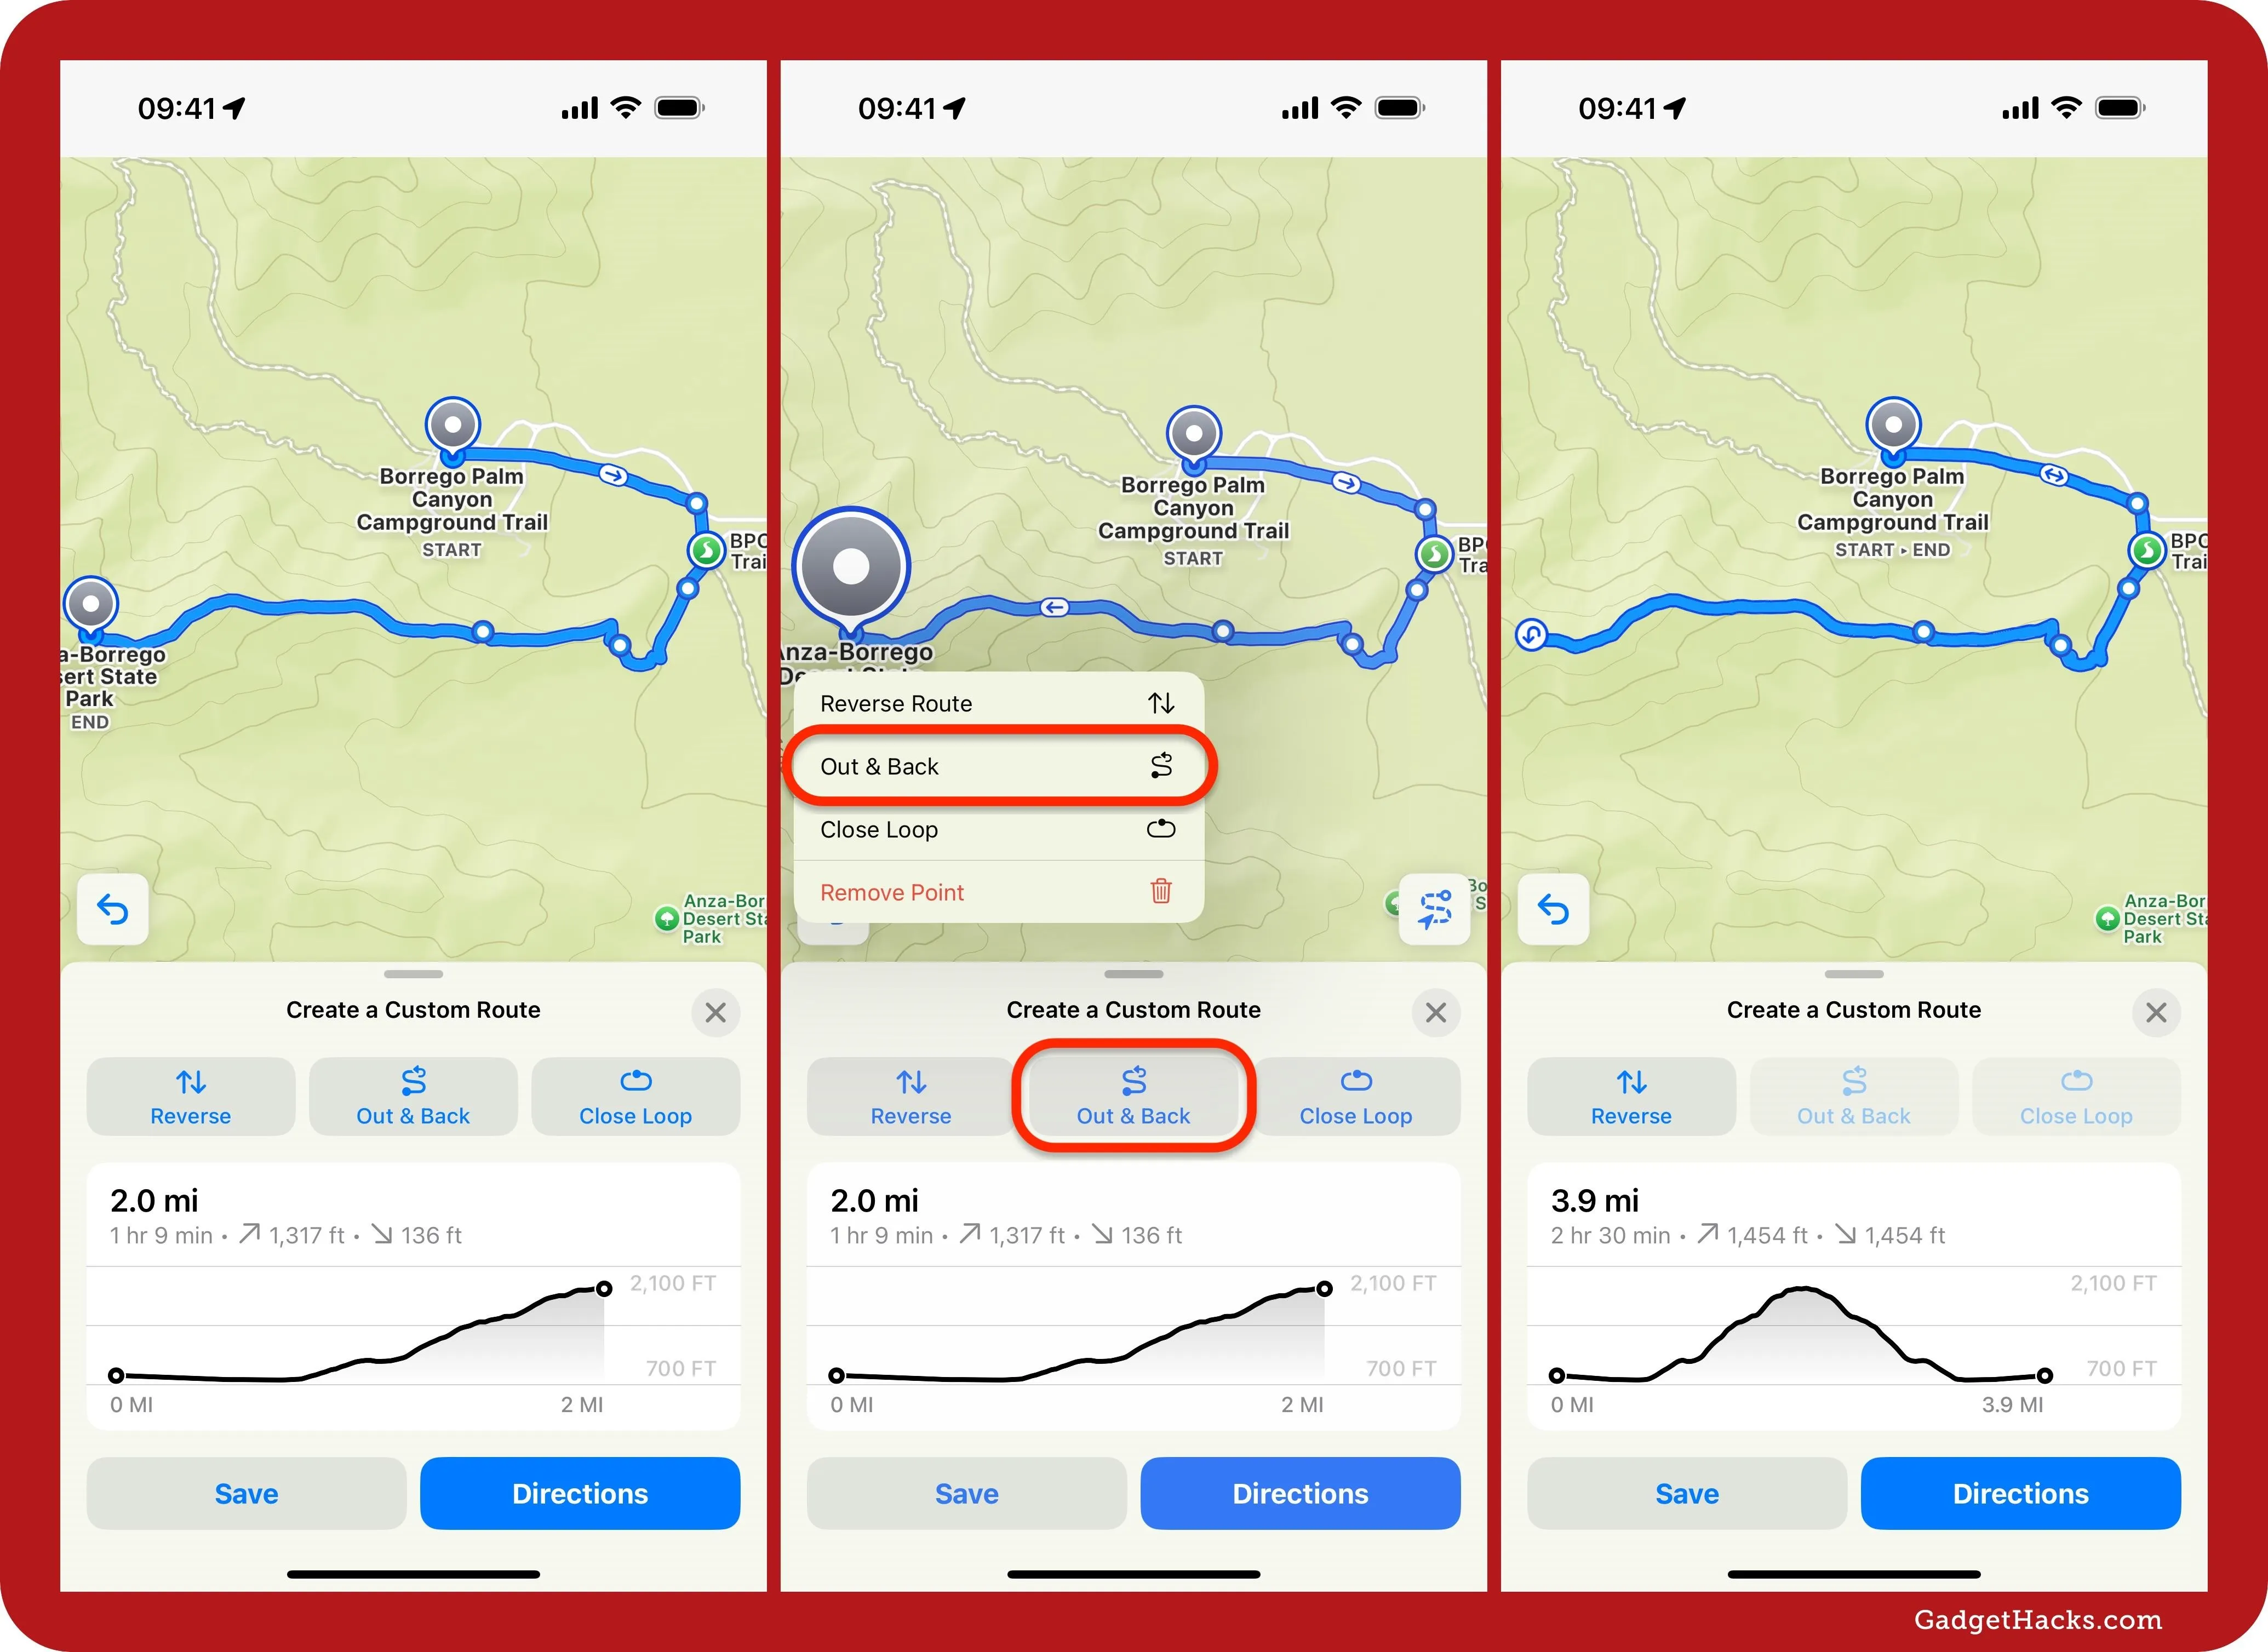
By default, your route is a one-way hike, but you can classify it as an out-and-back trail, which will change the original endpoint into a turnaround, moving the endpoint over with the start point. The directional arrows on the path will switch to double-headed arrows, the elevation chart will include the route back, and the distance and time will adjust accordingly.
To make the change, tap or click a start or end point on the path and hit Out & Back or use the Out & Back button on the editing panel.
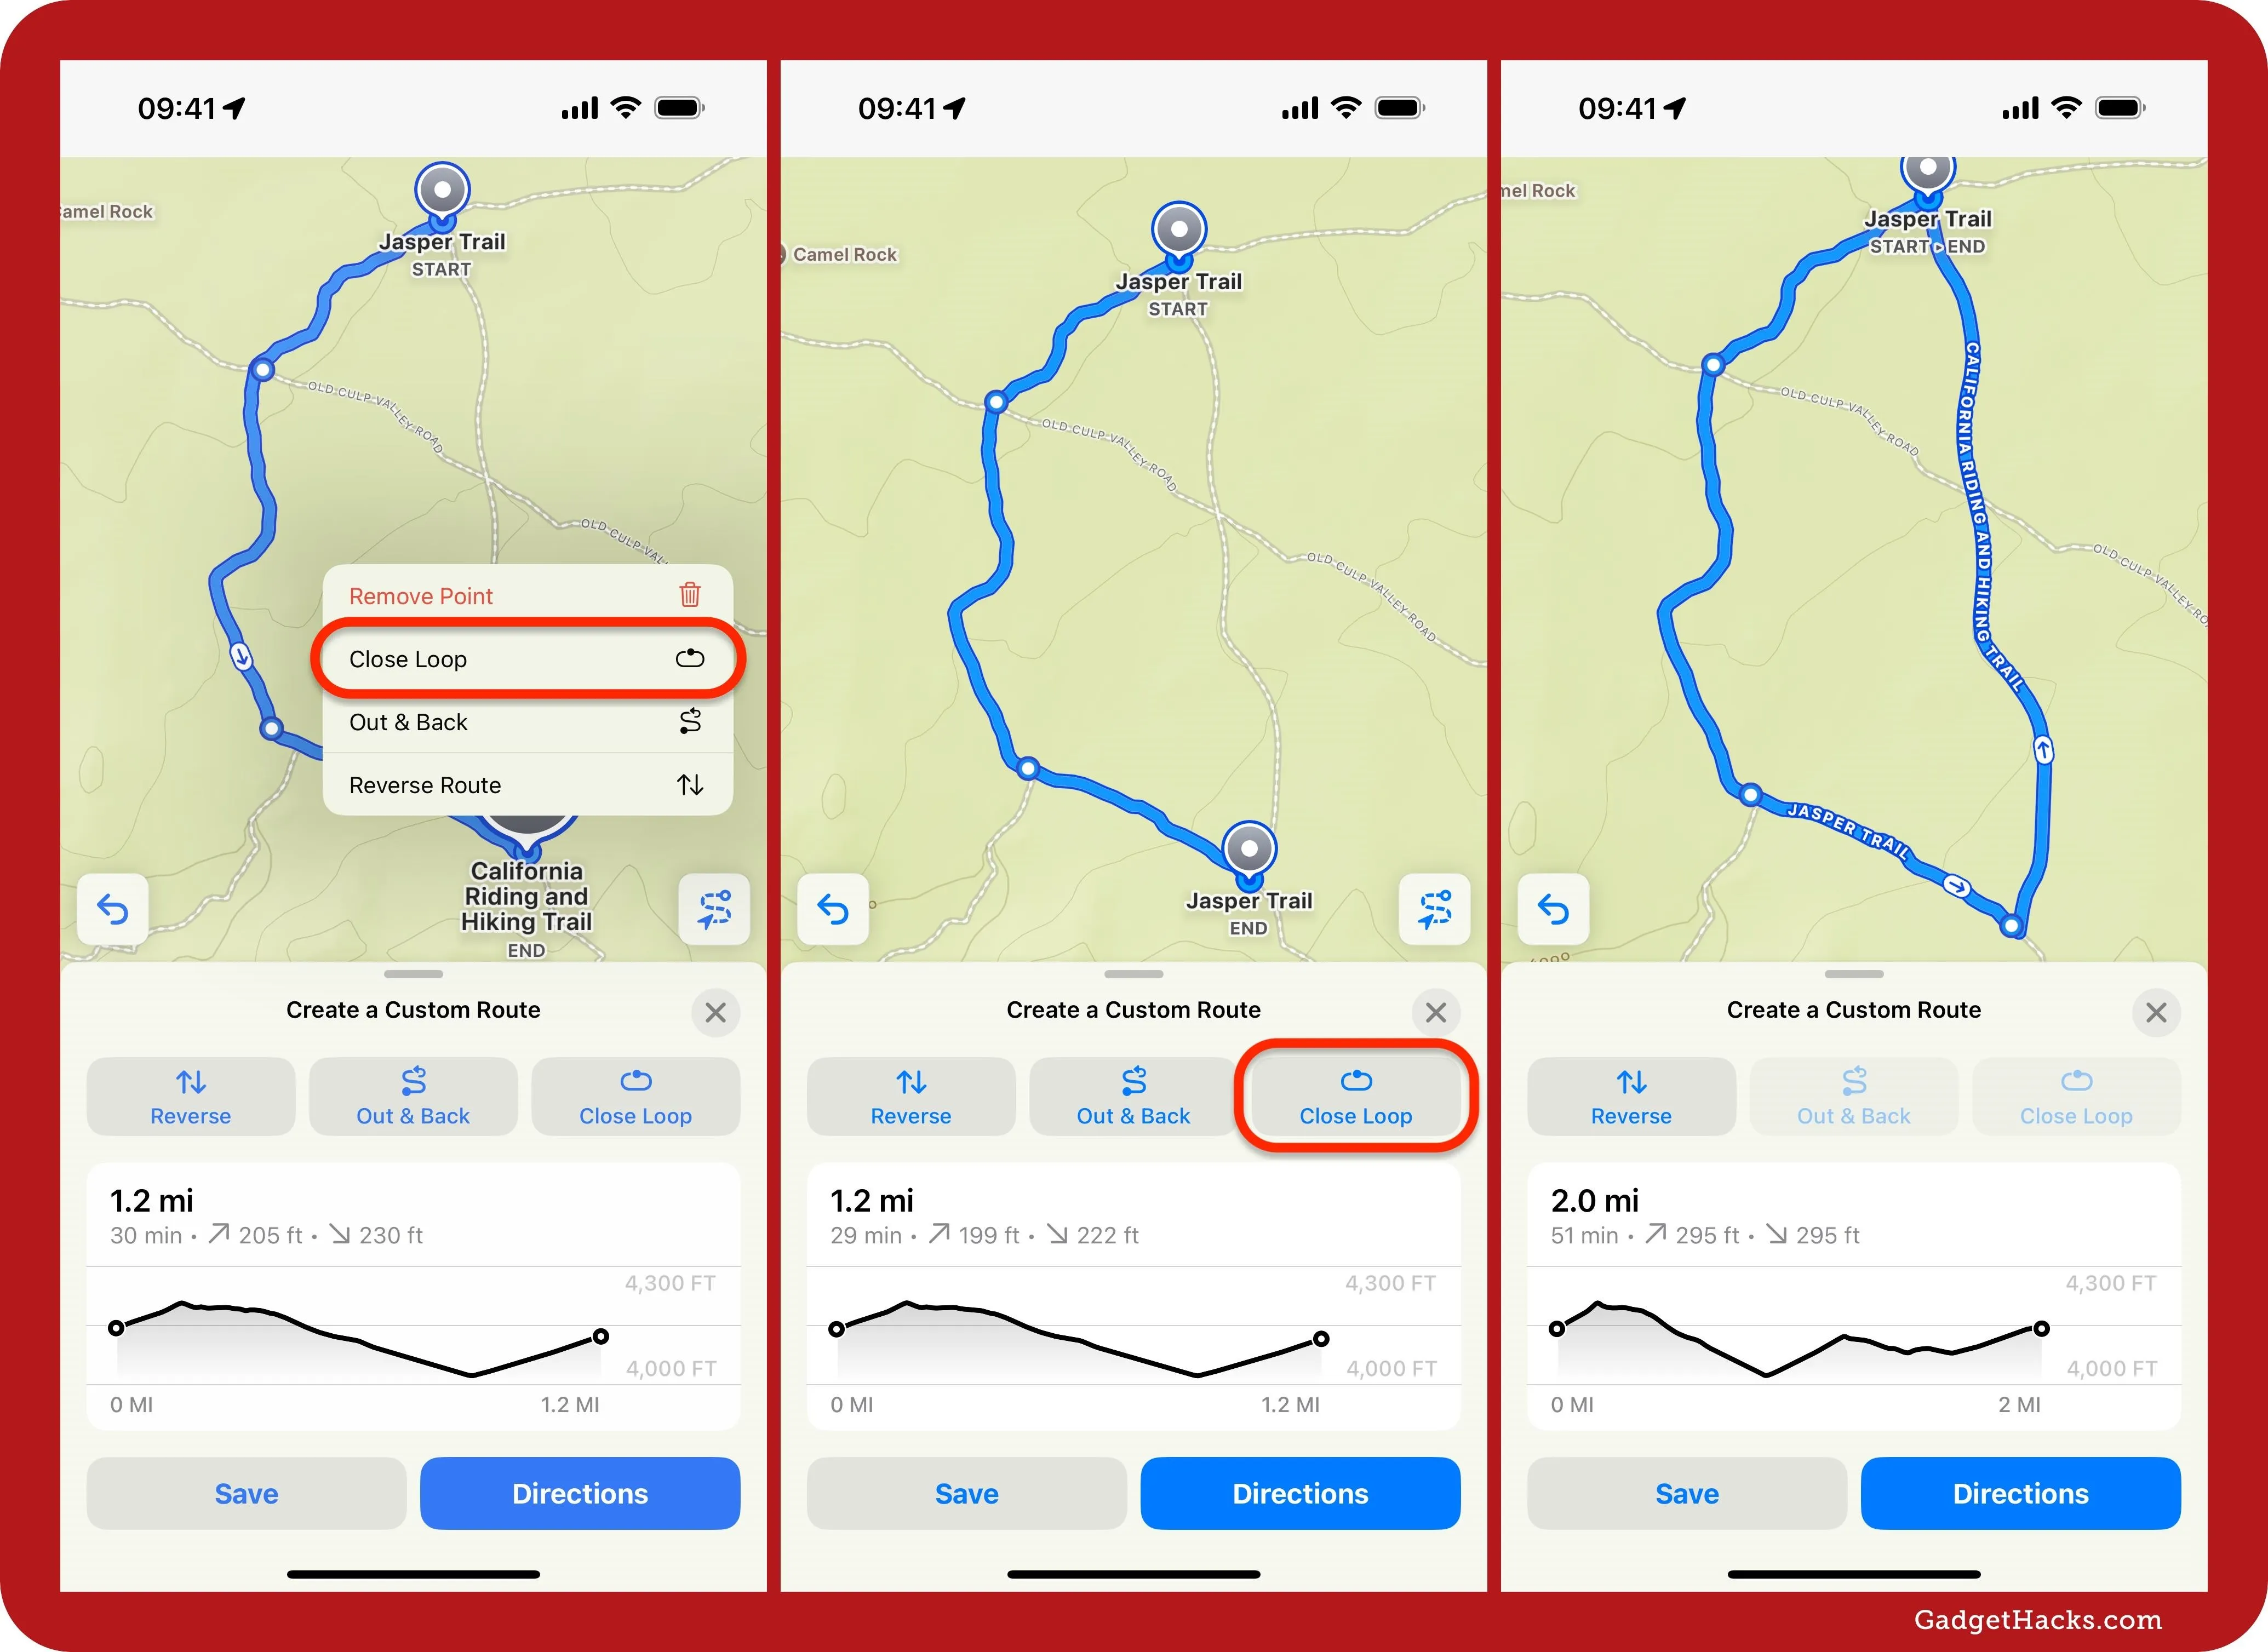
You can also classify the route as a closed loop, which makes your starting point also your ending point. To choose this option, tap or click a start or end point on the path and hit Close Loop or use the Close Loop button on the editing panel. If you've already closed the loop yourself, you won't notice any big chances, but if not, Maps will choose the most logical route to close things up for you.
Step 4: Remove Points
If you want to adjust your hiking or walking route path between the starting point and endpoint, tap or click a point along the path, then hit Remove Point to delete it. Depending on where the midpoint was, your route may not be affected, but Maps may also remove a section of the route.
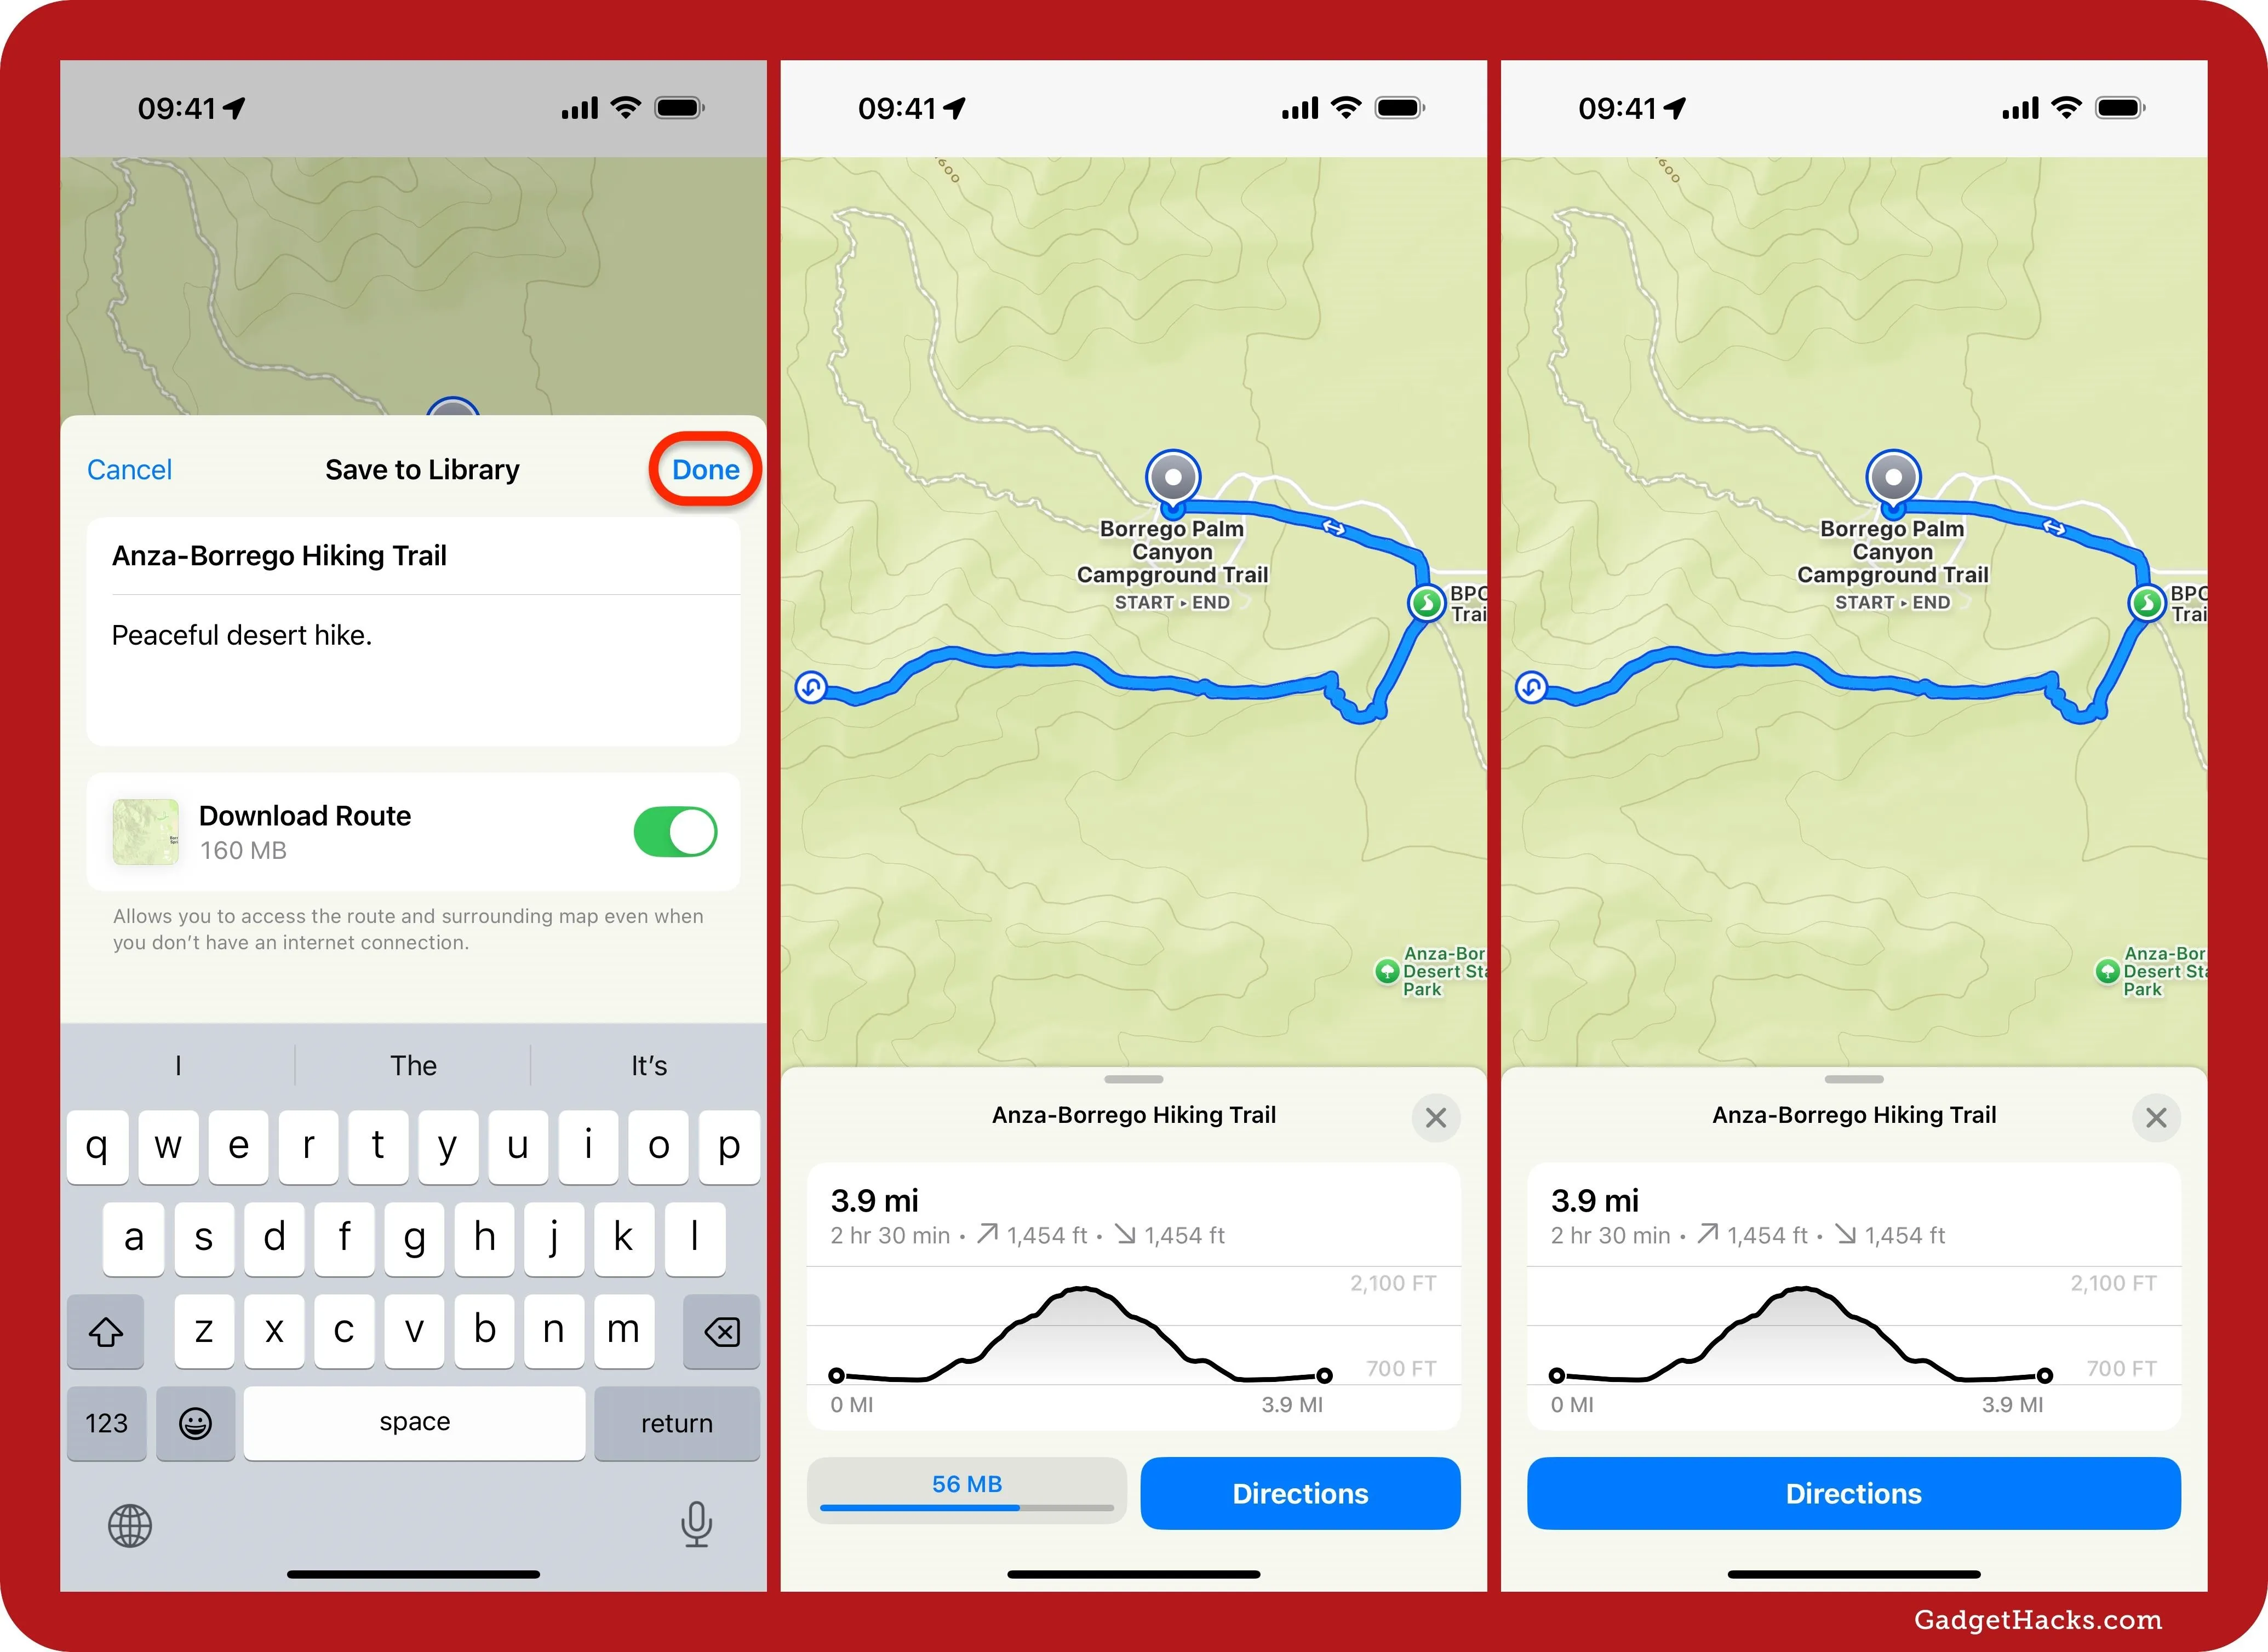
Step 5: Save to Your Library
When your custom hiking or walking route is ready, hit the Save button, rename the path if necessary, and add a note if you want. On an iPhone or iPad, you can also choose whether to download or not download an offline version with the Download Route switch. Hit Done to save.
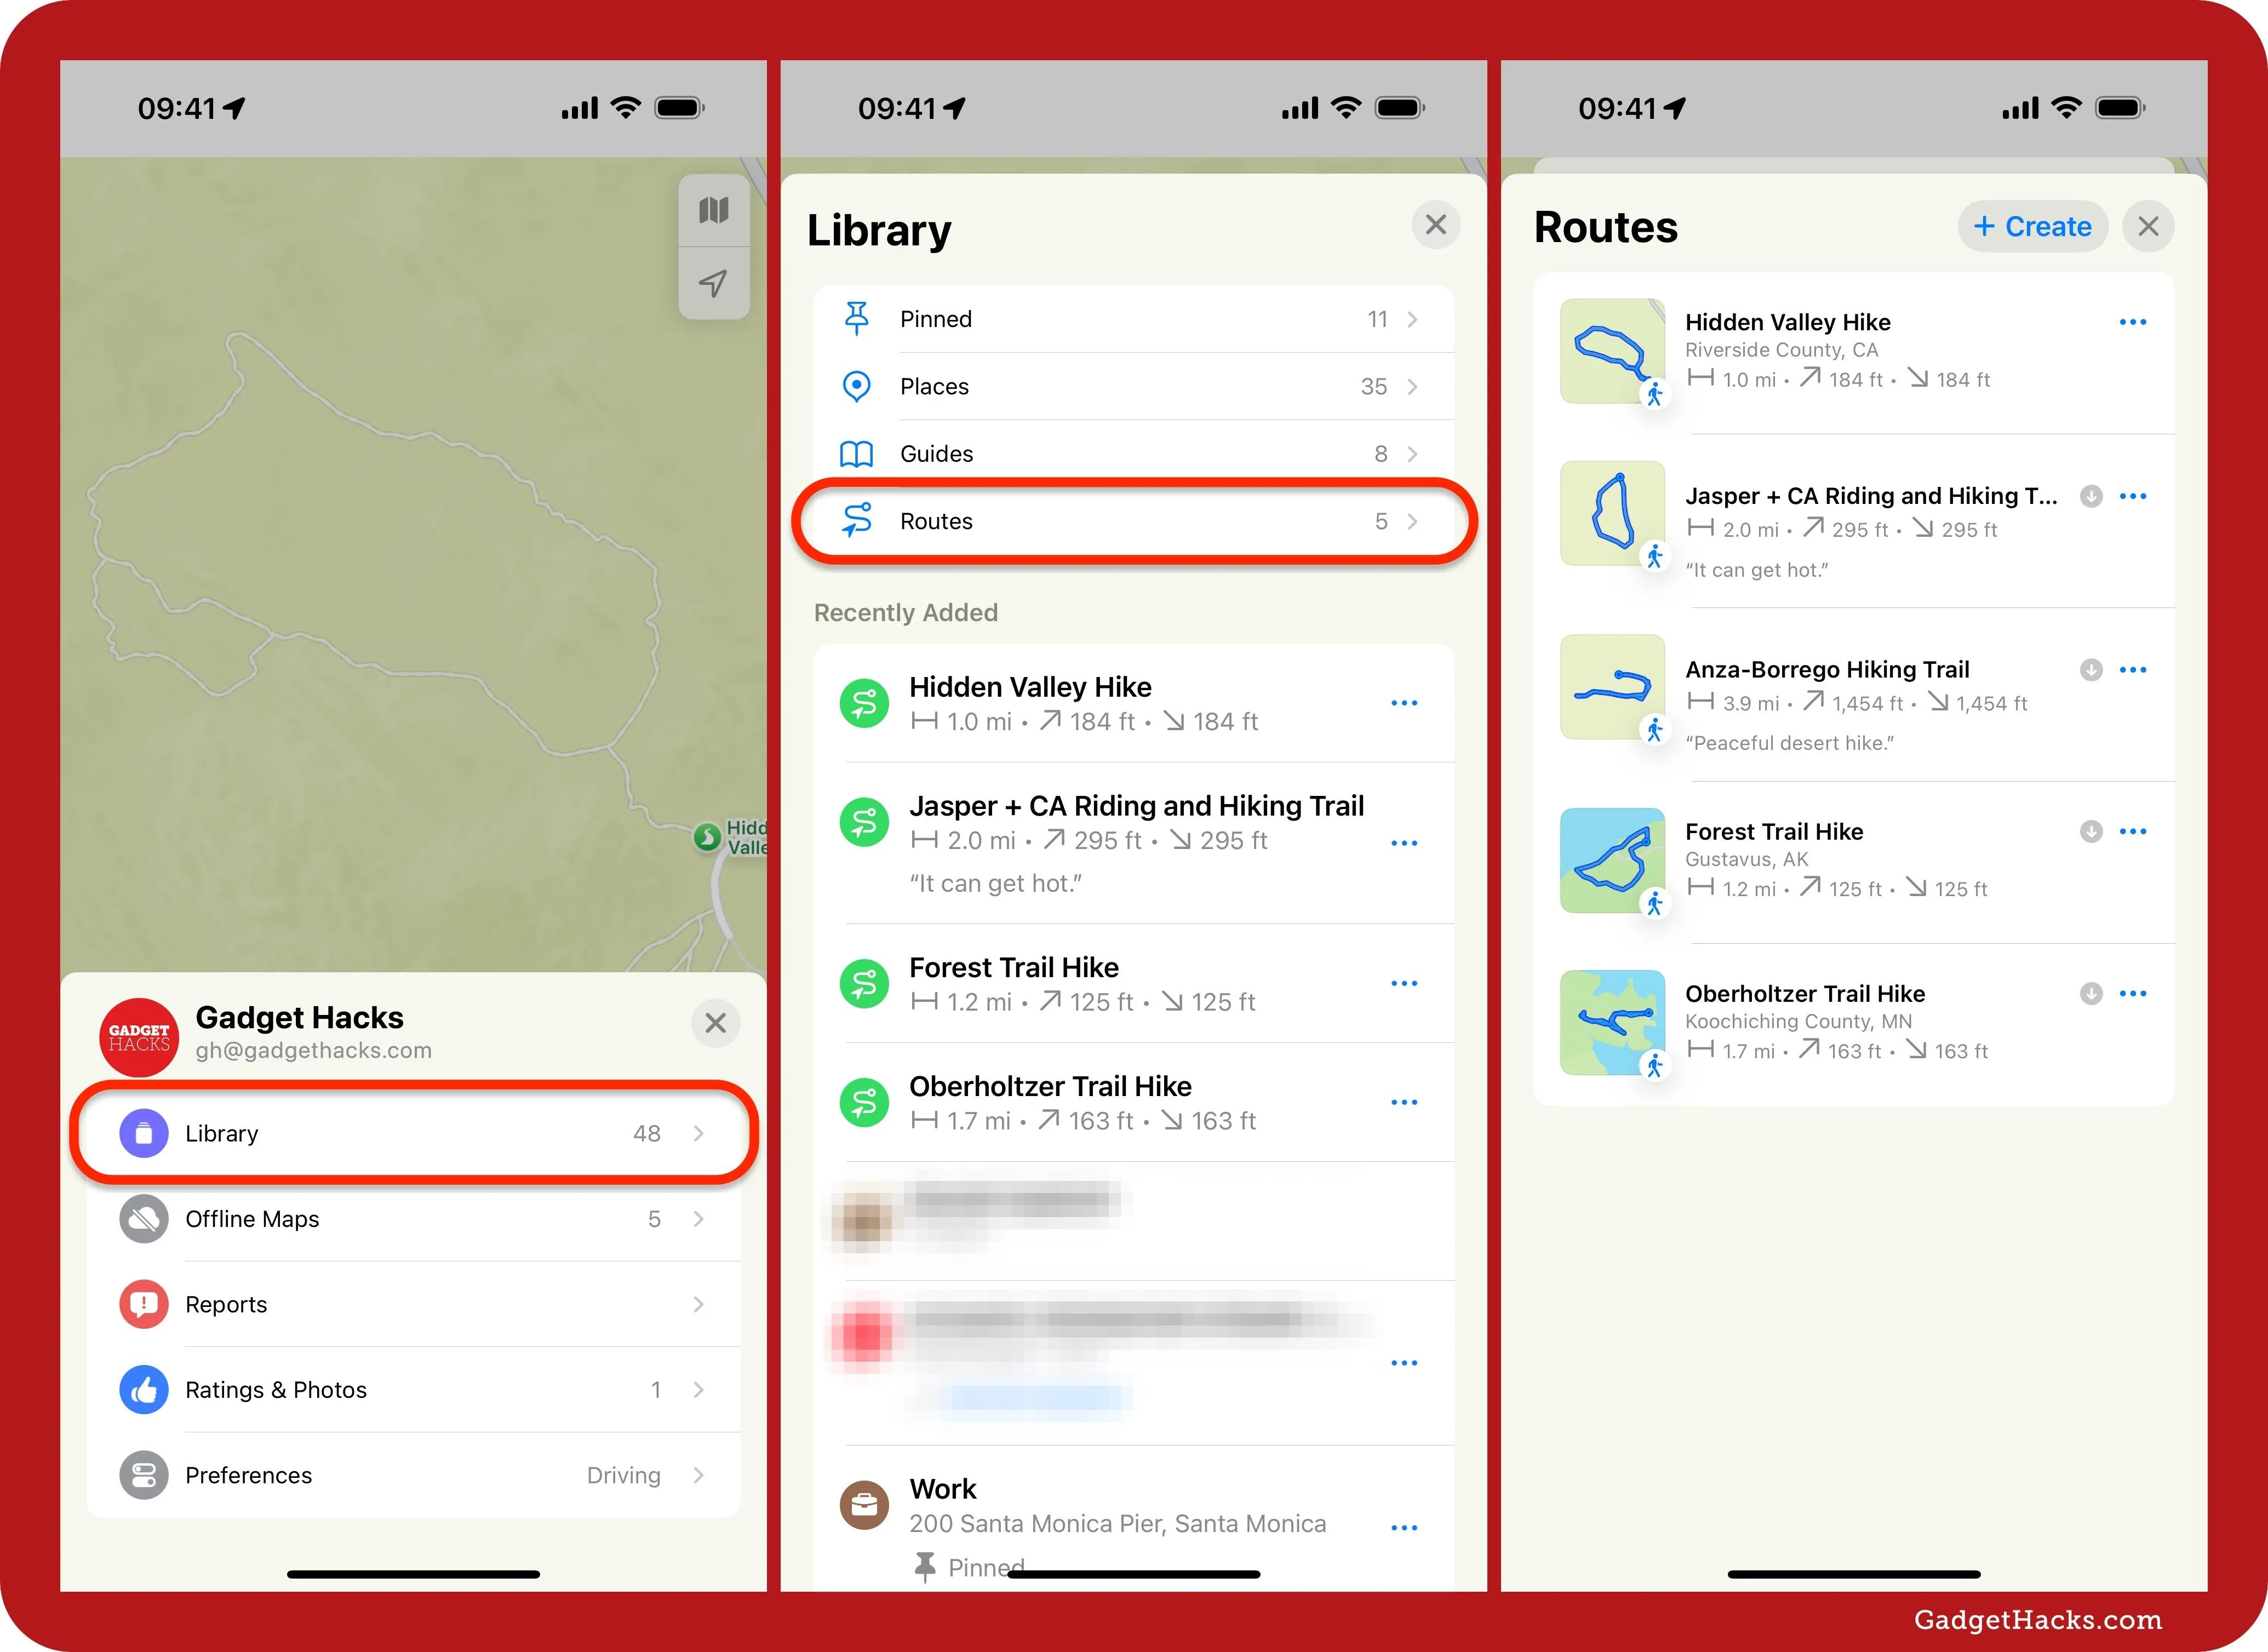
Step 6: View Your Custom Routes
To find all of your custom routes, which are housed in the same location as predefined routes, tap or click your profile picture and select Library. On iOS and iPadOS, your profile picture is on the search card. On macOS, it's in the top corner of the Maps app. Alternatively, you can tap or click [#] Places • [#] Guides • [#] Routes under Library on the search card or side panel. Next, select Routes.
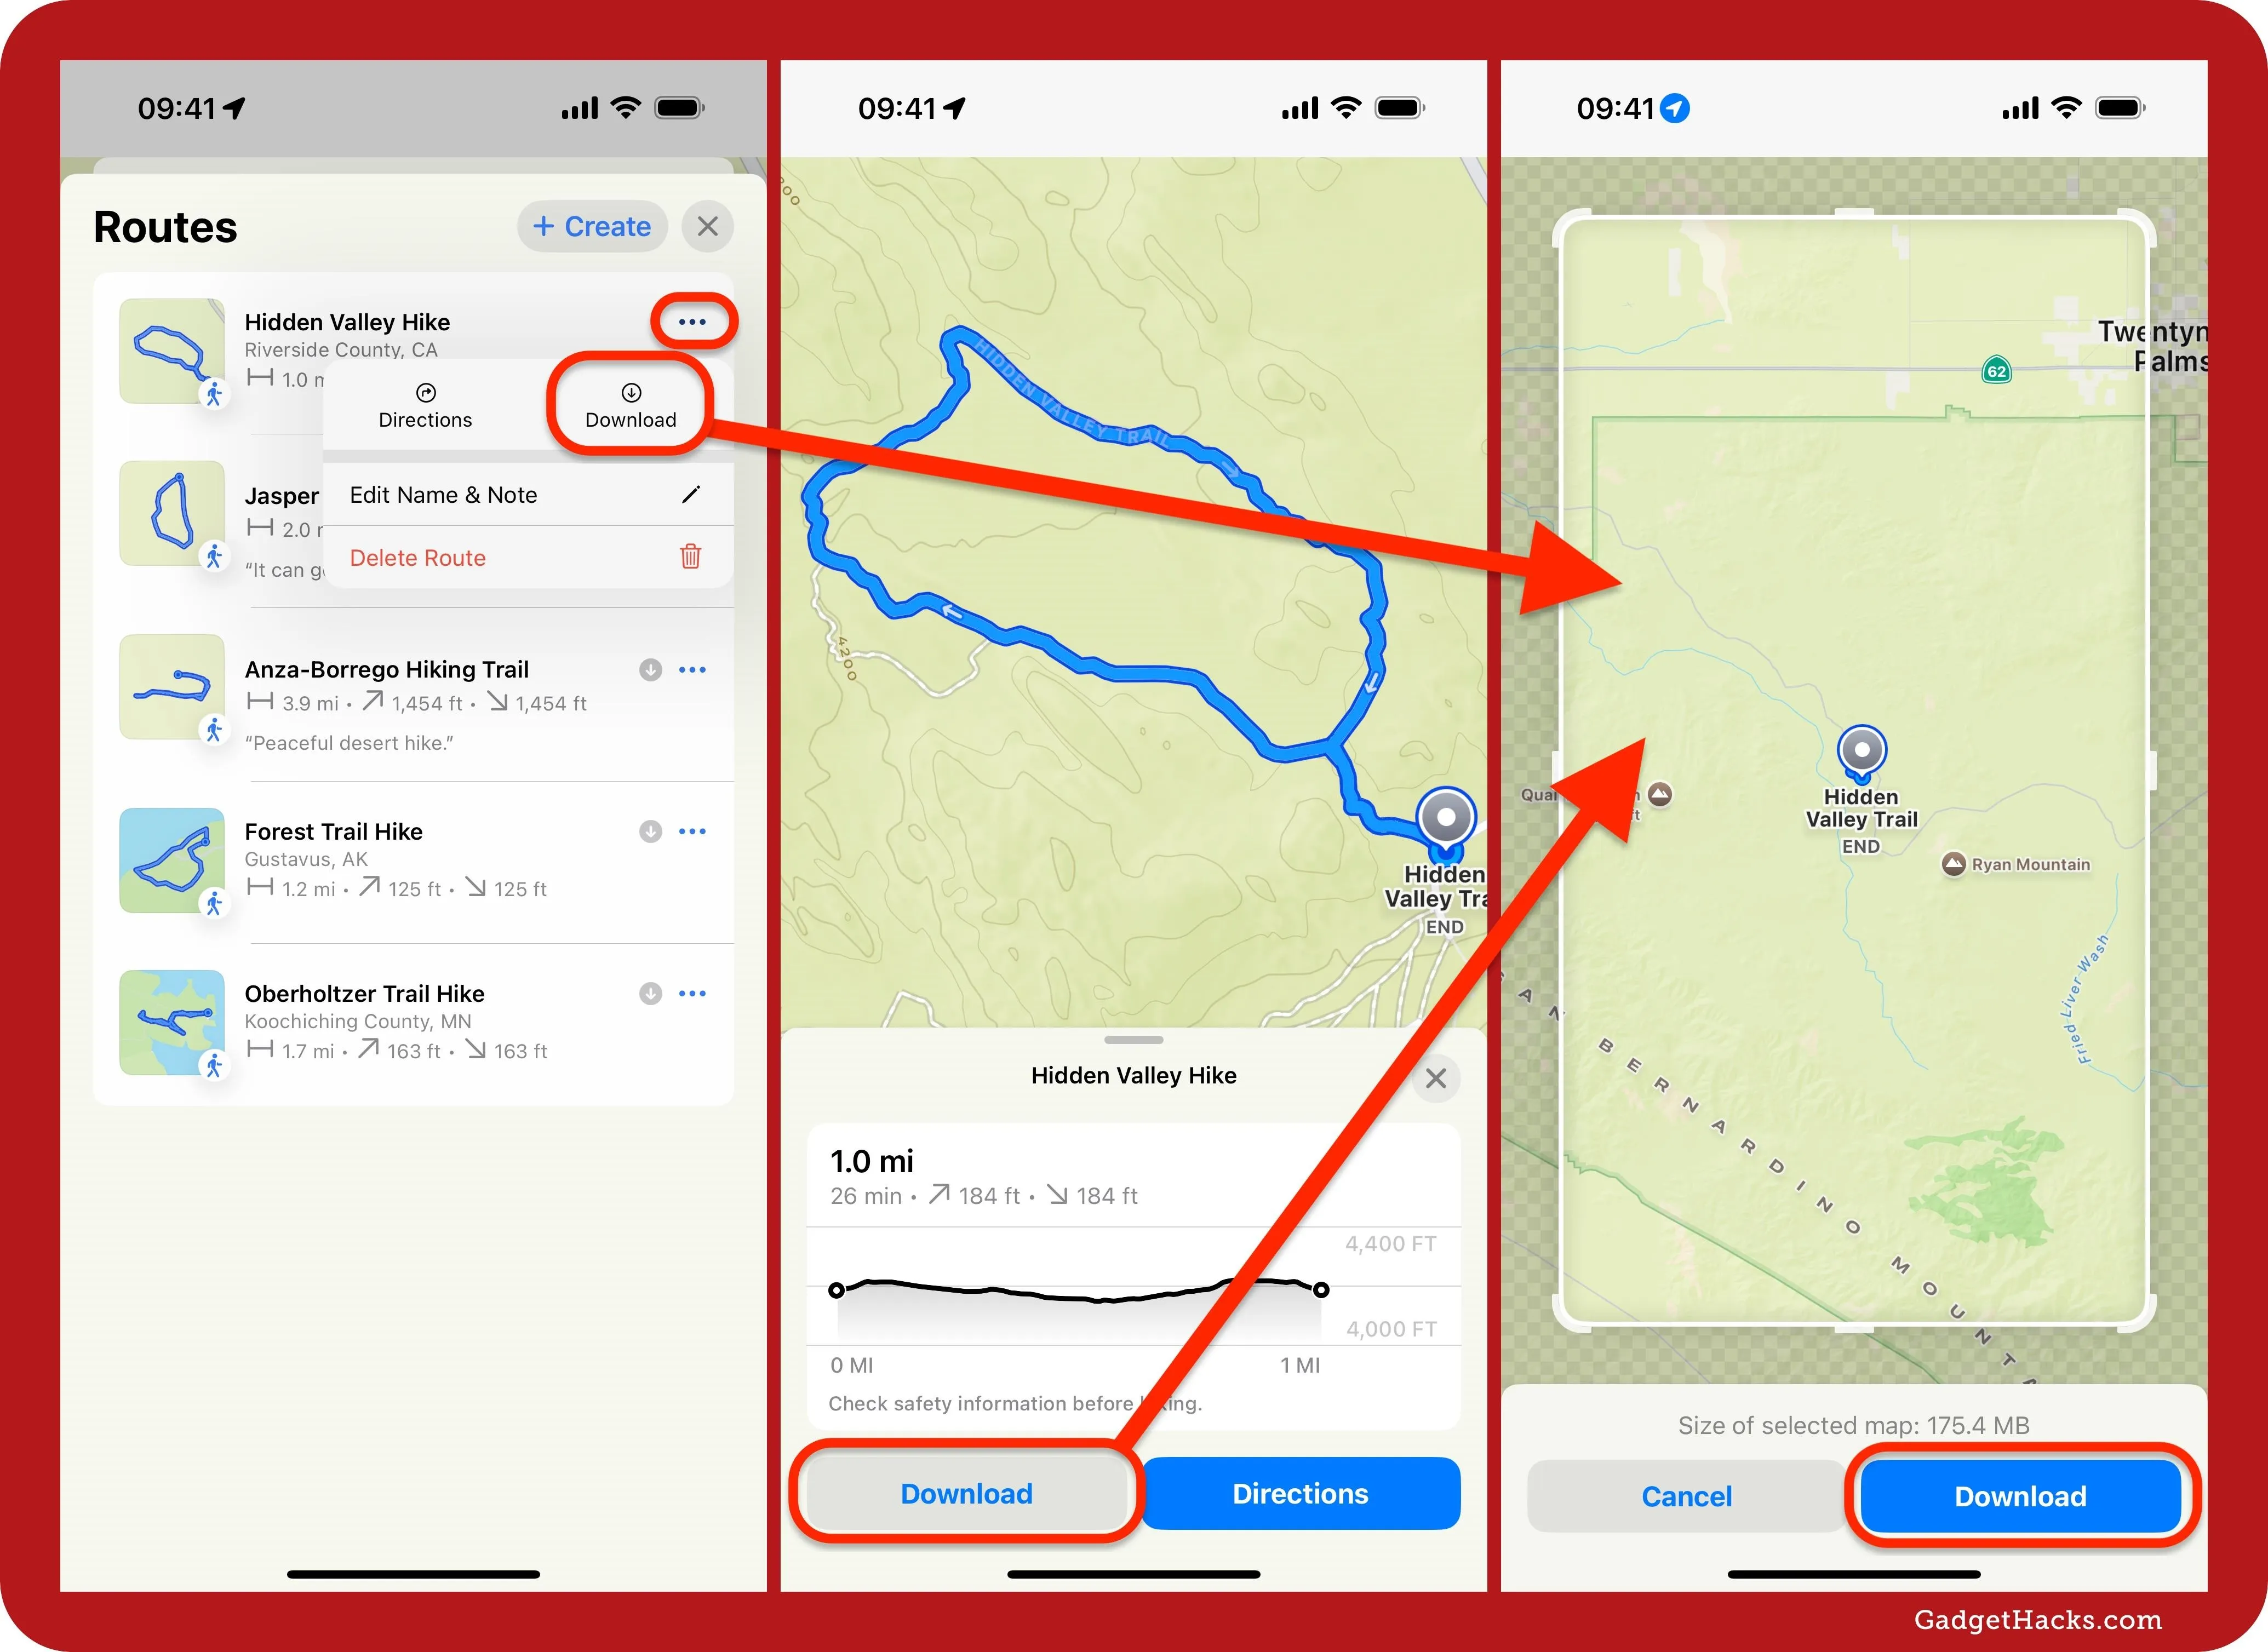
Step 7: Download Custom Routes
If you chose not to download an offline version of a walk or hike, it's easy to do so after the fact, but only on iOS and iPadOS. From your list of routes, you can tap the More (•••) button next to the route, then Download, or you can open the route itself and hit the big Download button. The map selector will appear, where you can zoom in or out to change the perimeter of the offline section. Hit Download to save it for use without an internet connection.
Step 8: Manage Custom Routes
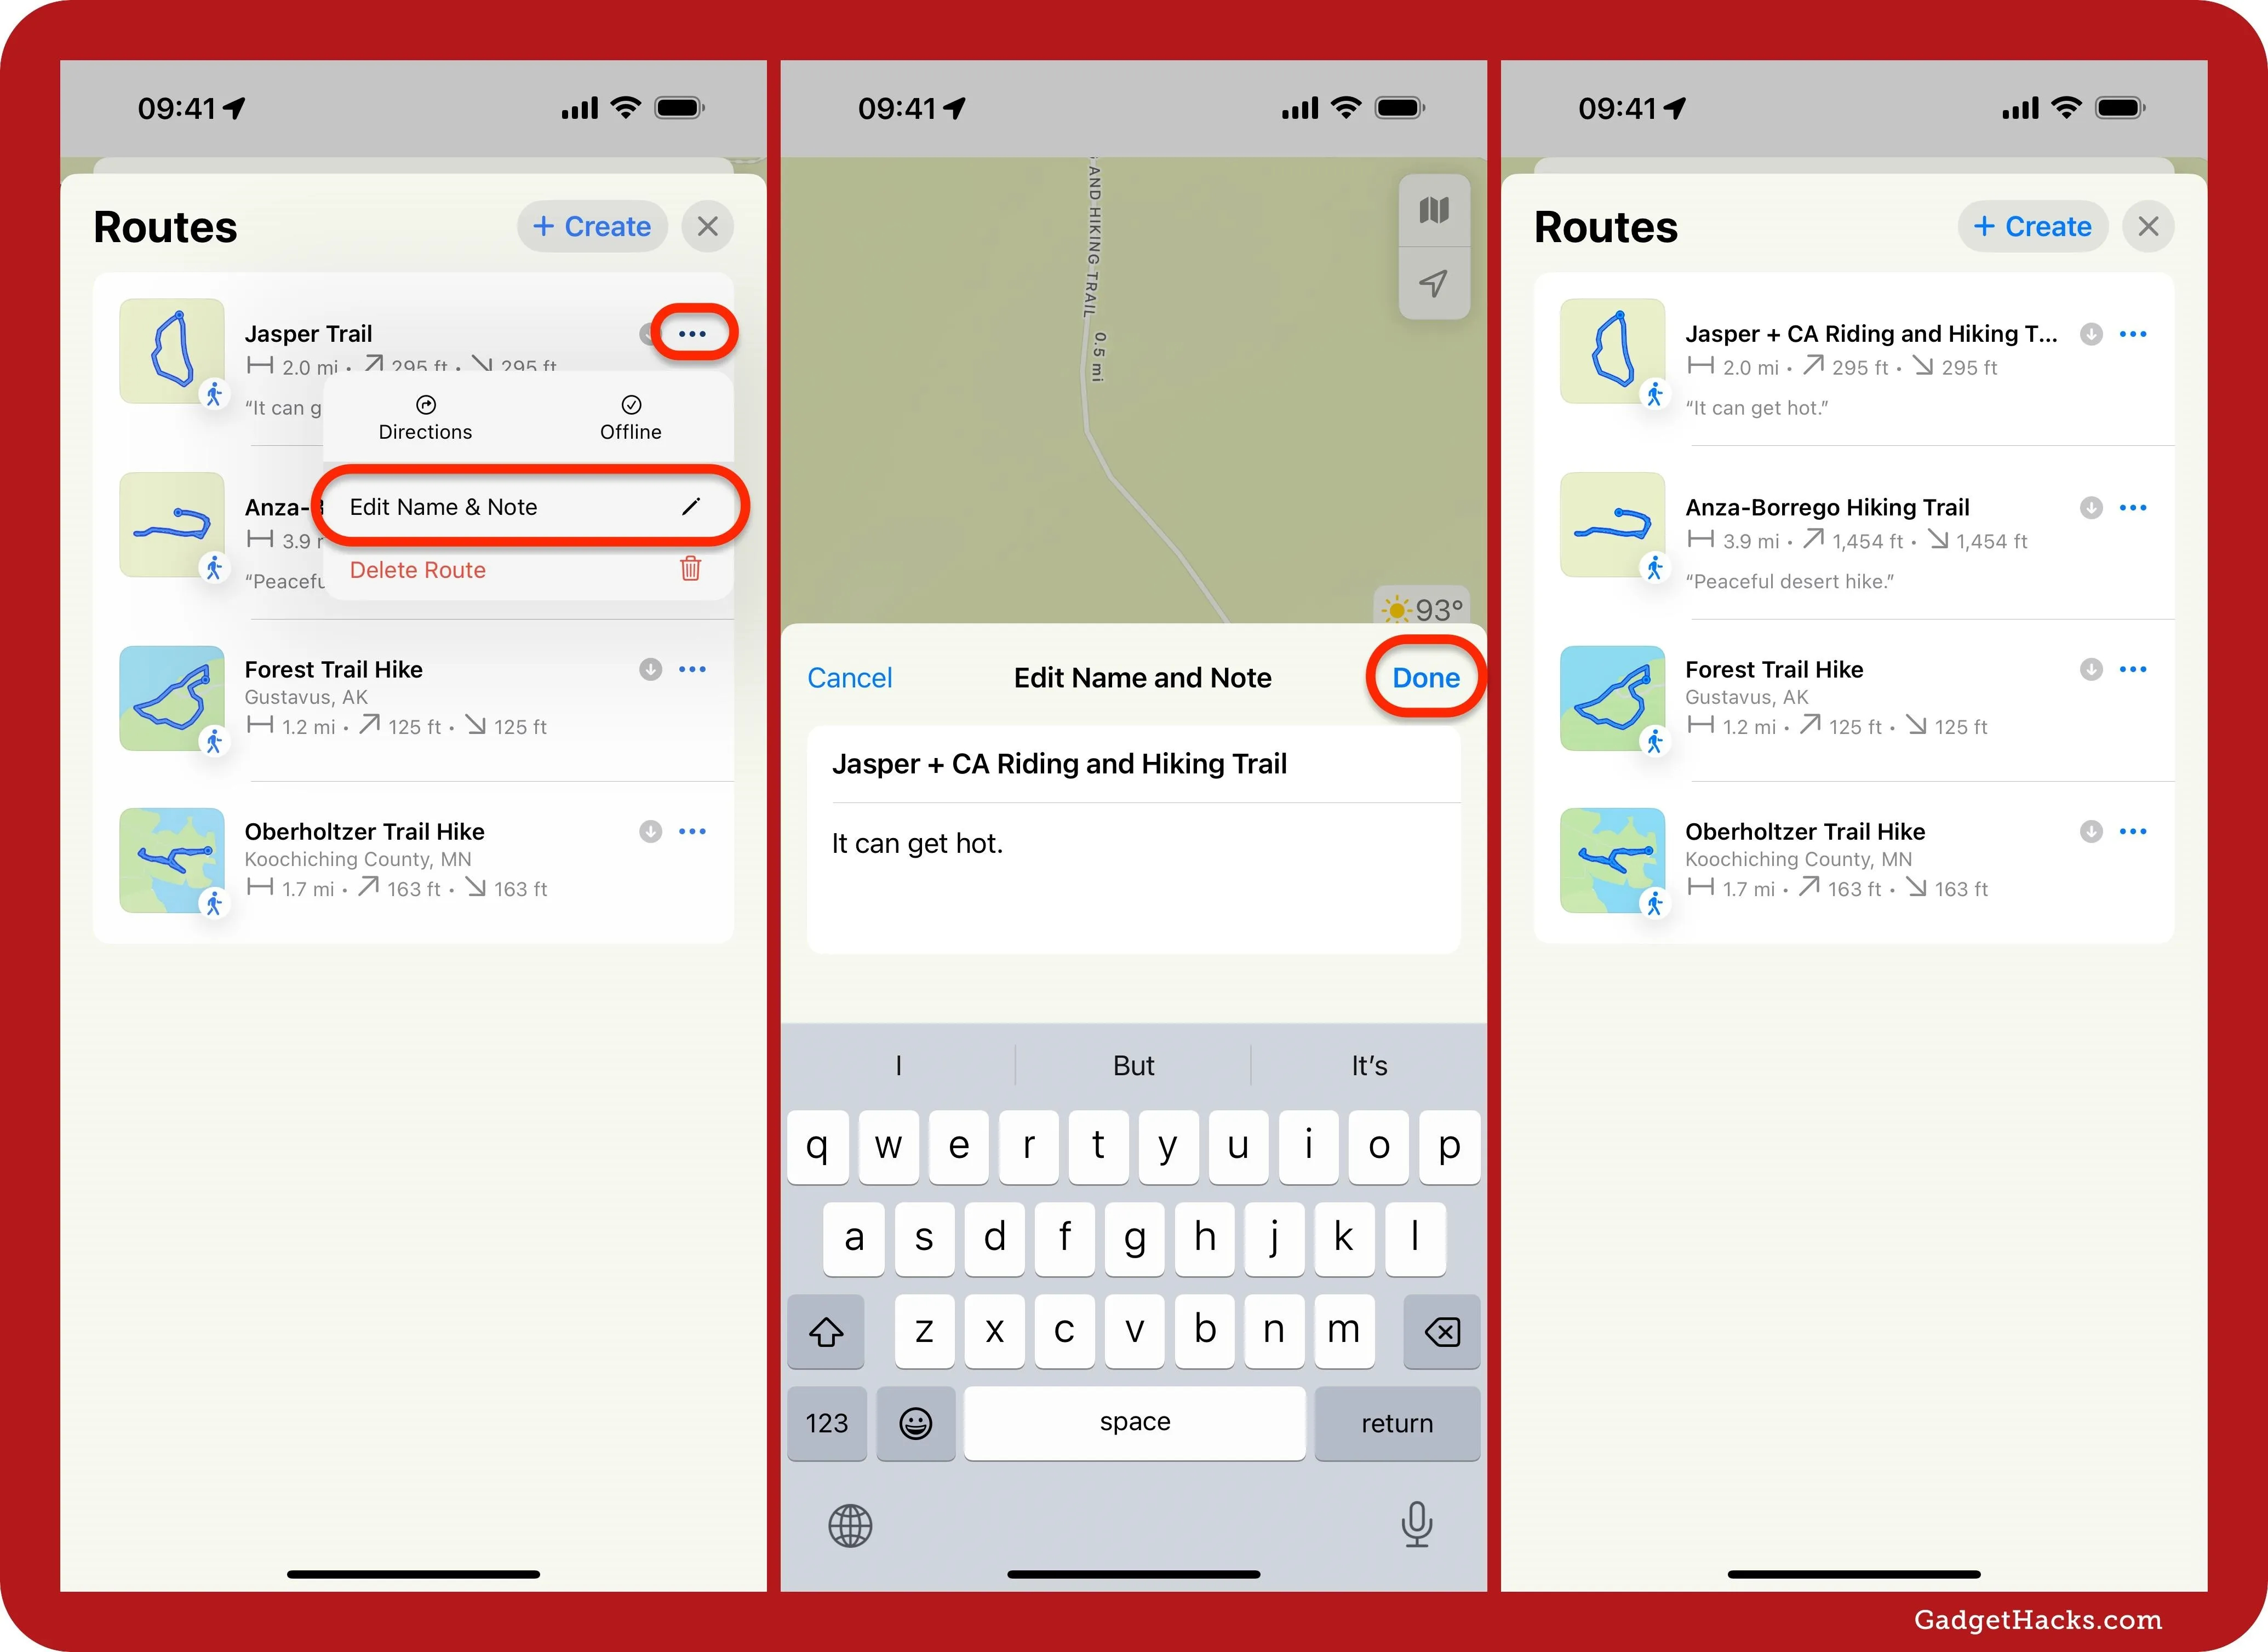
From your list of routes, you can tap or click the More (•••) button next to a route, followed by Edit Name & Note, to change the route's name and description. Hit Done to save the changes.
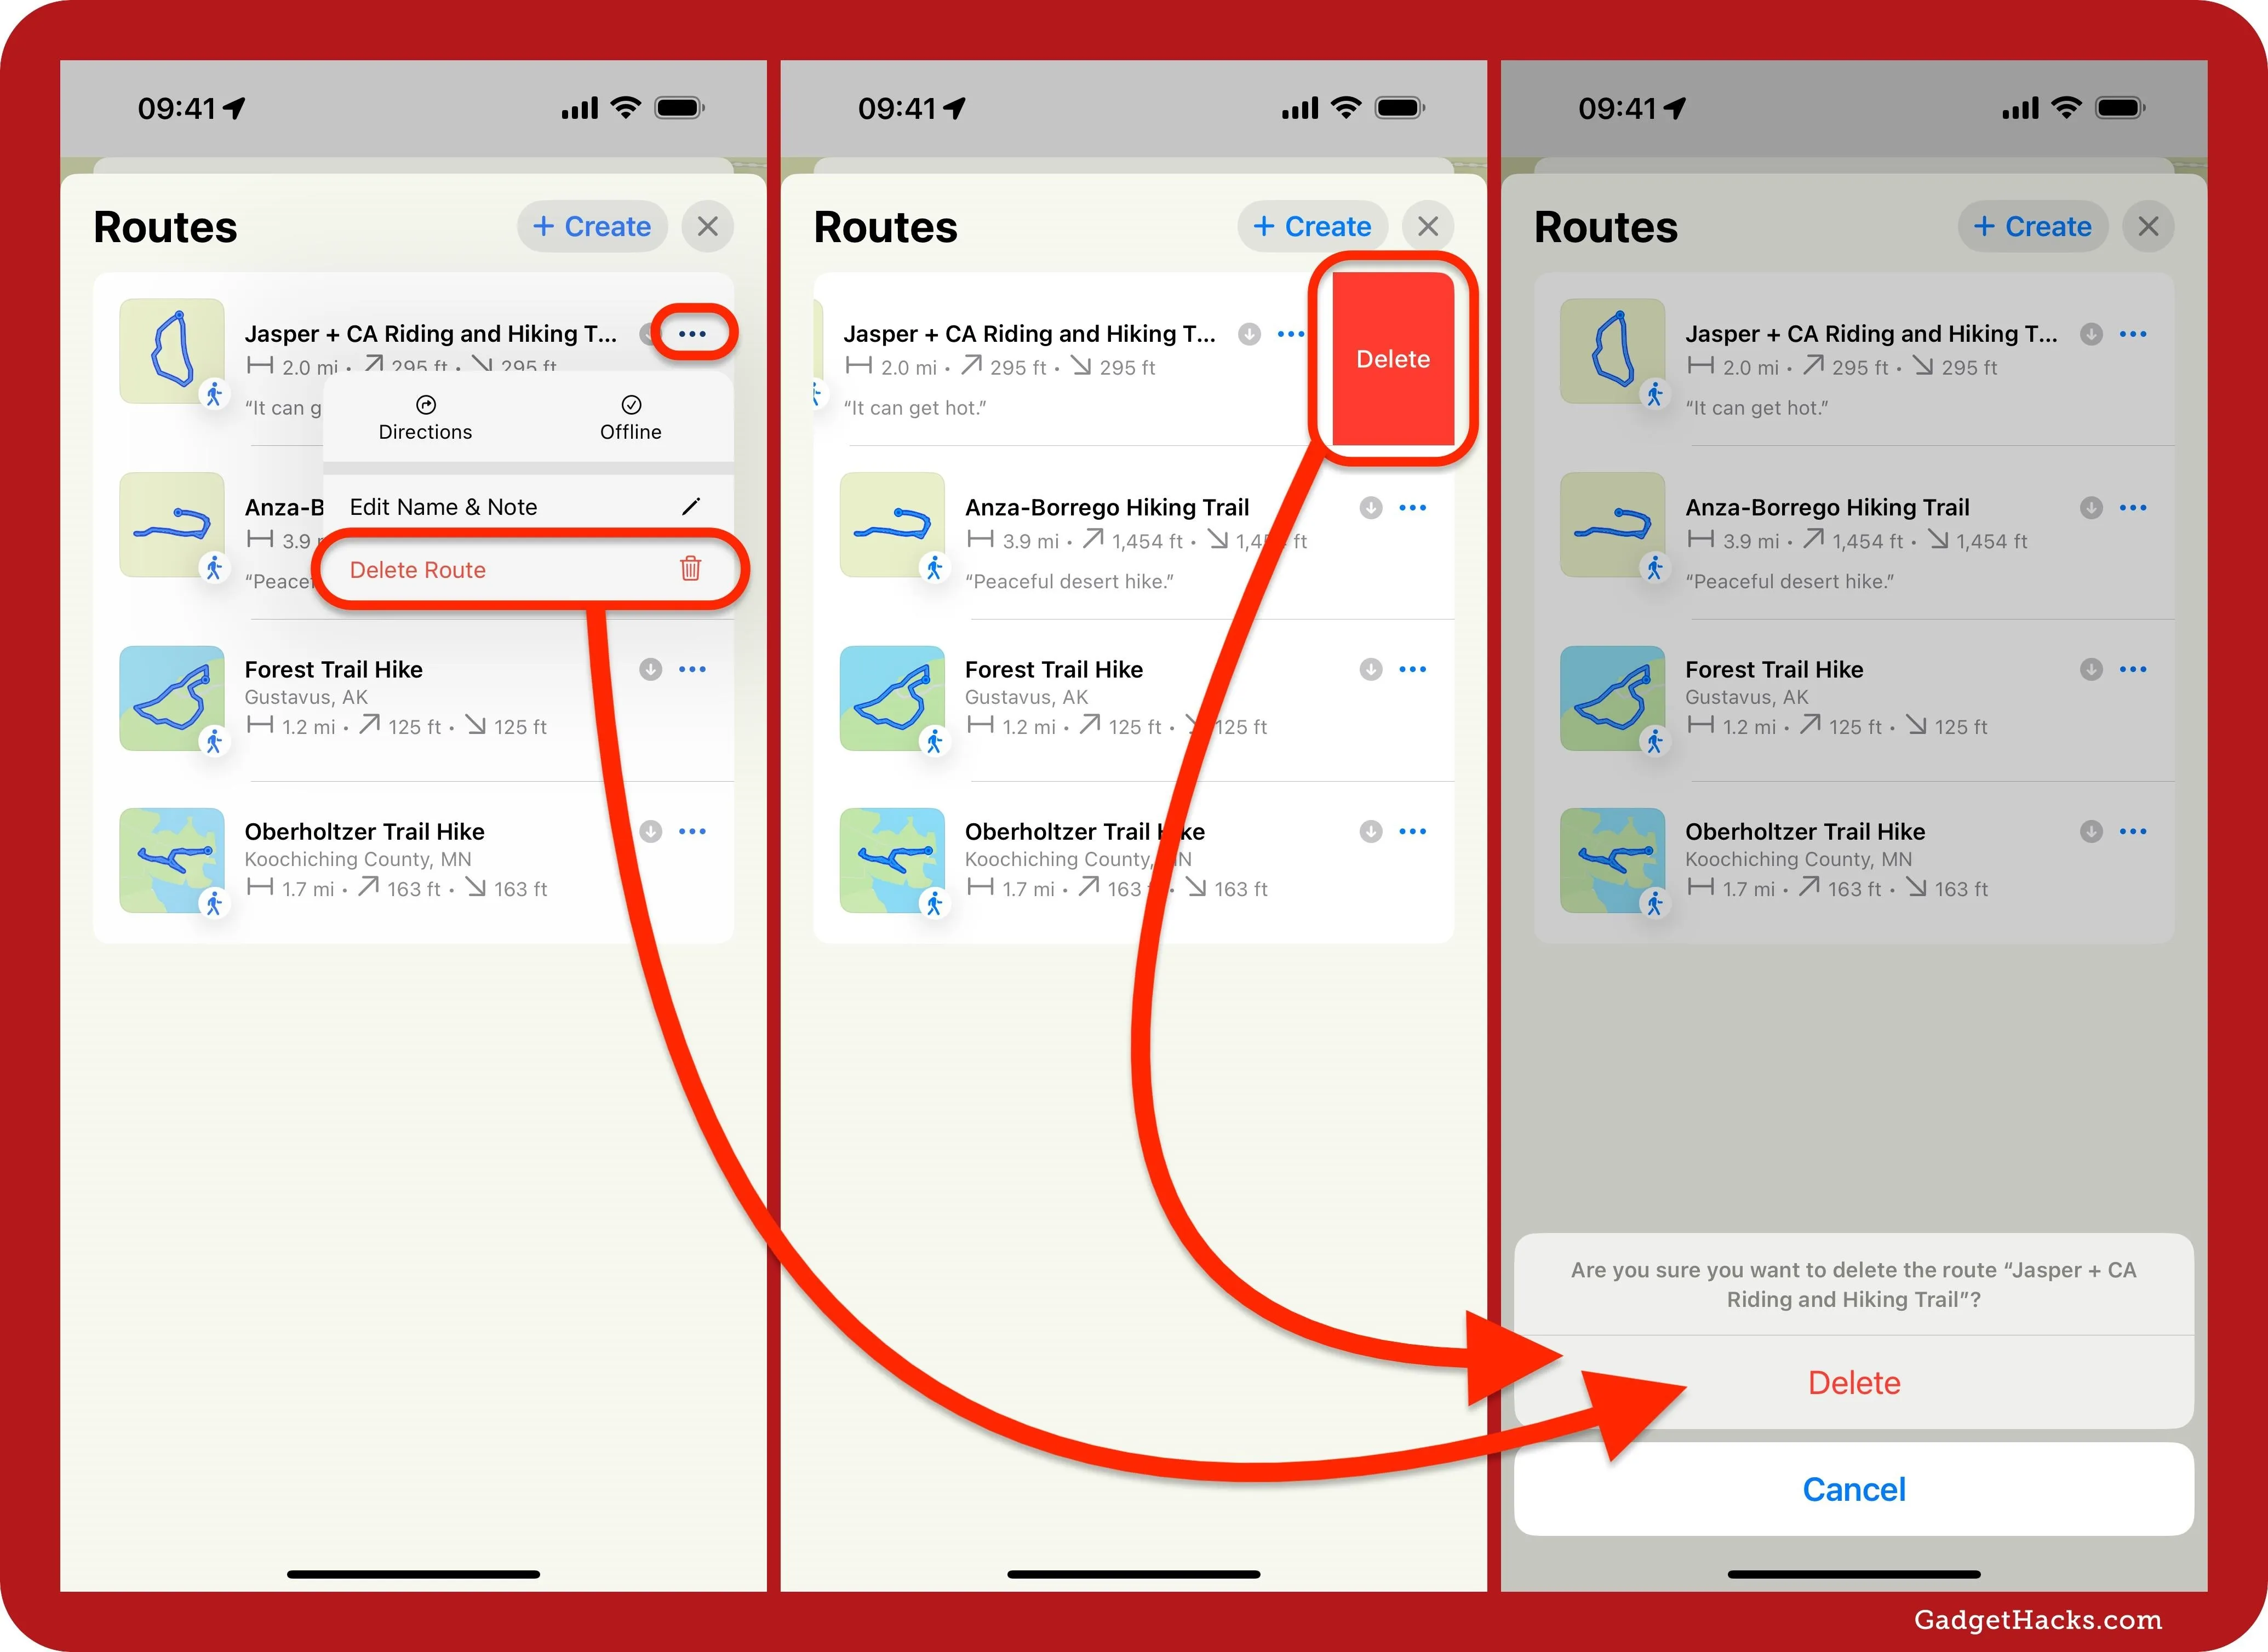
The More (•••) button also gives you a Delete Route option if you no longer need the path. You can also swipe left on a route (use one finger on iOS and iPadOS or two fingers on macOS) and hit Delete. Either way, tap or click Delete to confirm.
Step 9: Get Turn-by-Turn Voice Guidance
If you've planned out walking and hiking routes that aren't near your current location, you can only get directions to those routes. However, you can start turn-by-turn voice guidance when you are near the route. When you're close enough to the start point, the blue Directions button will be a green GO button. Tap that to start navigating your route.

Don't Miss: Safari's New Summary Feature Boils Webpages Down to Key Highlights for You — Here's How It Works
Cover photo and screenshots by Gadget Hacks


Comments
Be the first, drop a comment!