


Apple has revolutionized how we write with the introduction of its new Writing Tools, powered by Apple Intelligence. In beta on iPhone, iPad, and Mac, these tools allow you to select text and use intelligent features to summarize, proofread, or rewrite it until the tone and wording are just right. In a future beta, Writing Tools can even write original content for you.
The new Writing Tools feature is available nearly everywhere you write — or, in Apple's own words, "Everywhere words matter." So, it works in apps like Mail, Messages, Notes, Pages, and Reminders, as well as in third-party apps such as Facebook, Gmail, Instagram, Koder, Messenger, Outlook, Reddit, Signal, Slack, and Threads. Some apps, like Microsoft Word, do not support Writing Tools at all, but they may in the future.
Whether drafting an email, jotting down notes, sending an iMessage, or composing a blog post, Apple's Writing Tools can help you perfect your message in the tone and style you want. Let's see how it all works.
Jump to a Section
1. Compatibility
To use Apple's powerful systemwide Writing Tools, you'll need to be running iOS 18.1, iPadOS 18.1, and/or macOS Sequoia 15.1 on your iPhone, iPad, and/or Mac and have your device language set to U.S. English. These updates were in beta testing since July 29 but were officially released on Oct. 28. Writing Tools only works for the following devices:
- iPhone 16 Pro Max (Apple A18 Pro) [2024]
- iPhone 16 Pro (Apple A18 Pro) [2024]
- iPhone 16 Plus (Apple A18) [2024]
- iPhone 16 (Apple A18) [2024]
- iPhone 15 Pro Max (Apple A17 Pro) [2023]
- iPhone 15 Pro (Apple A17 Pro) [2023]
- iPad Air 13-inch (M2) [2024]
- iPad Air 11-inch (M2) [2024]
- iPad Air (5th generation, M1) [2022]
- iPad Pro 11-inch (M4) [2024]
- iPad Pro 11-inch (4th generation, M2) [2022]
- iPad Pro 11-inch (3rd generation, M1) [2021]
- iPad Pro 13-inch (M4) [2024]
- iPad Pro 12.9-inch (6th generation, M2) [2022]
- iPad Pro 12.9-inch (5th generation, M1) [2021]
- Any Mac with Apple Silicon, M1 chip and newer (full list of models)
More languages will work in upcoming software updates. Apple plans to add support for localized English in Australia, Canada, Ireland, New Zealand, South Africa, and the U.K. this December. It will also support more languages in April 2025 and in subsequent updates. Eventually, Apple Intelligence will also work with Chinese, English (India), English (Singapore), French, German, Italian, Japanese, Korean, Portuguese, Spanish, Vietnamese, and more.
2. Apple Intelligence
To begin using Writing Tools, you must enable Apple Intelligence on your device. You may need to join the waitlist before gaining beta access.
Go to Settings » Apple Intelligence & Siri on an iPhone or iPad or System Settings » Apple Intelligence & Siri on a Mac. Next, tap "Join the Apple Intelligence Waitlist," then confirm on the next window with "Join Waitlist." In my experience, it doesn't take very long to get access.
When you gain access, you can visit the "Apple Intelligence & Siri" settings to toggle Apple Intelligence on or off.
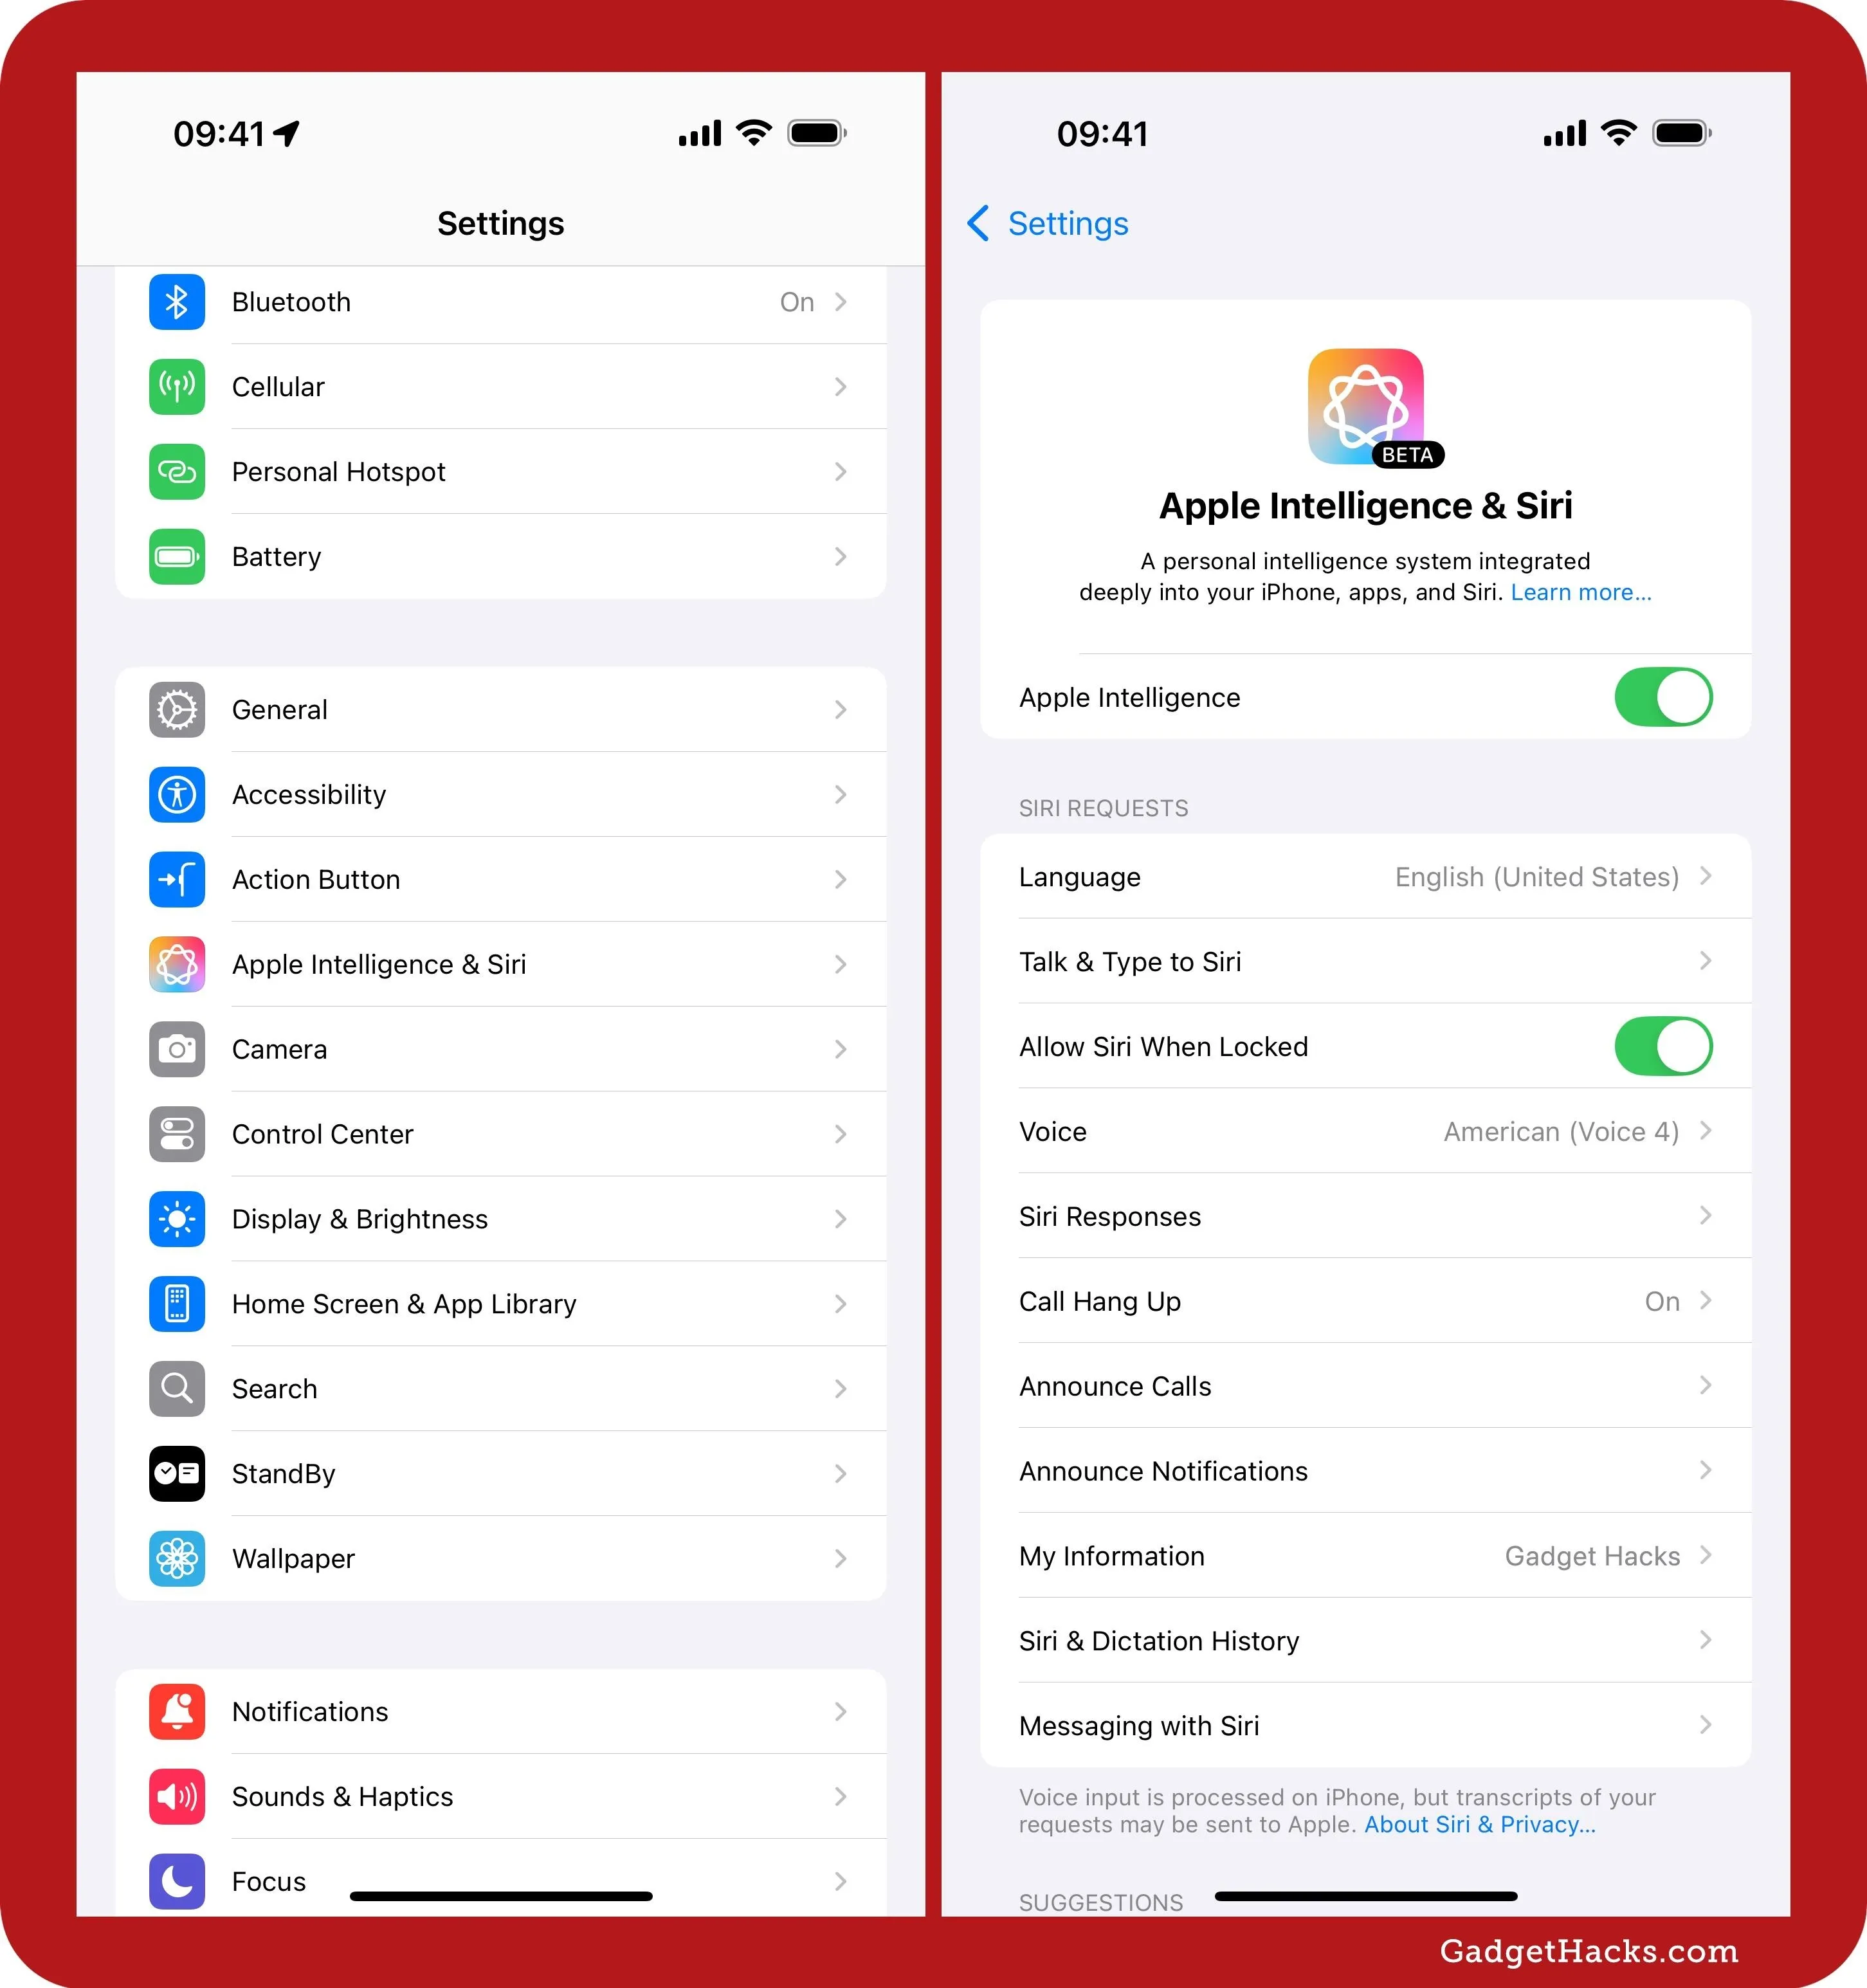
You can toggle Apple Intelligence on and off in Settings.
3. Proofread
Writing Tools' intelligent proofreading feature helps you transform what you have written into polished text you can be proud of. As you would expect from a proofreader, the Proofread tool checks your text for the following:
- Spelling errors
- Grammar errors
- Word choice
- Sentence structure
There are various ways to get started with Proofread on iOS or iPadOS:
- Select the text to check, then tap "Proofread" above the keyboard to proofread only the selected text.
- Select the text, tap the Apple Intelligence icon above the keyboard, and tap "Proofread" to proofread only the selected text.
- Select the text, tap "Writing Tools" from the context menu, and tap "Proofread" to proofread only the selected text.
- Tap any spot in the text to open the context menu, tap "Writing Tools," then "Proofread" to proofread the entire document.
- In the Notes app, you can also select the text or tap any spot in the text, tap the Apple Intelligence icon in Notes' toolbar, and then tap "Proofread" to proofread only the selected text or the whole document. If you don't see Notes' toolbar, tap the plus (+) button to unhide it.
Note that Predictive Text does not need to be enabled on your device to see the bar above the keyboard with "Proofread" and the Apple Intelligence icon. However, not all apps will show this bar. If you don't see it, use the context menu.
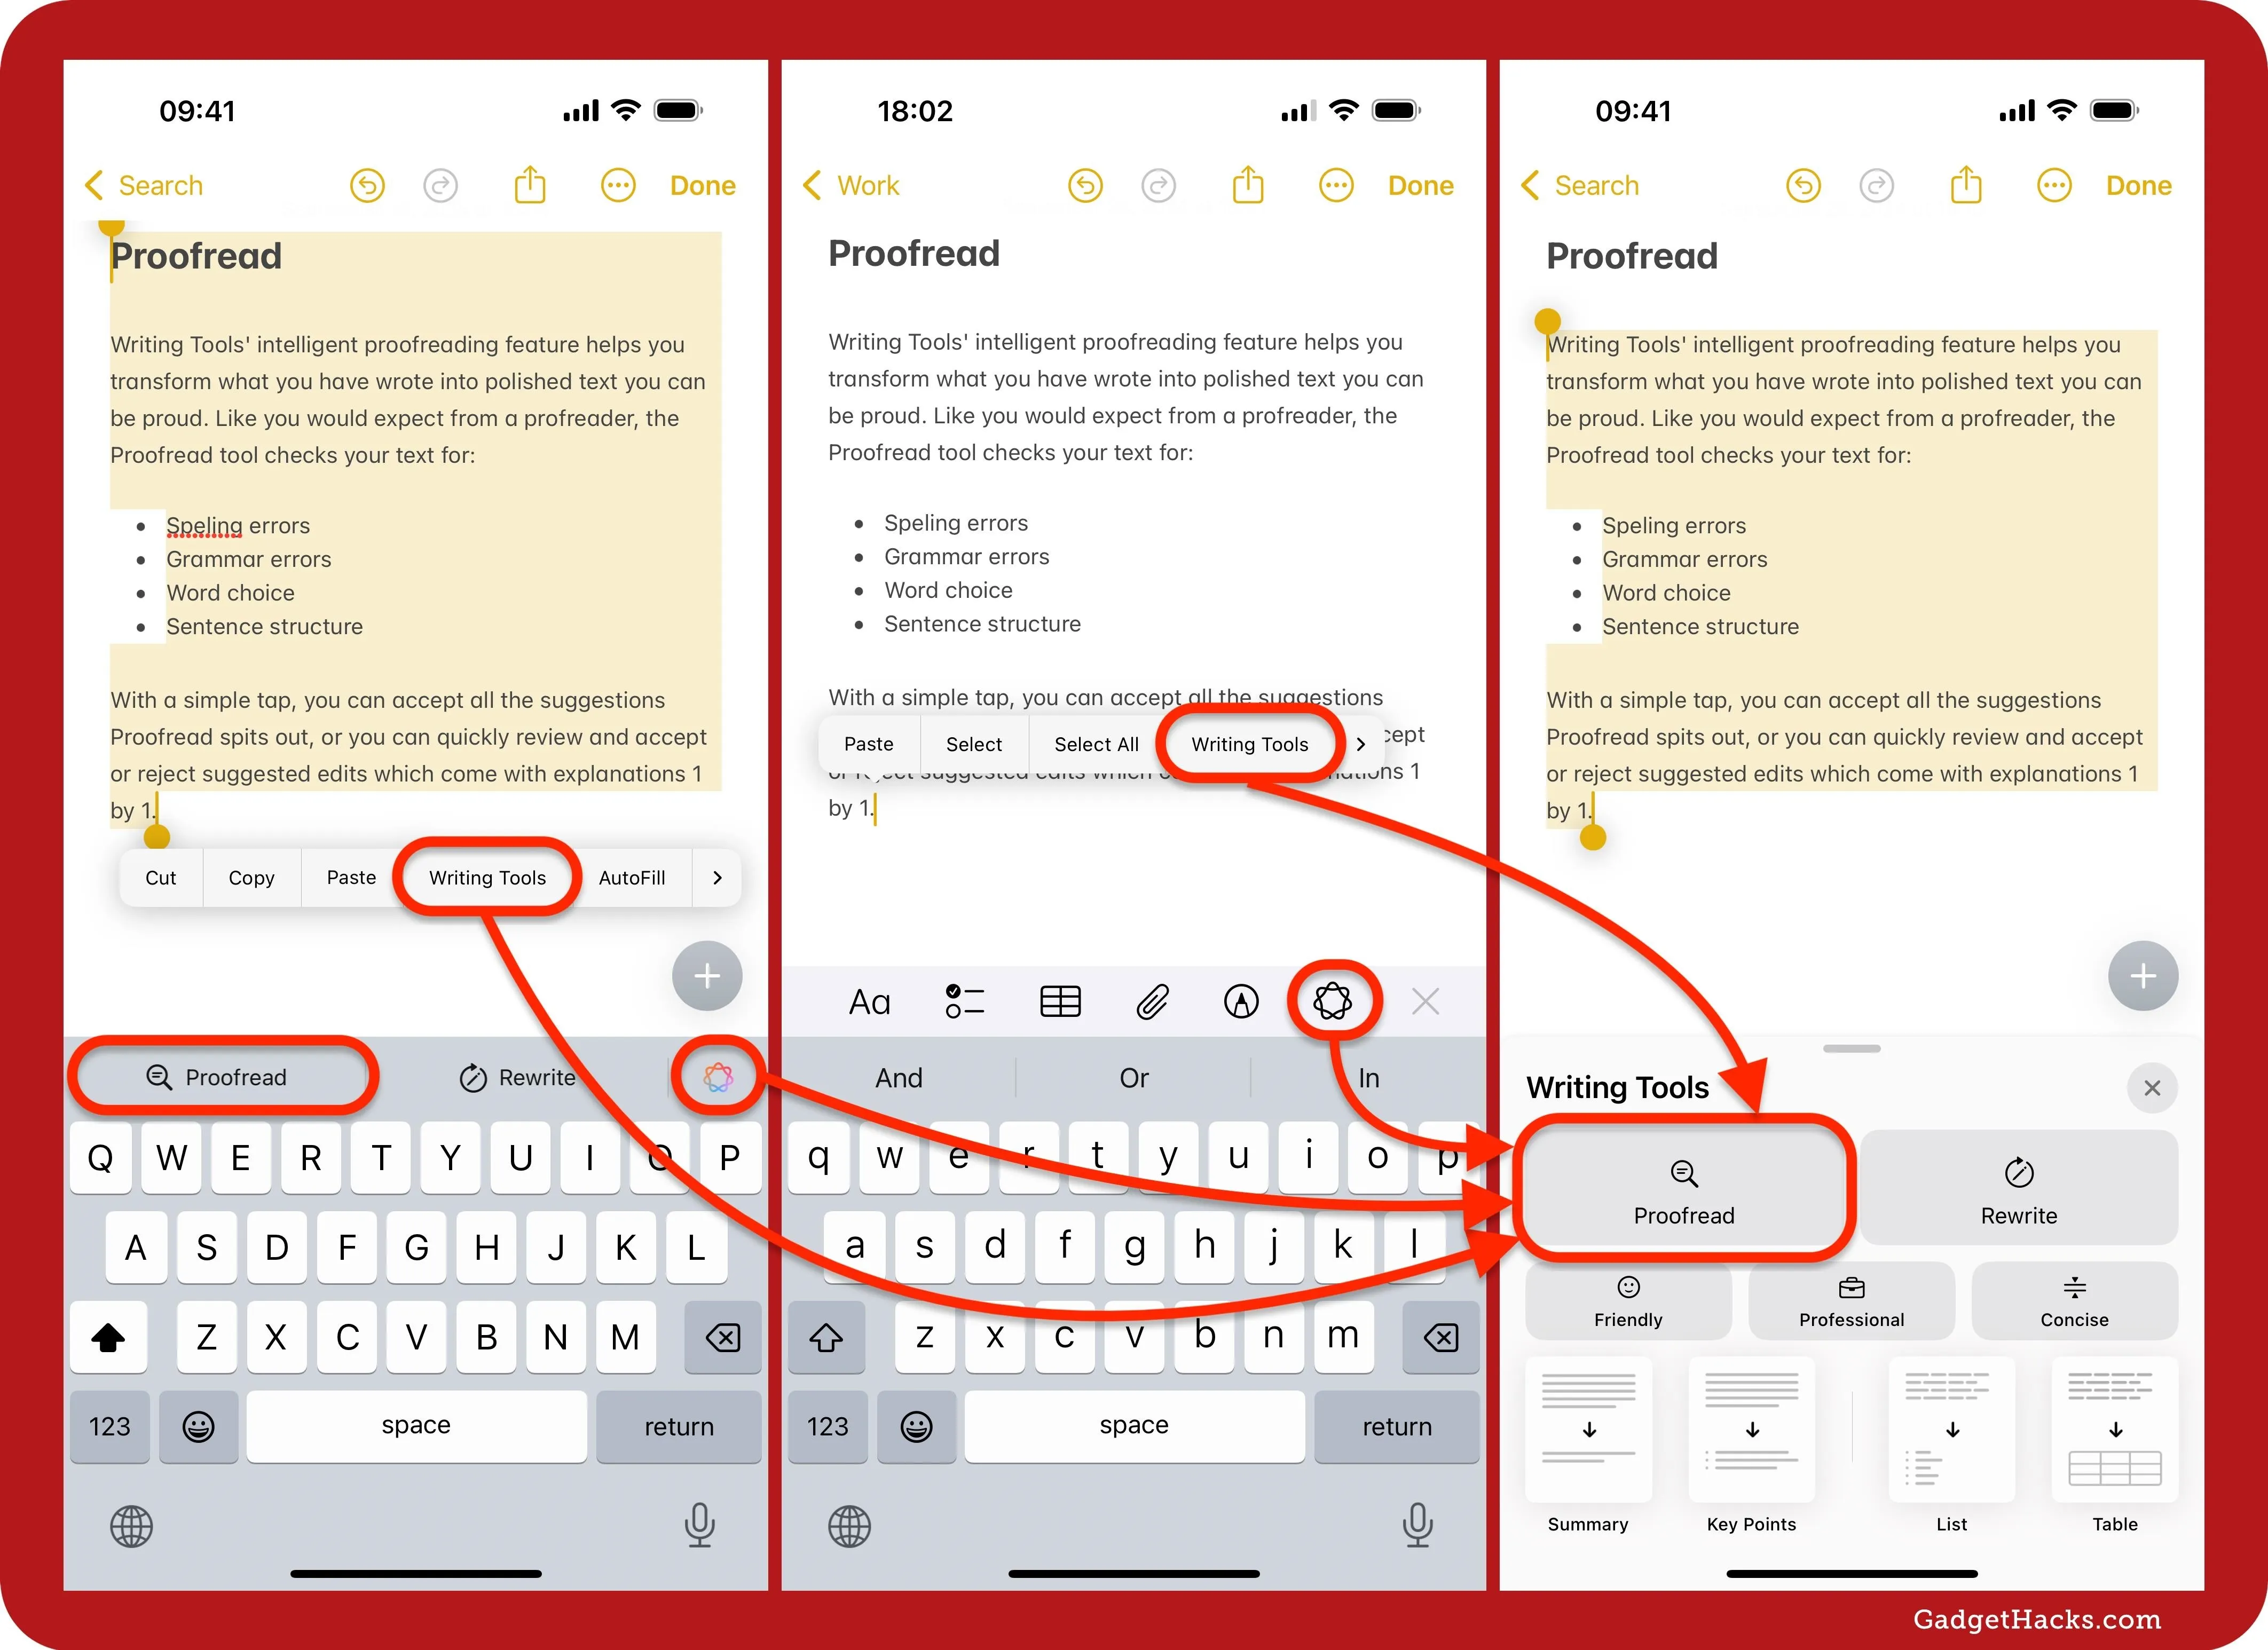
There are multiple ways to trigger the Proofread tool on iOS/iPadOS.
On a Mac, you can select the text, click the Apple Intelligence icon next to it, and then hit "Proofread." Alternatively, you can right-click or Control-click the selected text, choose "Writing Tools" from the context menu, and then "Proofread." Or you can visit Edit » Writing Tools in the menu bar and either open the "Writing Tools" or "Proofread" it right away.
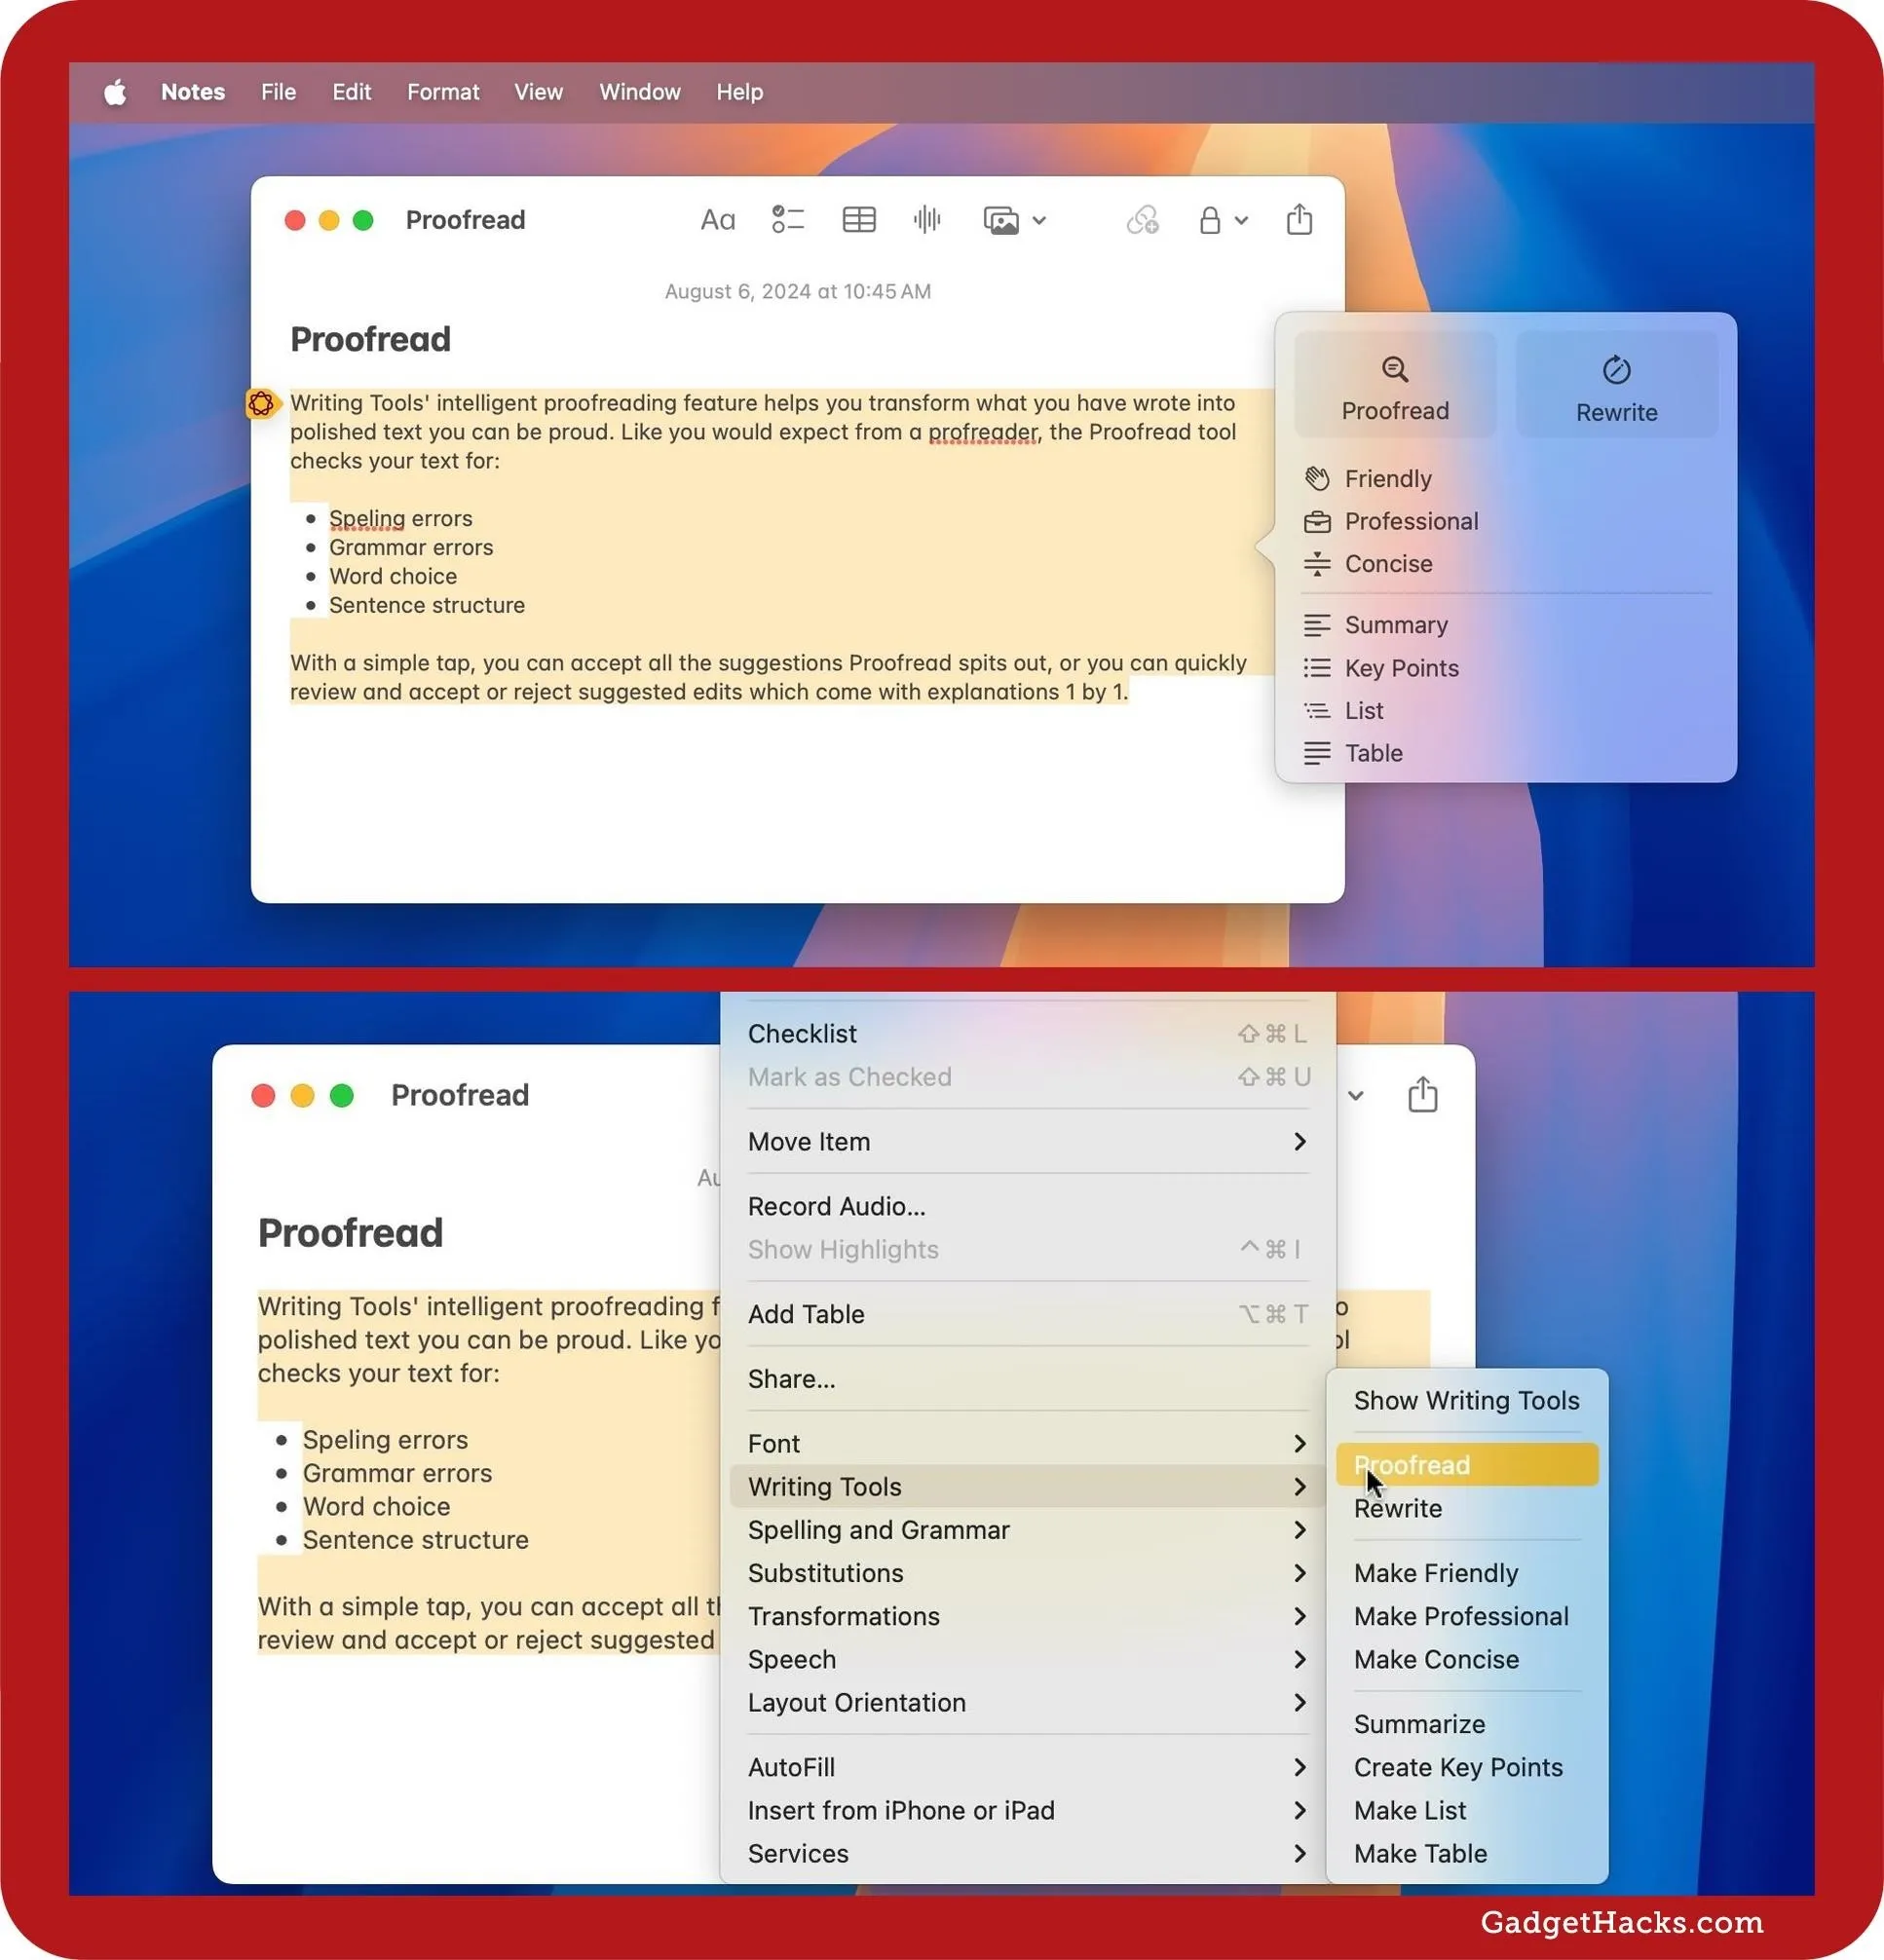
There are also multiple ways to trigger the Proofread tool on macOS.
What you see next depends on the app you're using.
In apps like Facebook, Instagram, Mail, Messages, Notes (my example), Reddit, and Threads, you can hit "Done" to accept all the suggestions Proofread spits out. Hit "Revert" to reject them all. You can also hit the "Original" button to compare the original and edited versions. Selecting "Done" when the original is visible will not reject the edits — the "Original" button is just for comparing your initial draft to the edited version.

In apps like Notes, Proofread automatically replaces the original text.
Instead of accepting all or none, you can individually review and accept or reject suggested edits, which come with explanations. To do so, hit the up or down chevron (on iOS/iPadOS) or left or right chevron (on macOS) to begin cycling through them. Alternatively, you can tap or click on an underlined word in the text to jump right to that suggestion and explanation. To accept, do nothing. To reject, hit "Use Original" (on iOS/iPadOS) or the undo button (on macOS).
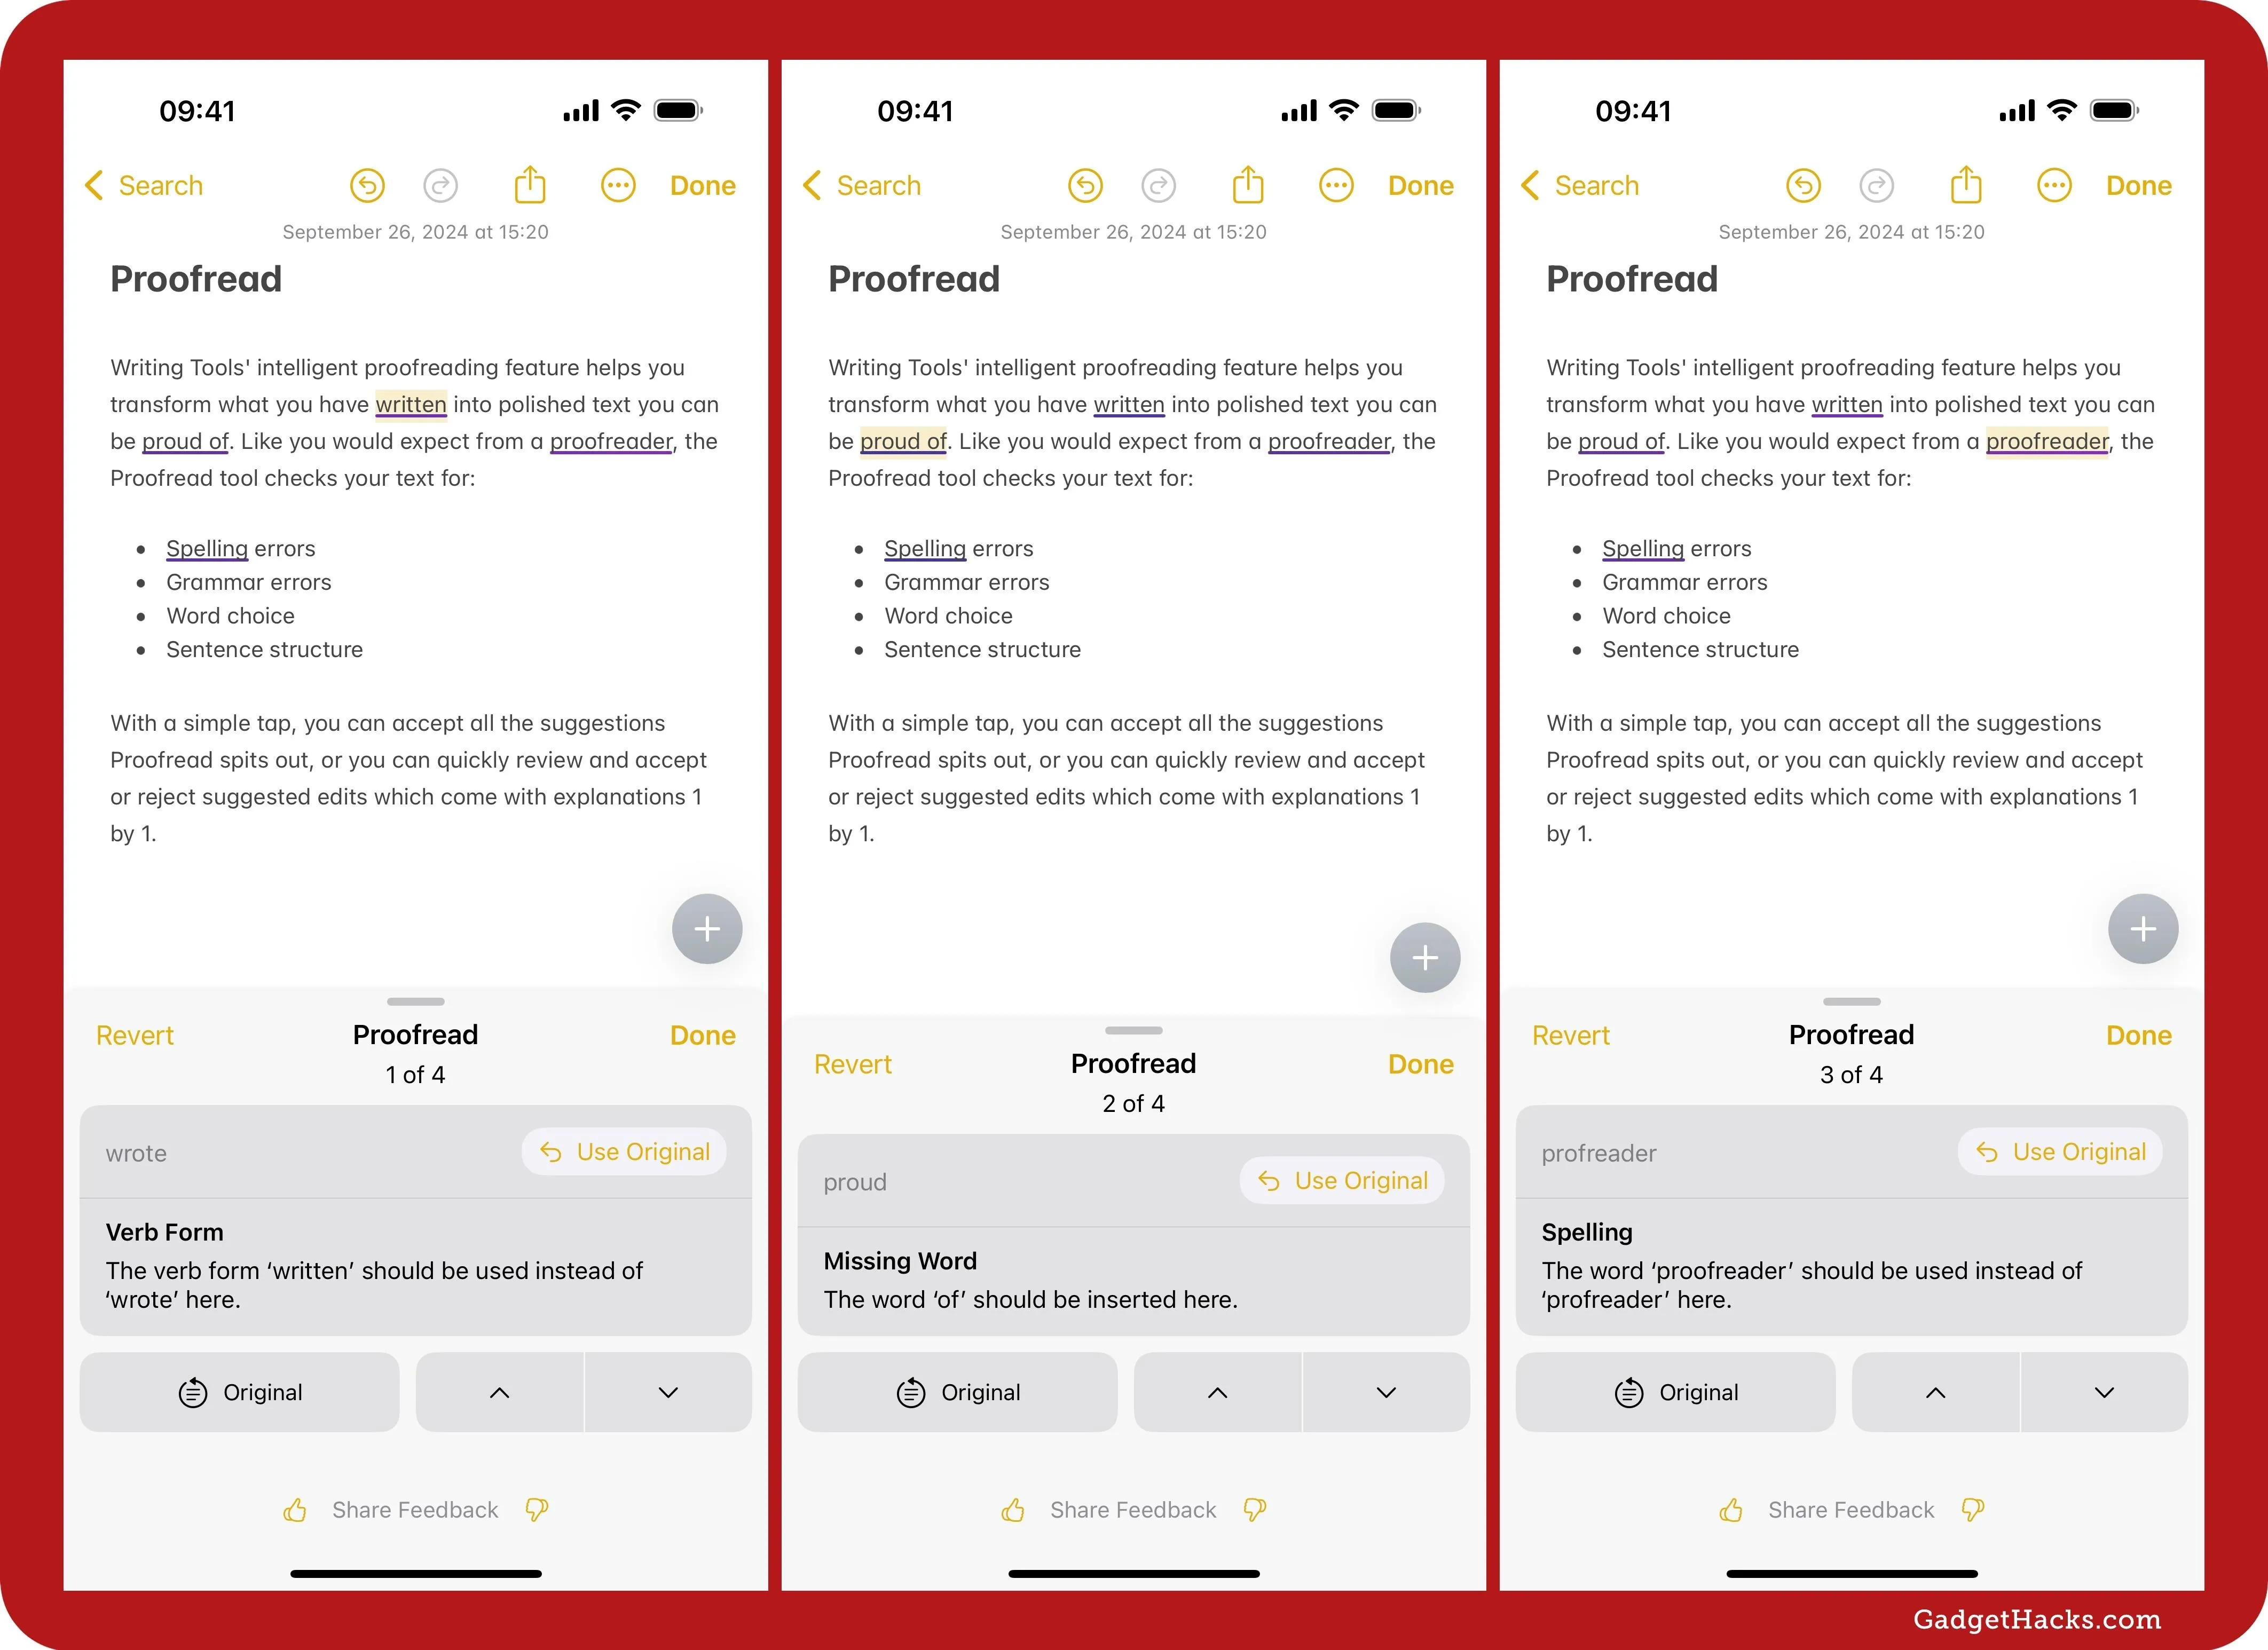
In apps like Notes, you can review Proofread's suggestions individually.
You get fewer options in apps like Gmail, Koder, Messenger, Outlook, Pages (my example), Reminders, Signal, and Slack. Proofread won't automatically replace the text with its version, and you can't view suggestions individually. Instead, it shows its version in the Proofread pane, and you can hit "Replace" to swap out your original text with it. You can also select "Copy" and then paste it yourself somewhere. On iOS and iPadOS, you can also tap "Share" to send it to a contact or another app, and hitting "Done" closes the Proofread tool.
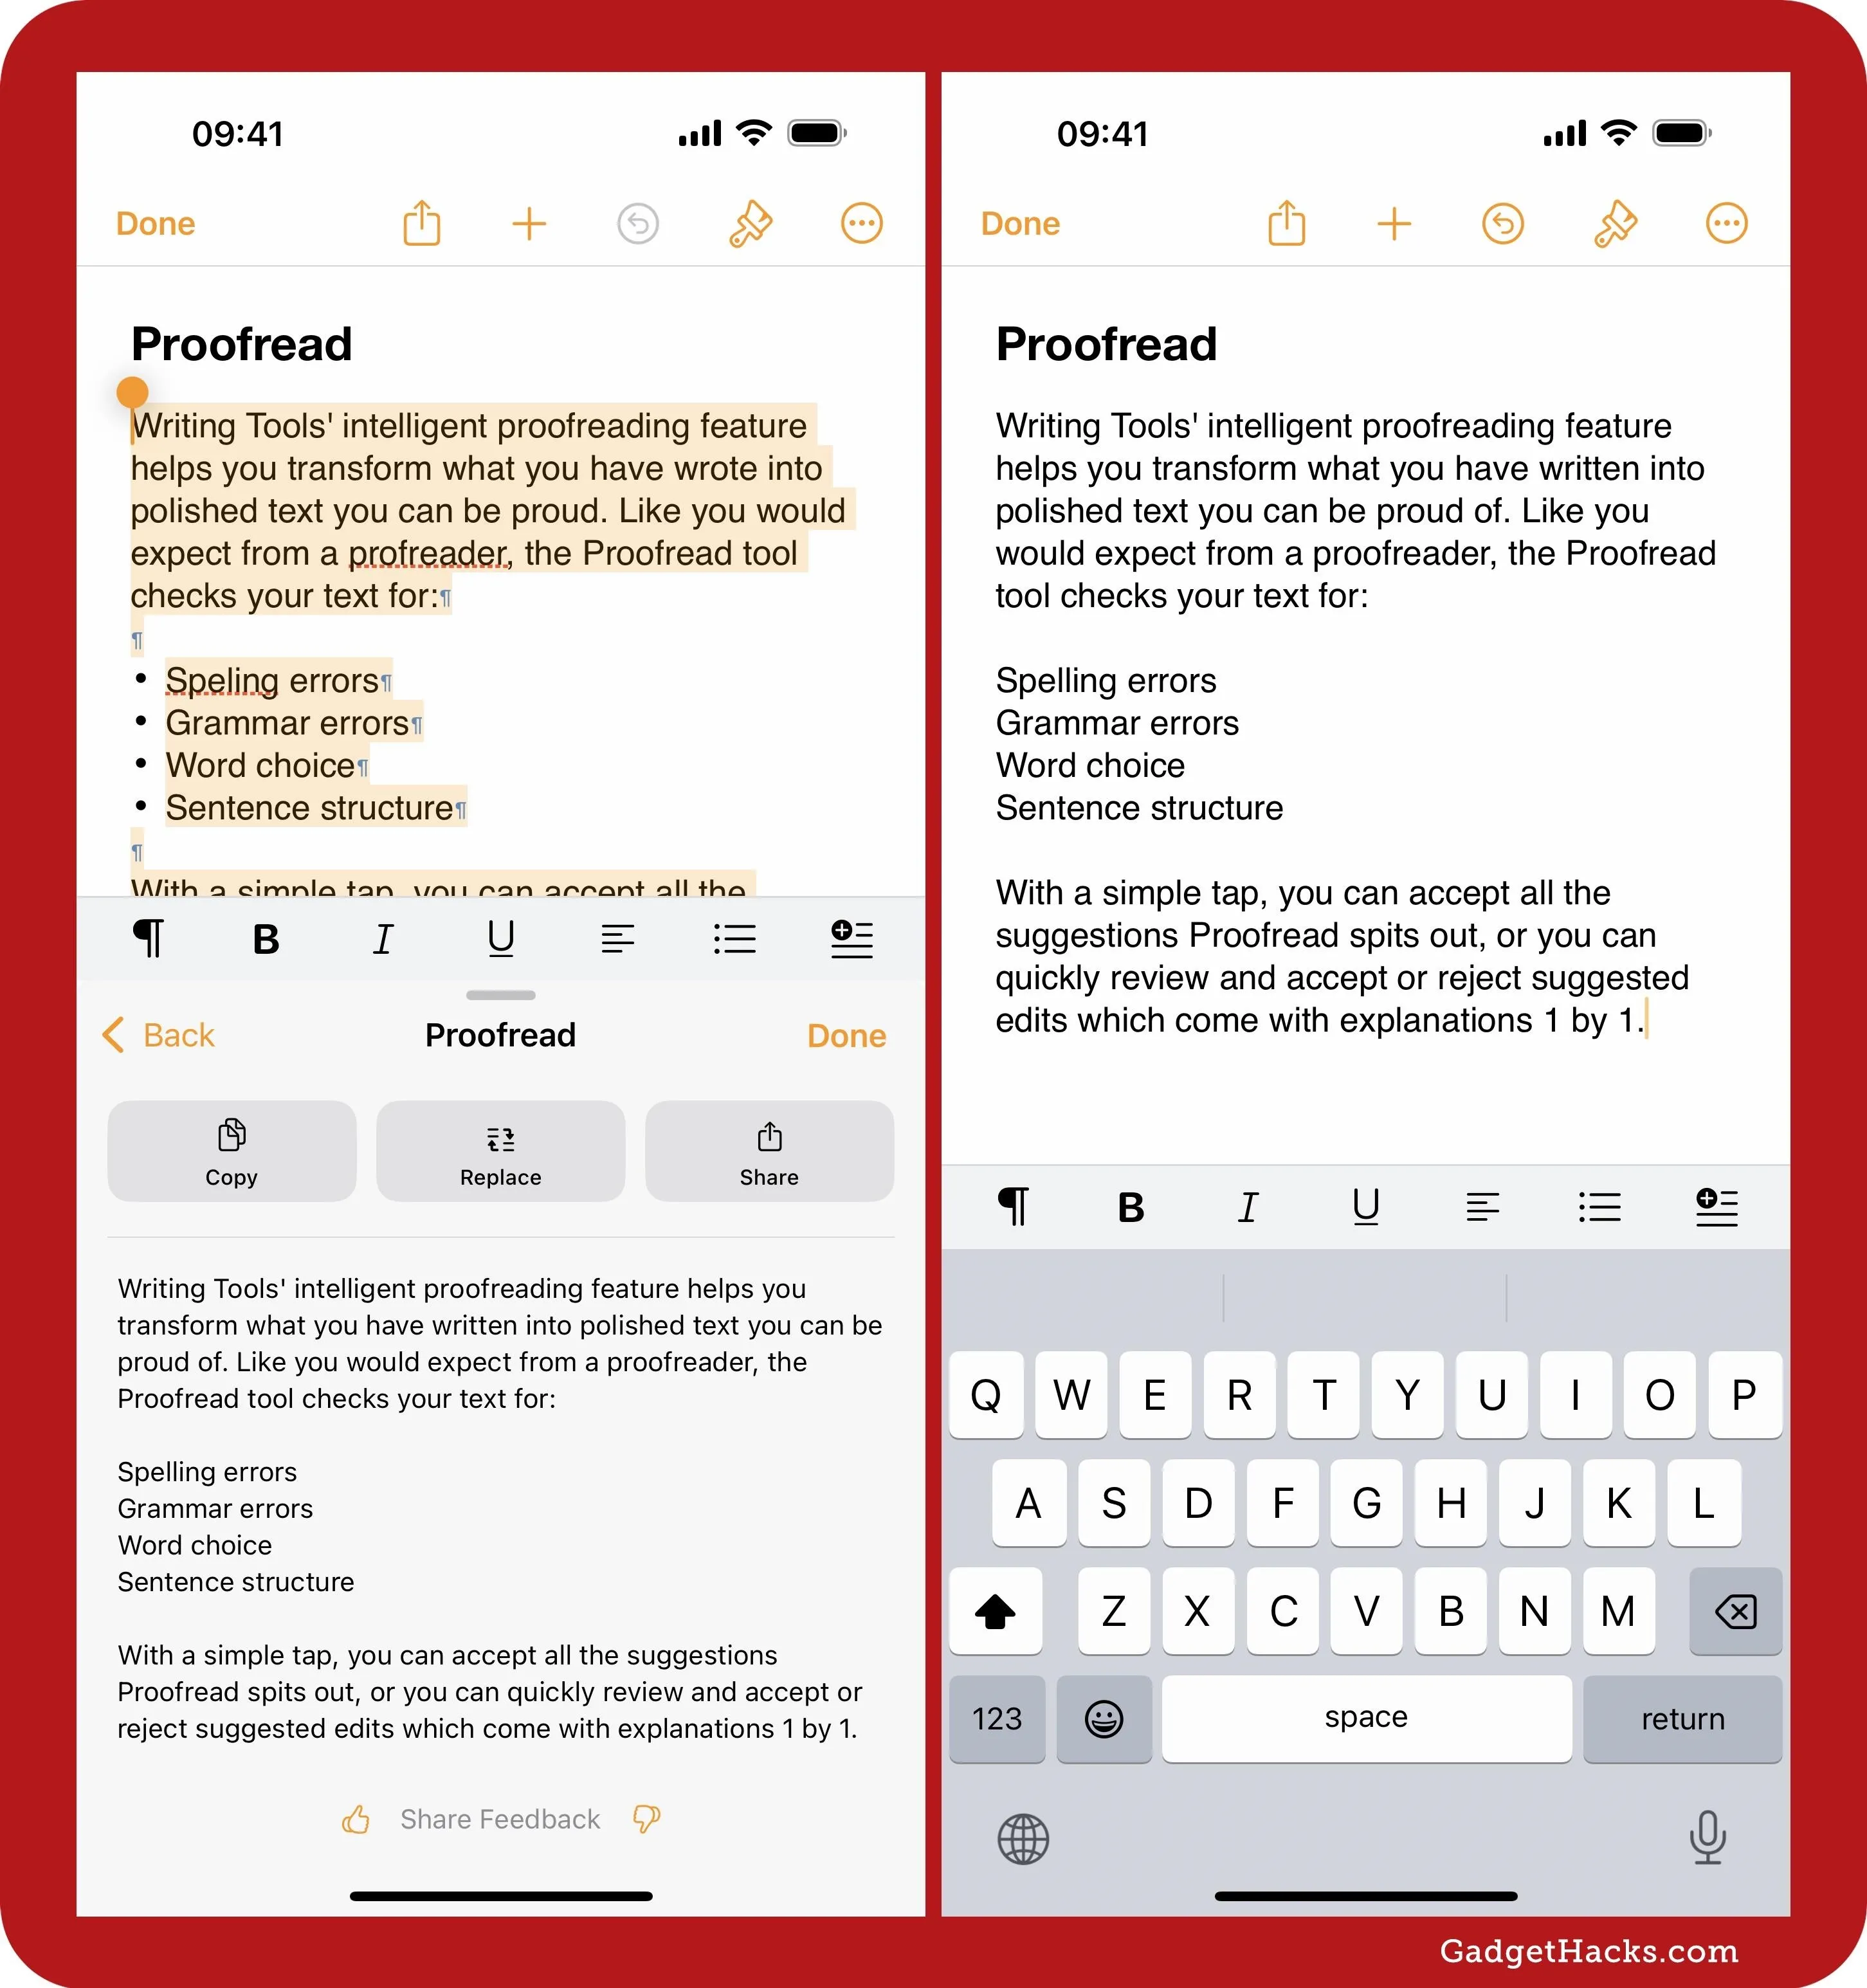
In apps like Pages, you need to replace the original text manually.
Remember, Writing Tools is in beta, so it won't always catch everything a proofreader would. In my example above, there were a few things it could have done better. First, I expected it to suggest commas before and after "which come with explanations." Second, "1 by 1" should be "one by one" in most cases. Third, the overall structure of the last sentence could have been improved.
4. Rewrite
Apple Intelligence's rewriting feature cleans up what you've written — without impacting the overall meaning of the content — allowing you to choose from different rewritten versions until you're satisfied. The Rewrite tool's primary mode gives you edited text in the tone that it thinks would fit best, but you can also choose between the following options to specify how you want to shift the tone and wording to suit the audience, recipient, task, etc.:
- Friendly
- Professional
- Concise
Rewrite can help you fine-tune a cover letter for a job application, add humor to a party invitation, make a work email sound more polished, create a friendlier vibe in a blog post, remove the filler from a social post, and more.
There are various ways to get started with Rewrite on iOS or iPadOS:
- Select the text to rewrite, then tap "Rewrite" above the keyboard to rewrite only the selected text.
- Select the text, tap the Apple Intelligence icon above the keyboard, and tap "Rewrite" to rewrite only the selected text.
- Select the text, tap "Writing Tools" from the context menu, and tap "Rewrite" to rewrite only the selected text.
- Tap any spot in the text to open the context menu, tap "Writing Tools," then "Rewrite" to rewrite the entire document.
- In the Notes app, you can also select the text or tap any spot in the text, tap the Apple Intelligence icon in Notes' toolbar, and then tap "Rewrite" to rewrite only the selected text or the whole document. If you don't see Notes' toolbar, tap the plus (+) button to unhide it.
As with Proofread, Predictive Text does not need to be enabled on your device to see the bar above the keyboard with "Rewrite" and the Apple Intelligence icon. However, not all apps will show this bar. If you don't see it, use the context menu.
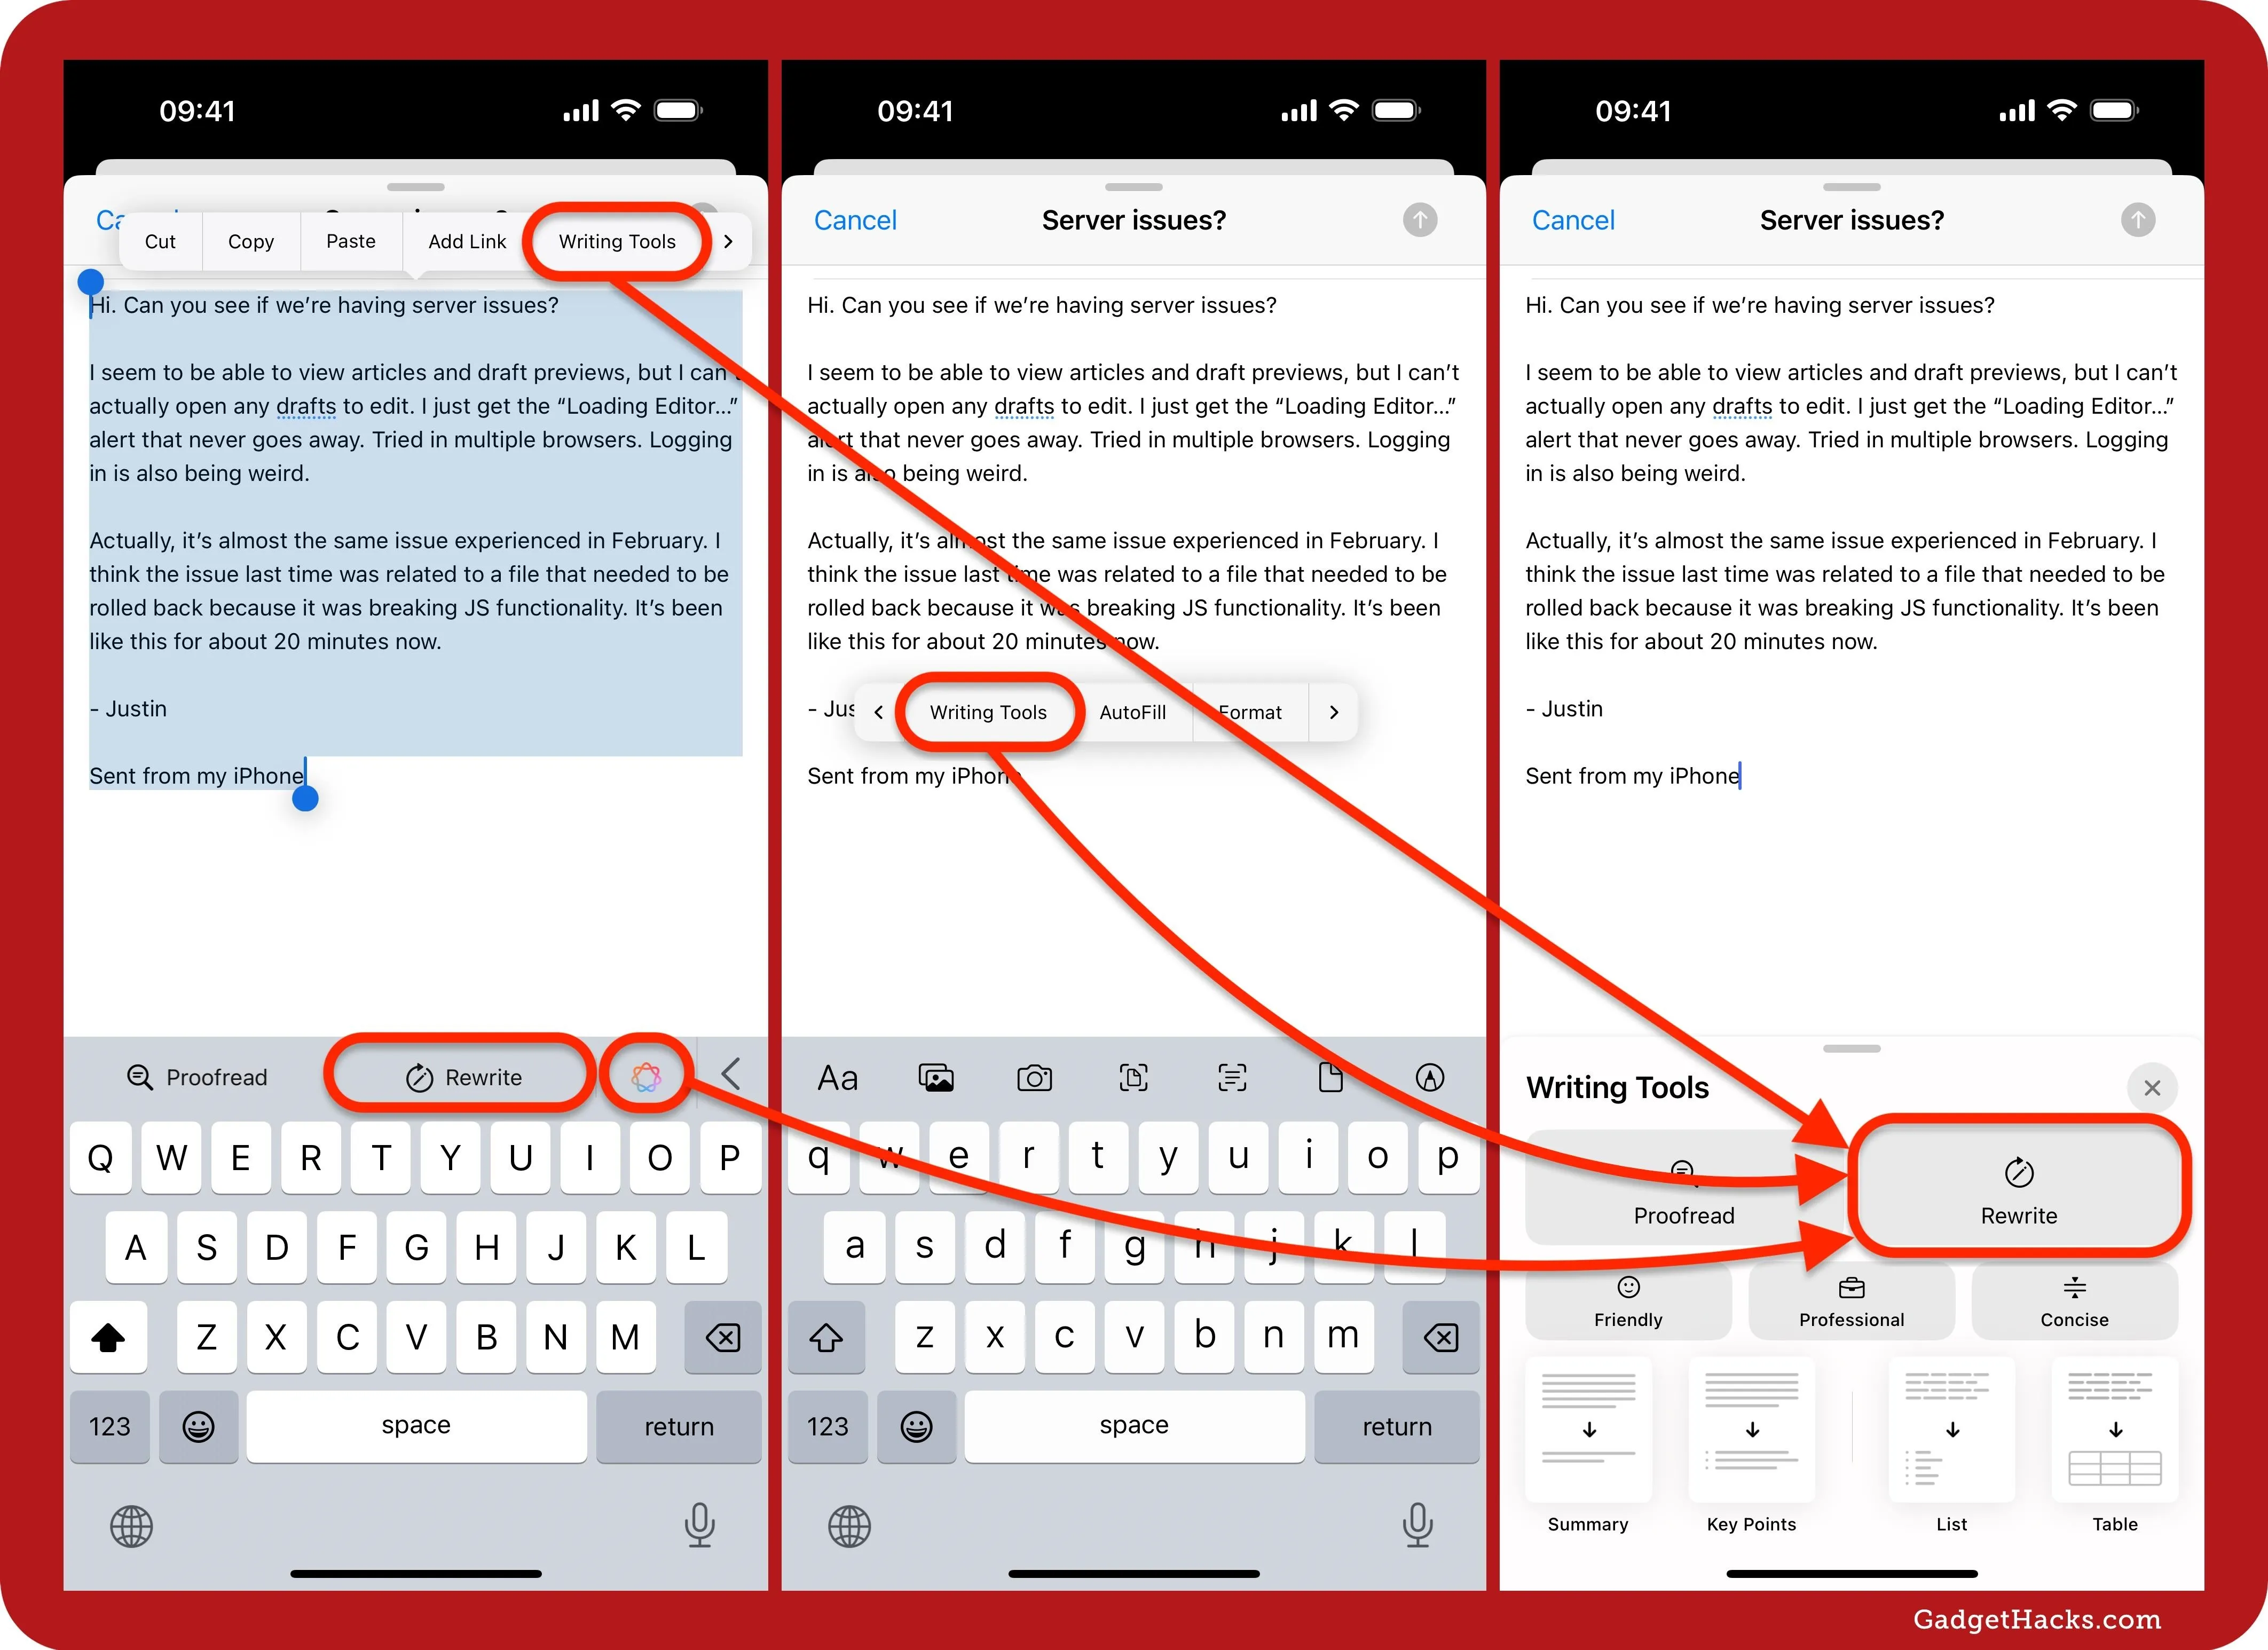
There are multiple ways to trigger the Rewrite tool on iOS/iPadOS.
On a Mac, you can select the text, click the Apple Intelligence icon next to it, and then hit "Rewrite." Alternatively, right-click or Control-click the selected text, choose "Writing Tools" from the context menu, and then "Rewrite." Or visit Edit » Writing Tools in the menu bar and either open the "Writing Tools" or "Rewrite" it right away.
As with Proofread, what you see next depends on the app you're using.
In apps like Facebook, Instagram, Mail (my example), Messages, Notes, and Reddit, hit "Done" to accept the rewritten copy or "Revert" to reject it. You can also use the "Original" button to compare the original and rewritten versions. Selecting "Done" when the original is visible will not reject the rewrite — the "Original" button is just for comparing your initial draft to the rewritten version.
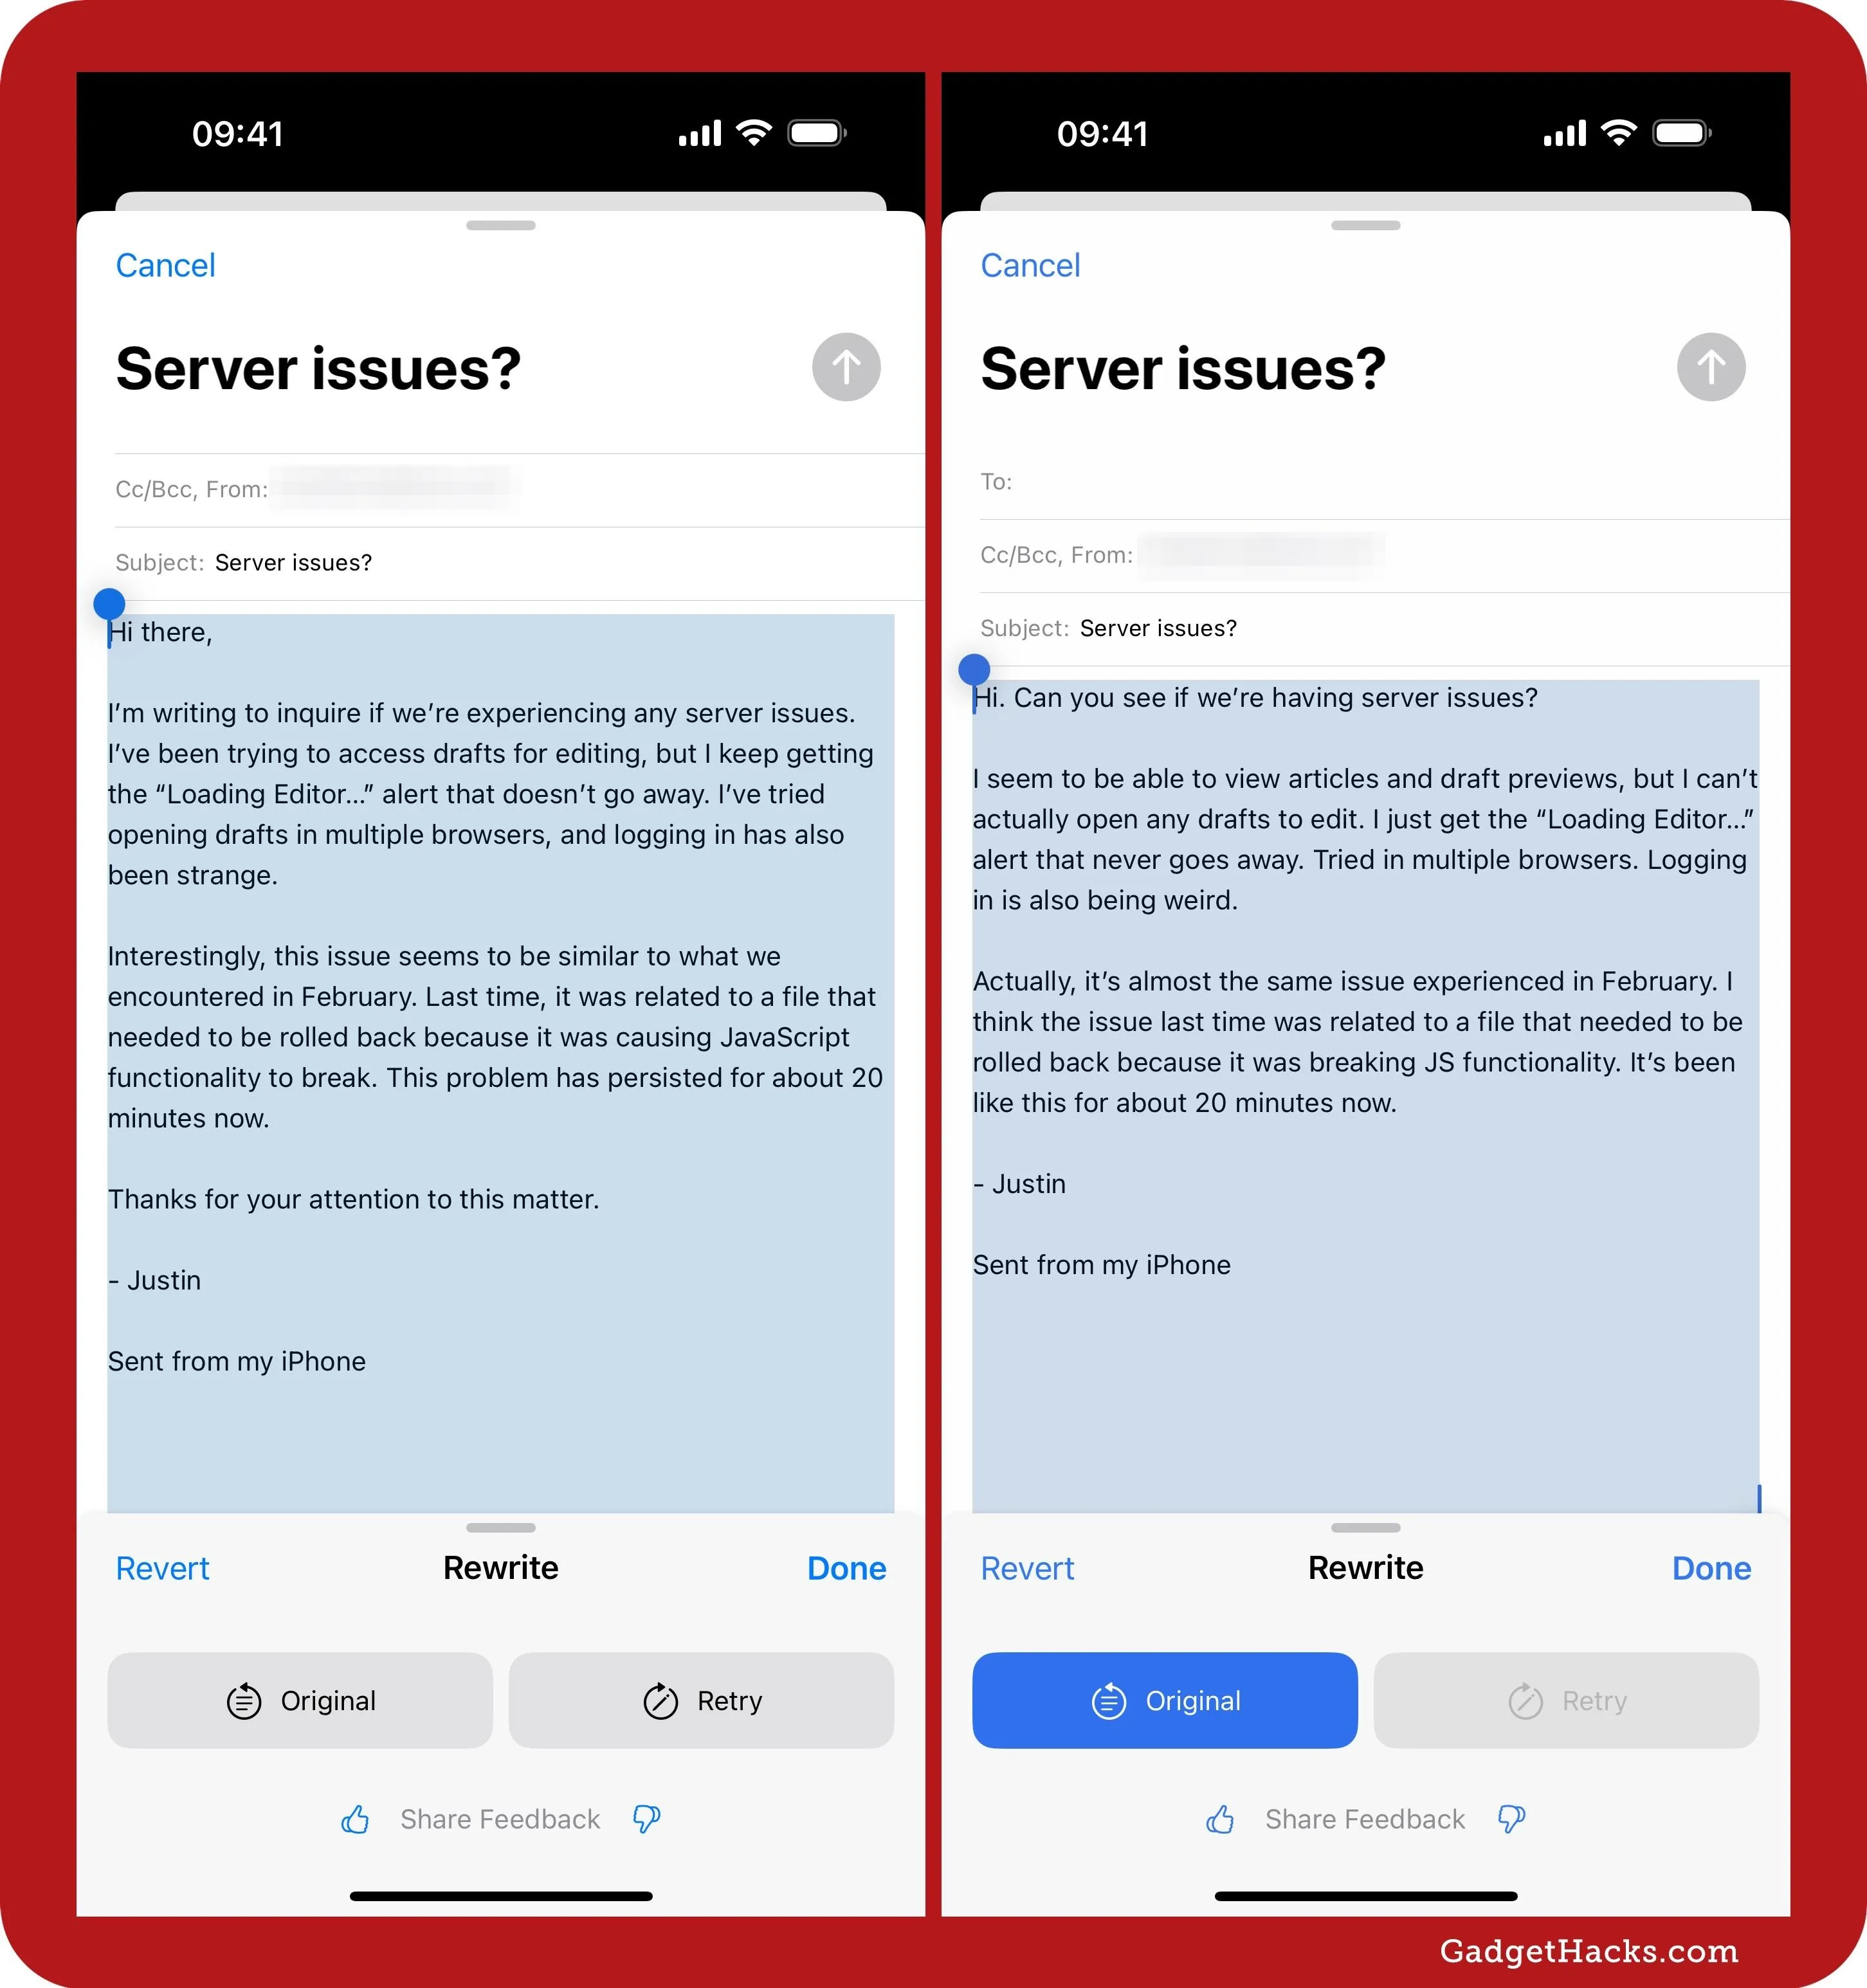
In apps like Mail, you can ask for a basic rewrite.
If the rewritten copy doesn't look or sound good, Rewrite gives you another chance to see what it offers. Simply tap or click on "Retry." When you have two or more rewritten versions in the same session, the Retry button shrinks, giving you access to the Previous and Next buttons to help you look over all the versions to find the right one.
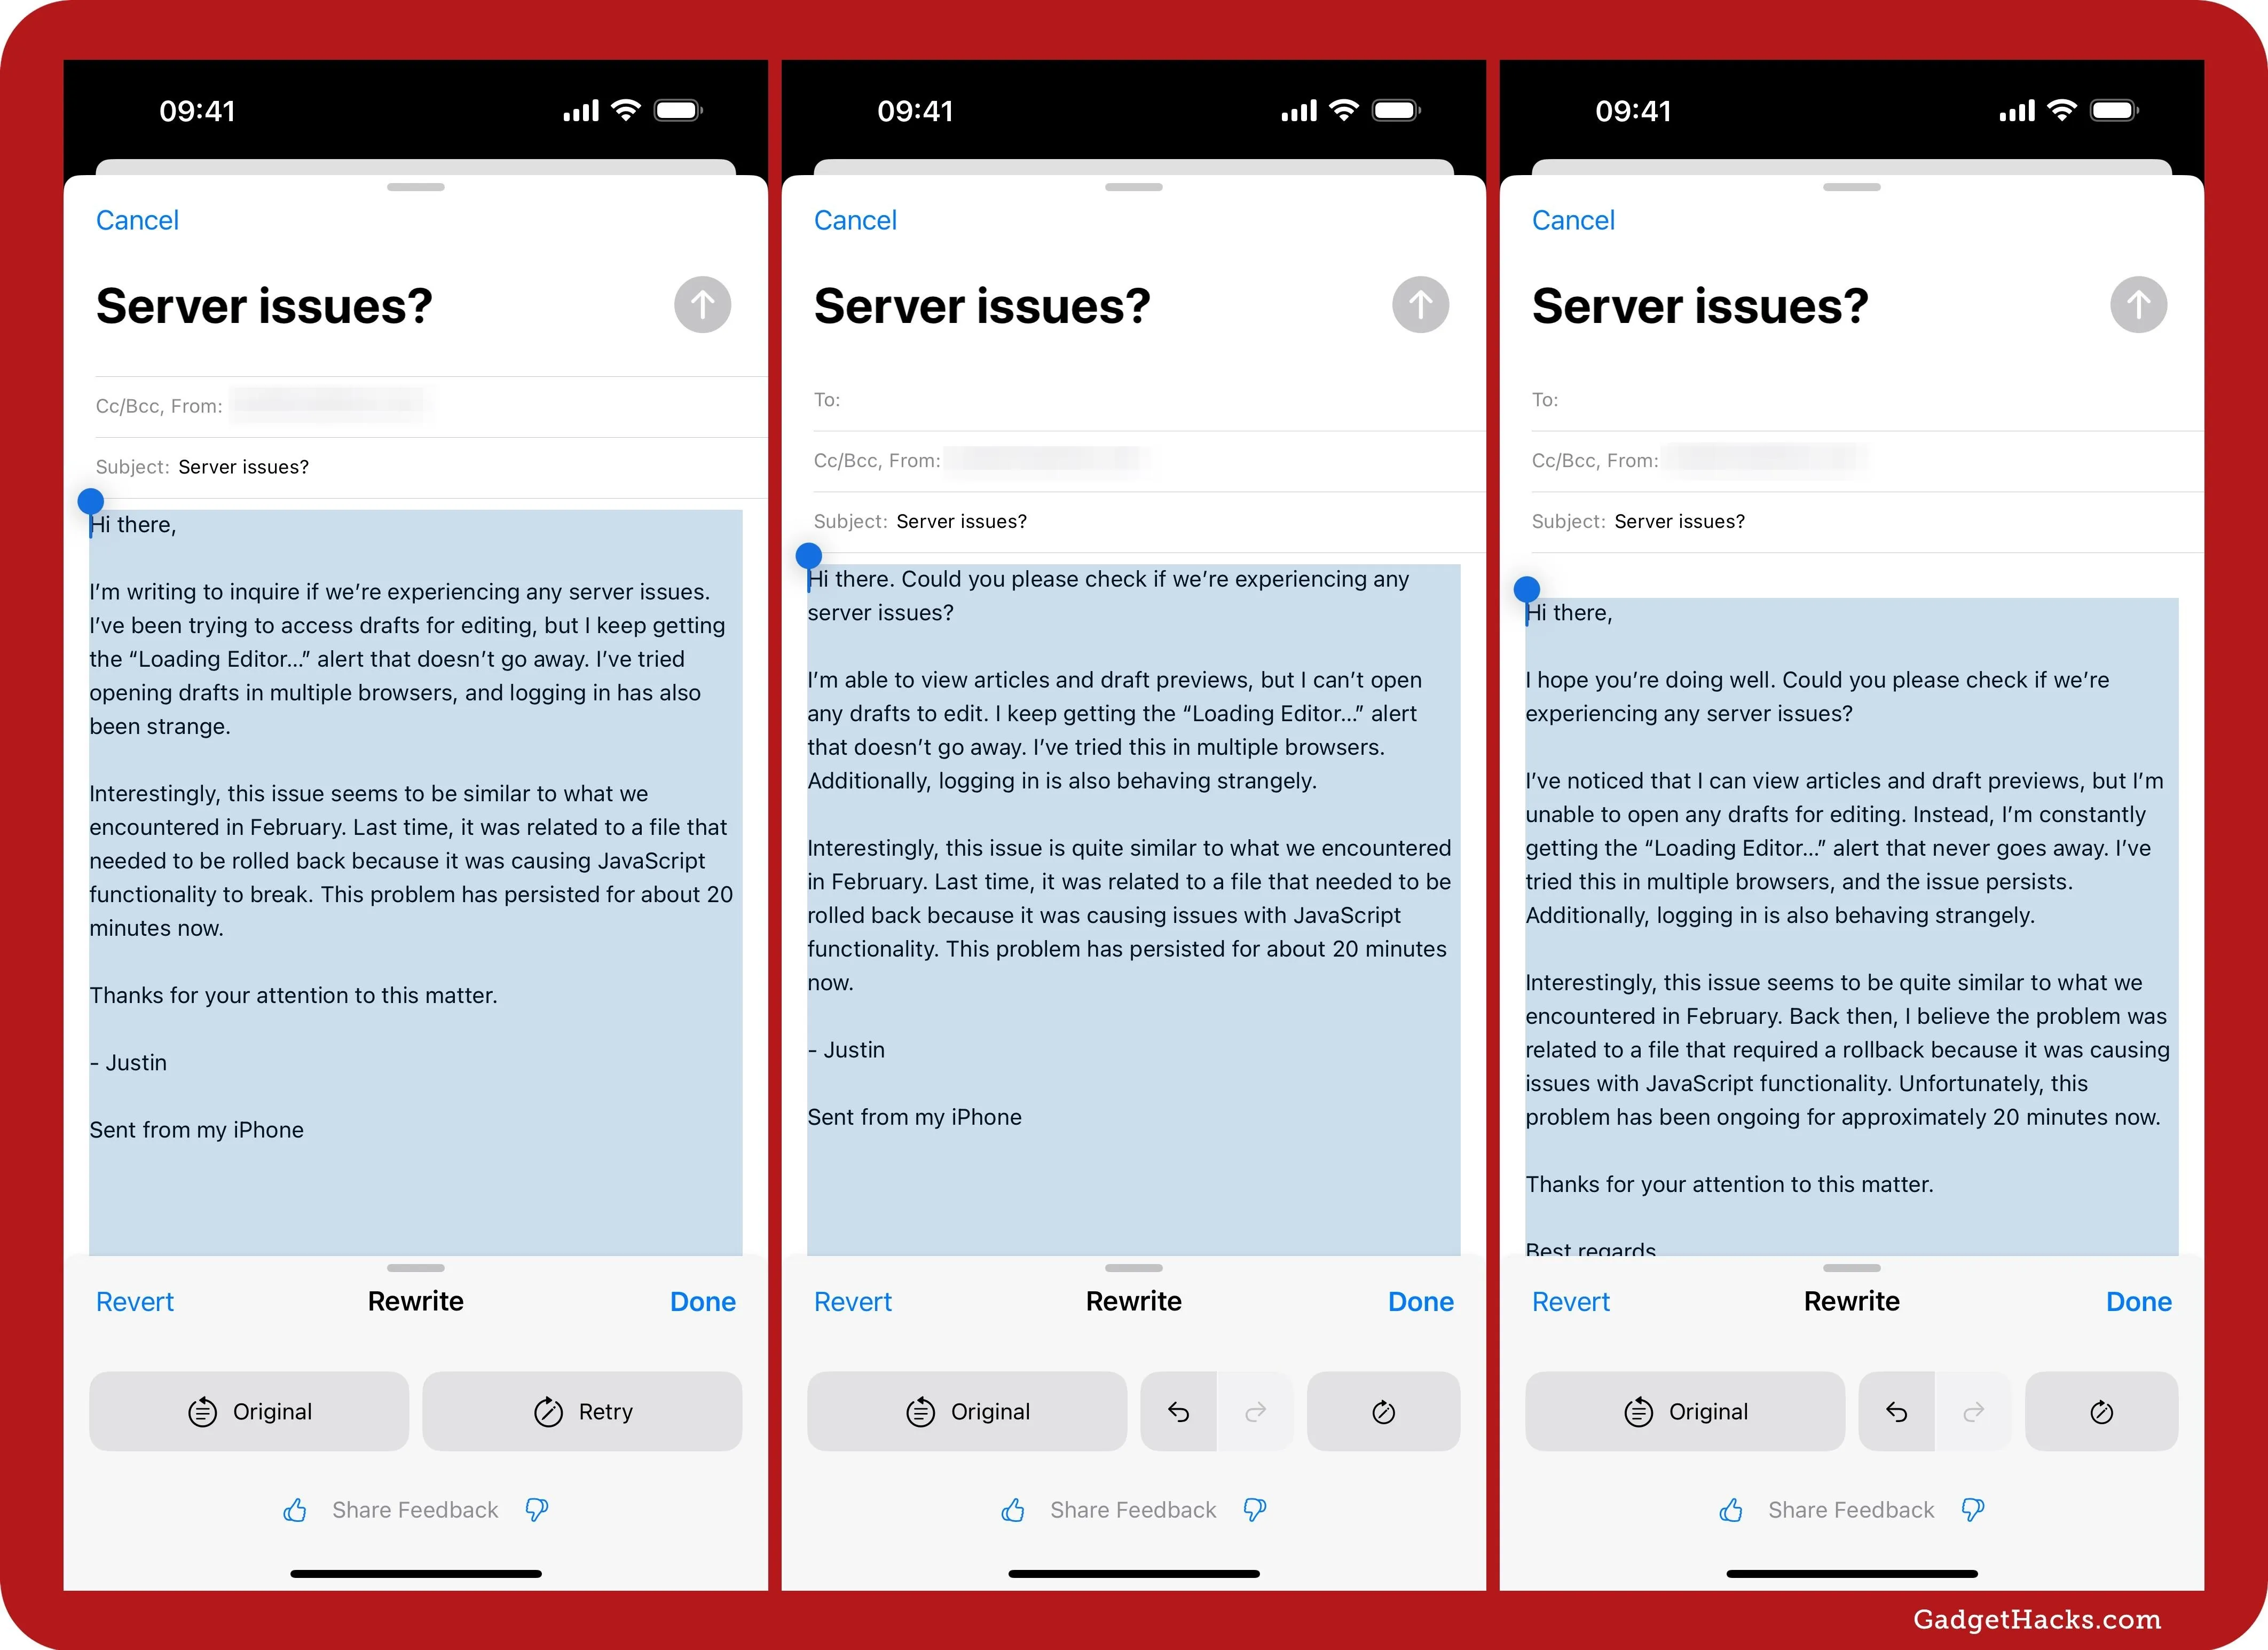
You can ask for more rewrites in apps like Mail to find the best one.
To be more specific about what you expect Rewrite to produce, use the "Friendly," "Professional," or "Concise" button on the Writing Tools menu. Rewrite will give you versions that better fit the specified tone.
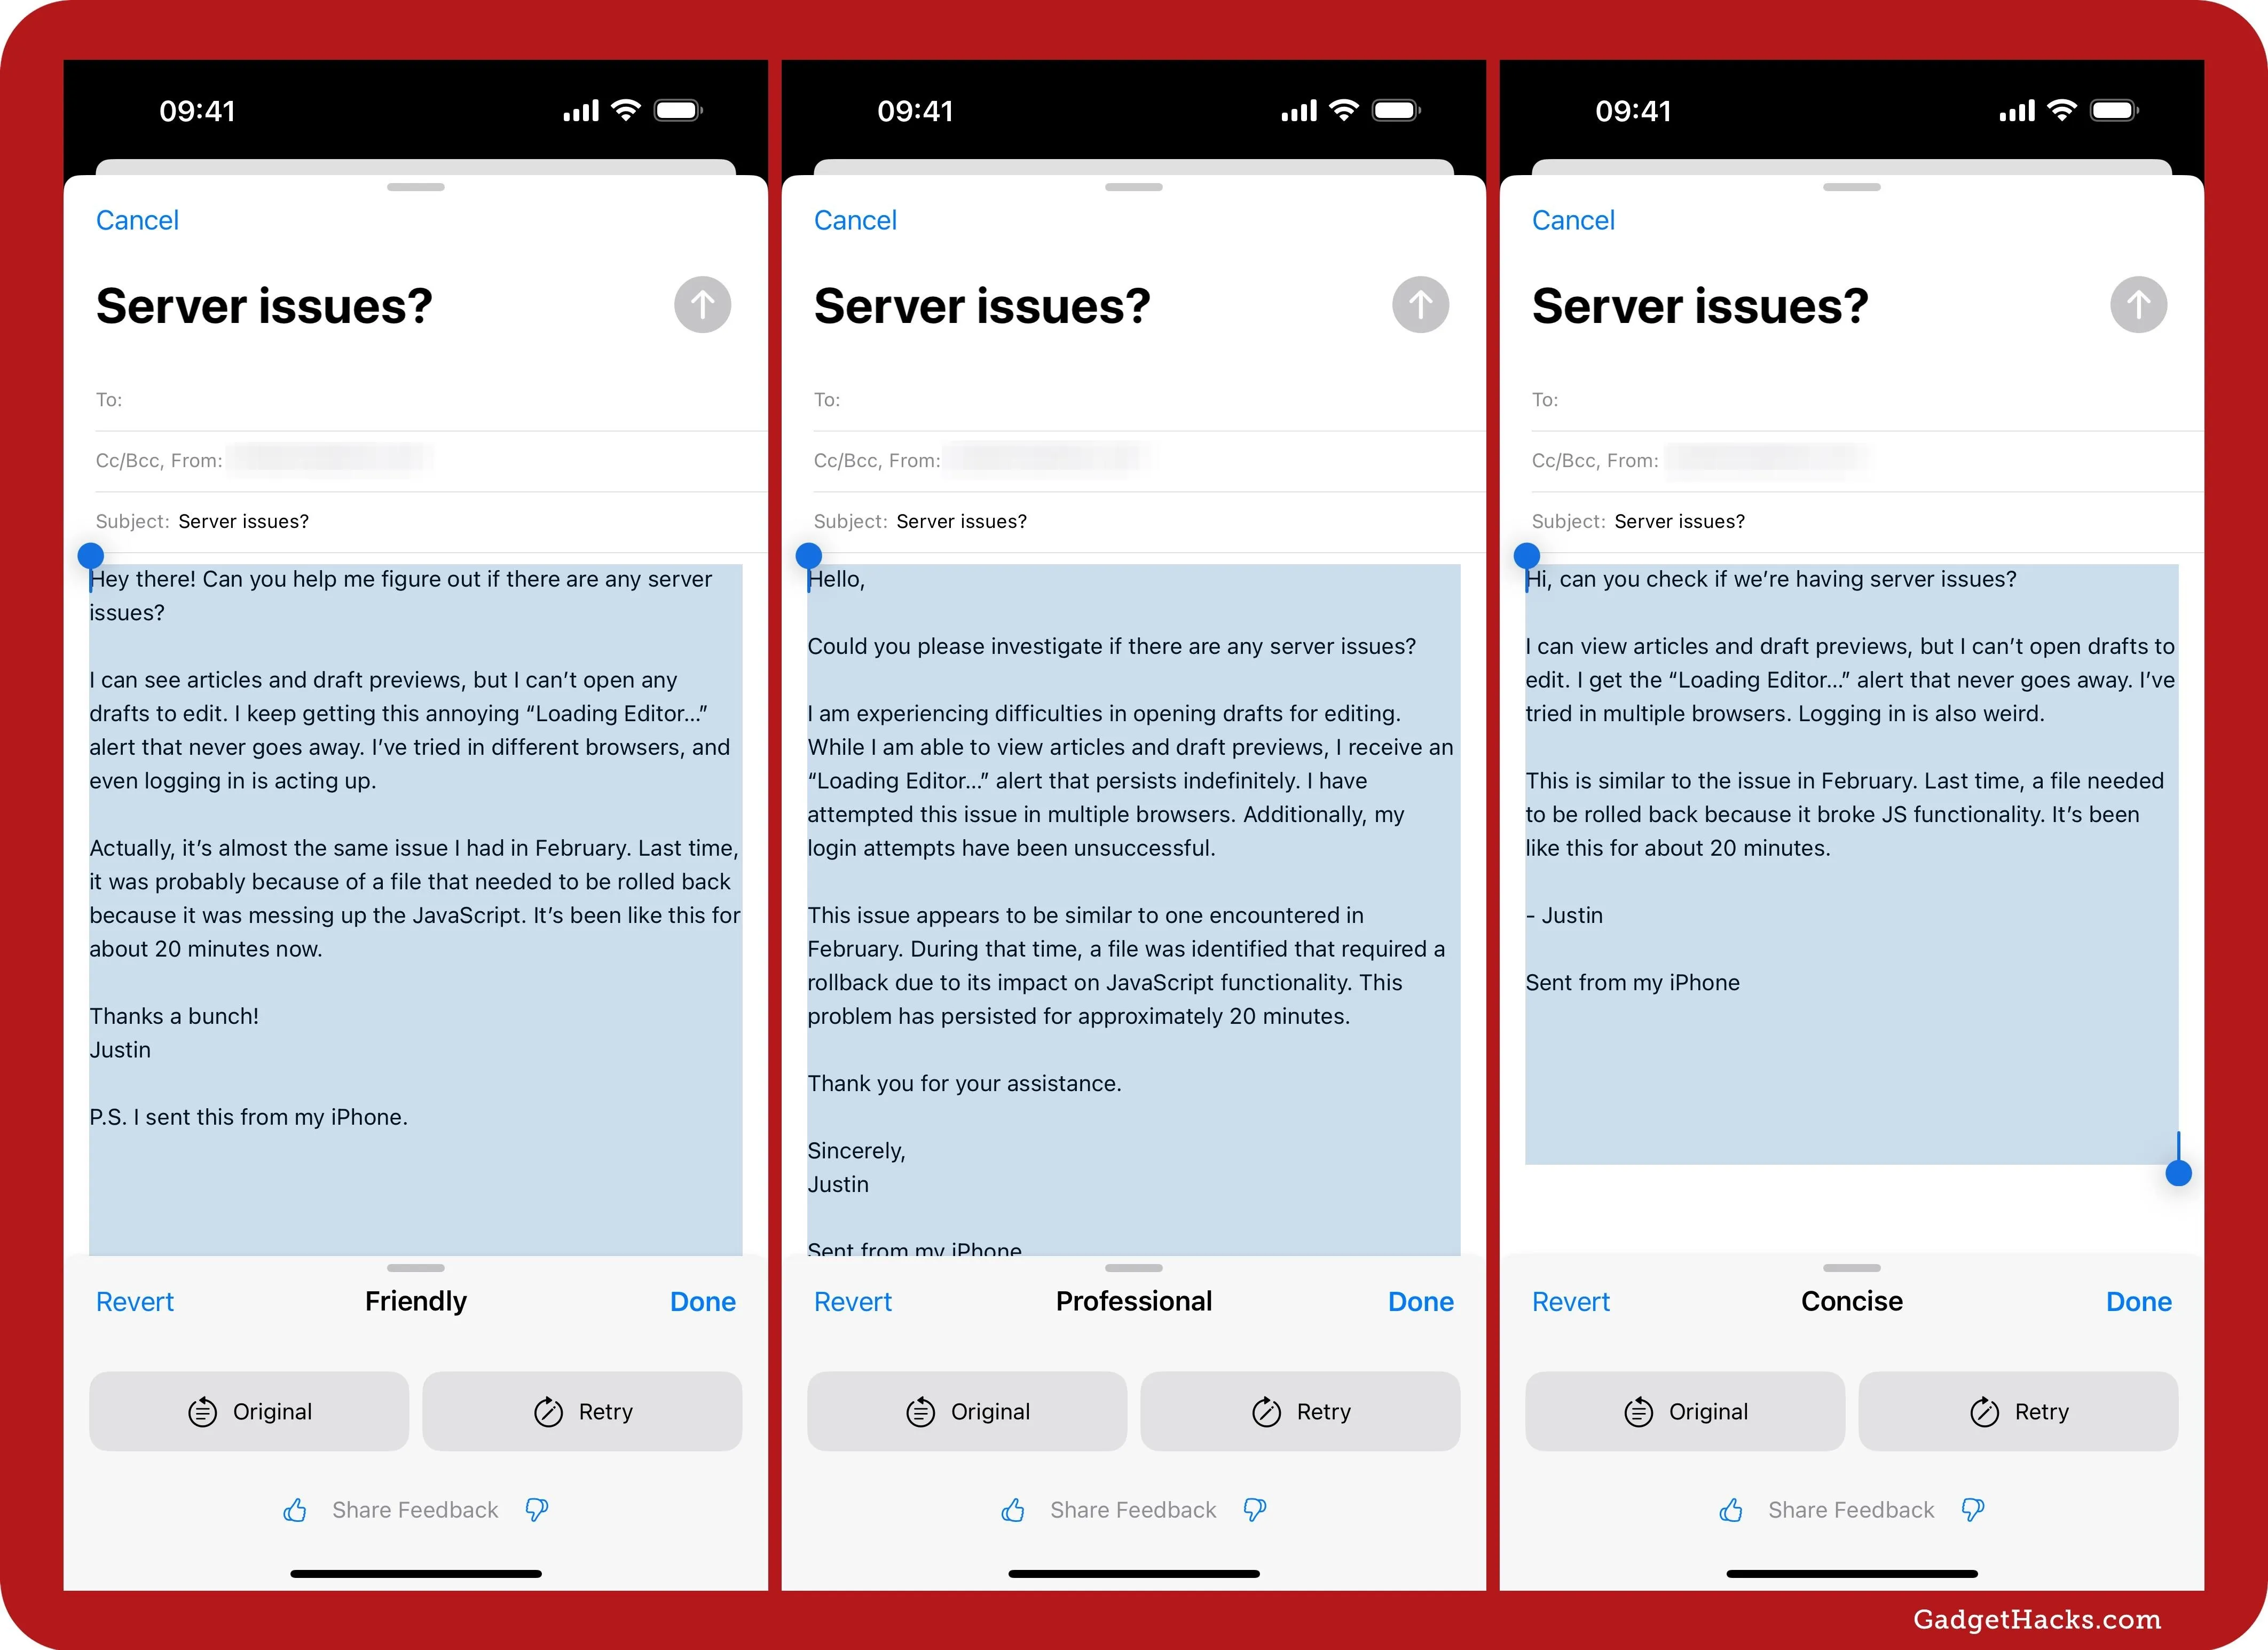
You can get more specific rewrites with Friendly, Professional, and Concise styles.
You get fewer options in apps like Gmail, Koder, Messenger, Outlook (my example), Pages, Reminders, Signal, and Slack. Rewrite won't automatically replace the text with its version. Instead, it shows its version in the Rewrite pane, and you can hit "Replace" to swap out your original text with it. You won't get a history of rewritten versions during the session, nor will you be able to compare it quickly against the original.
You can hit "Copy" in the Rewrite pane and paste it yourself wherever you need it. On iOS and iPadOS, tap "Share" to send it to a contact or another app, or tap "Done" to close the Rewrite tool.
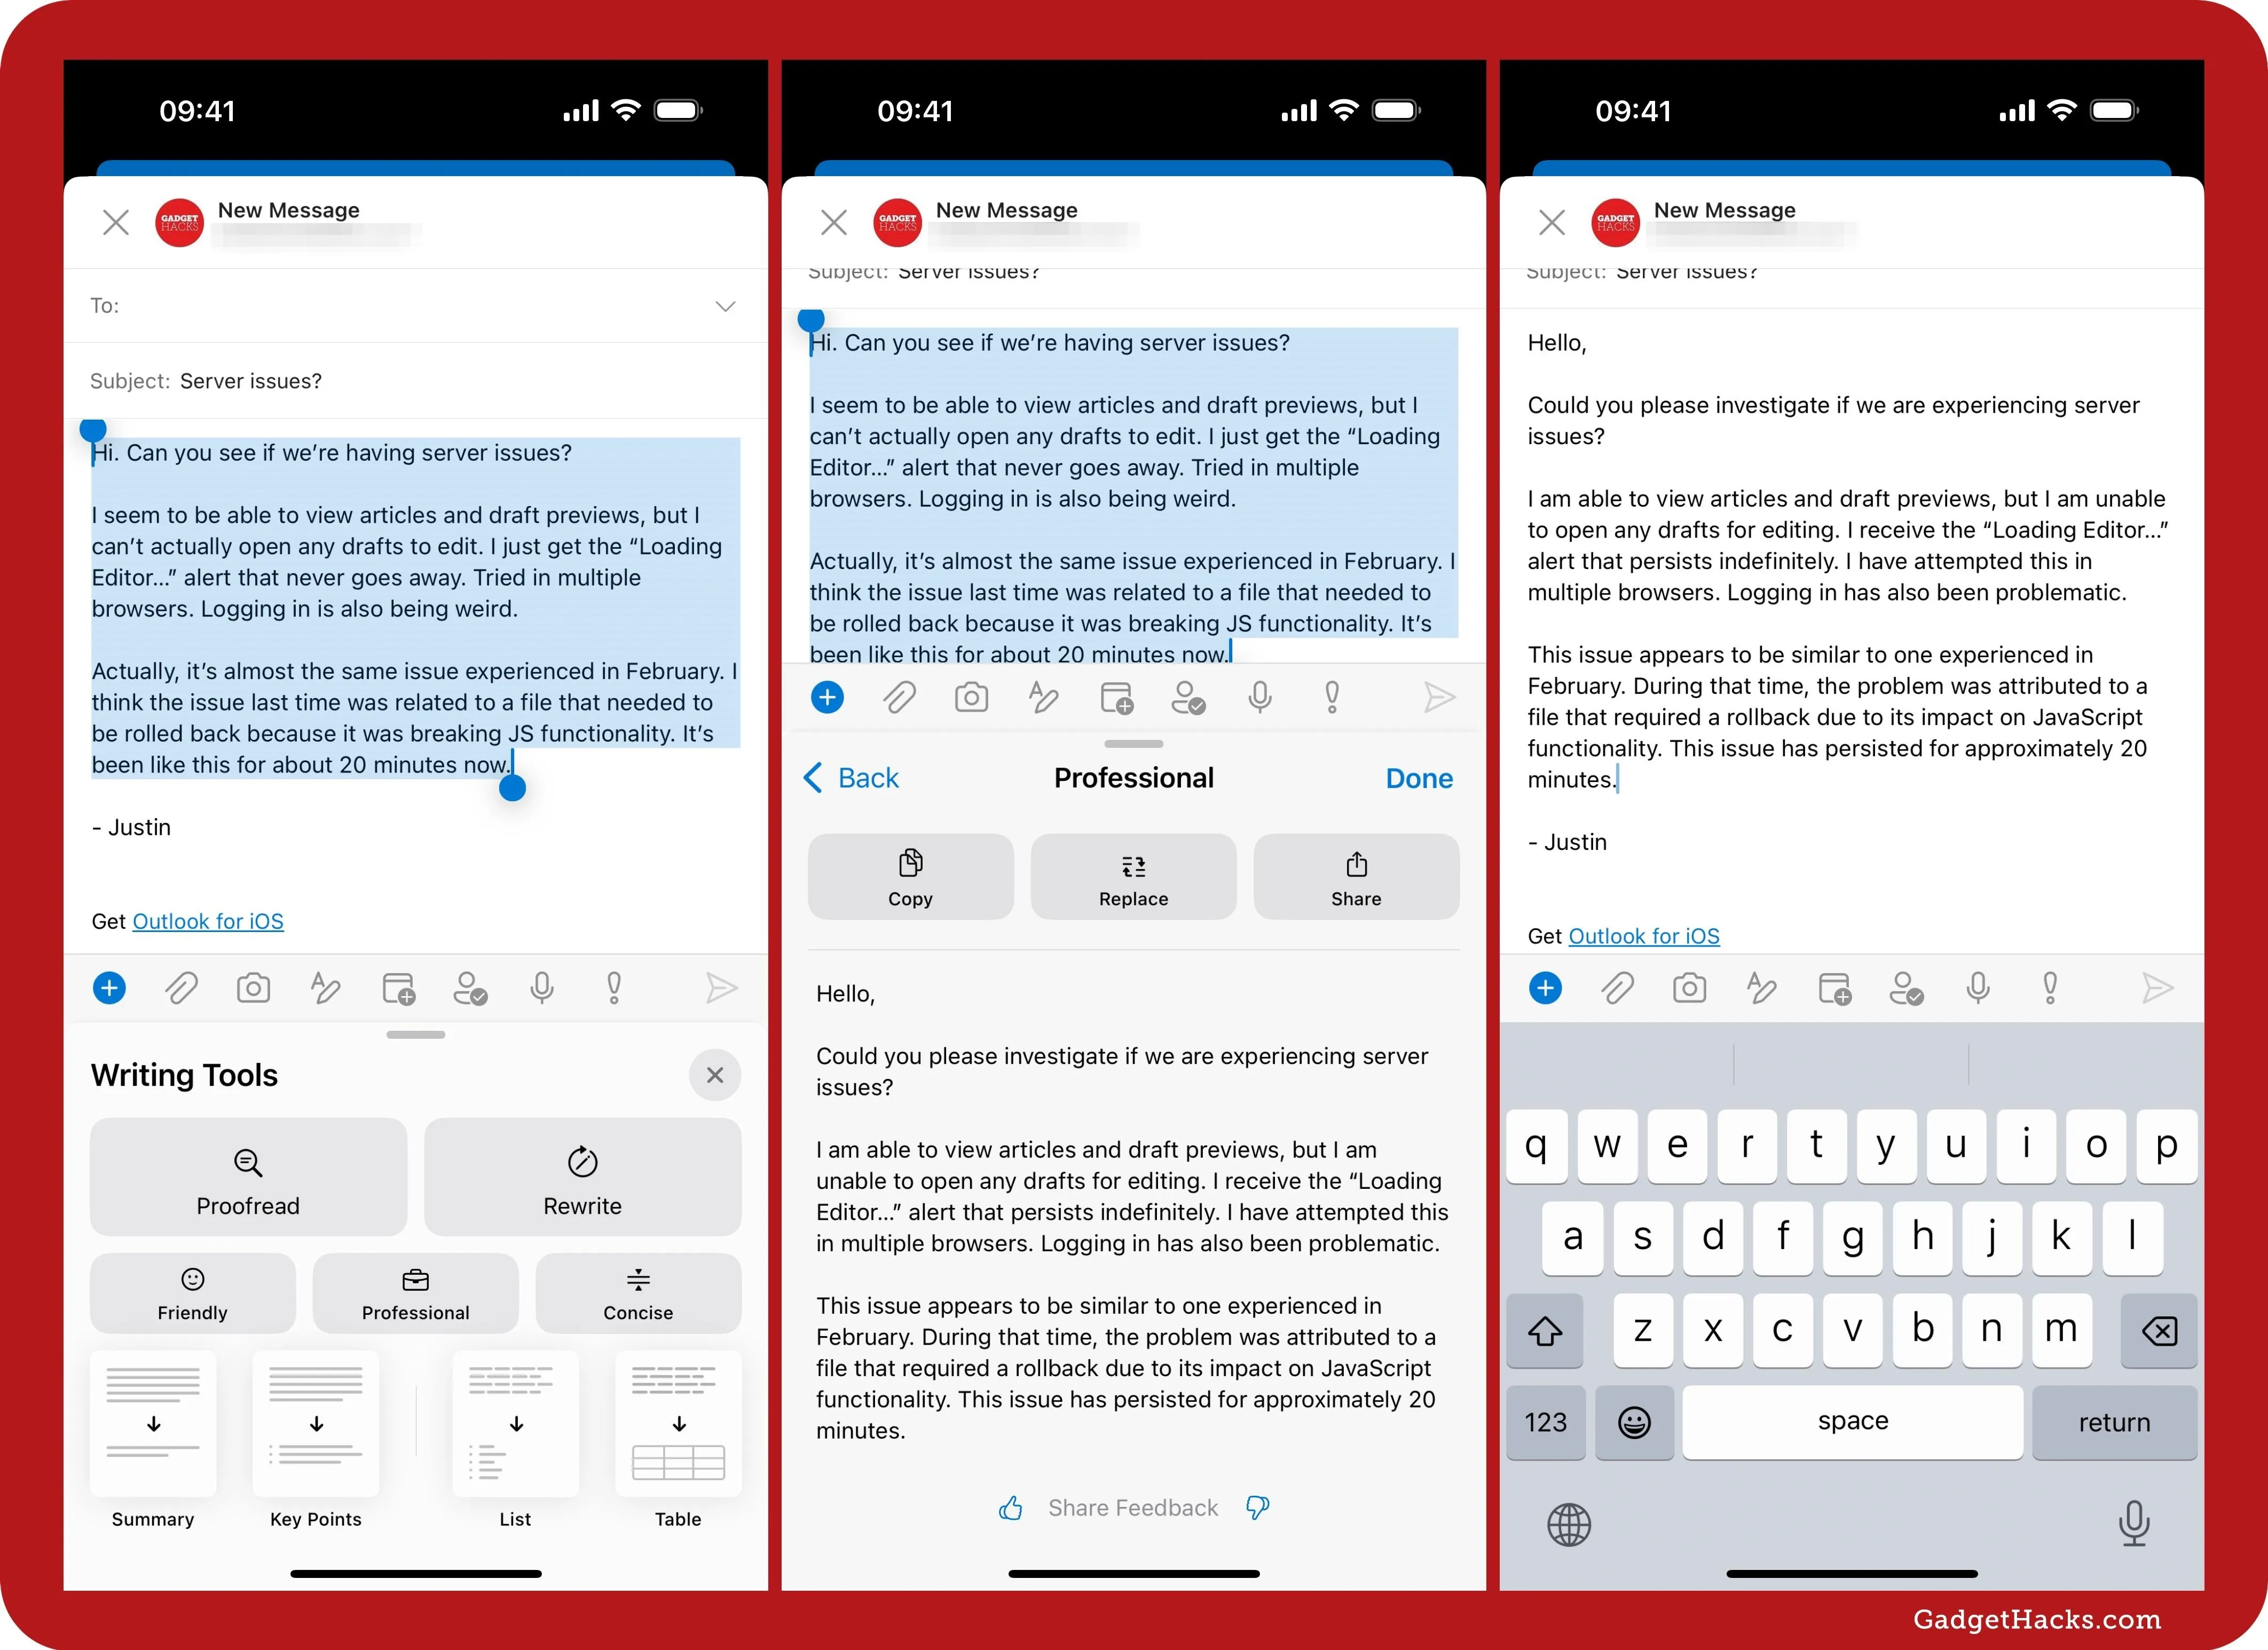
In apps like Outlook, you need to replace the original text manually.
Rewrite does a halfway decent job with your text, but remember, Writing Tools is still in beta, so Apple's still working out all the kinks.
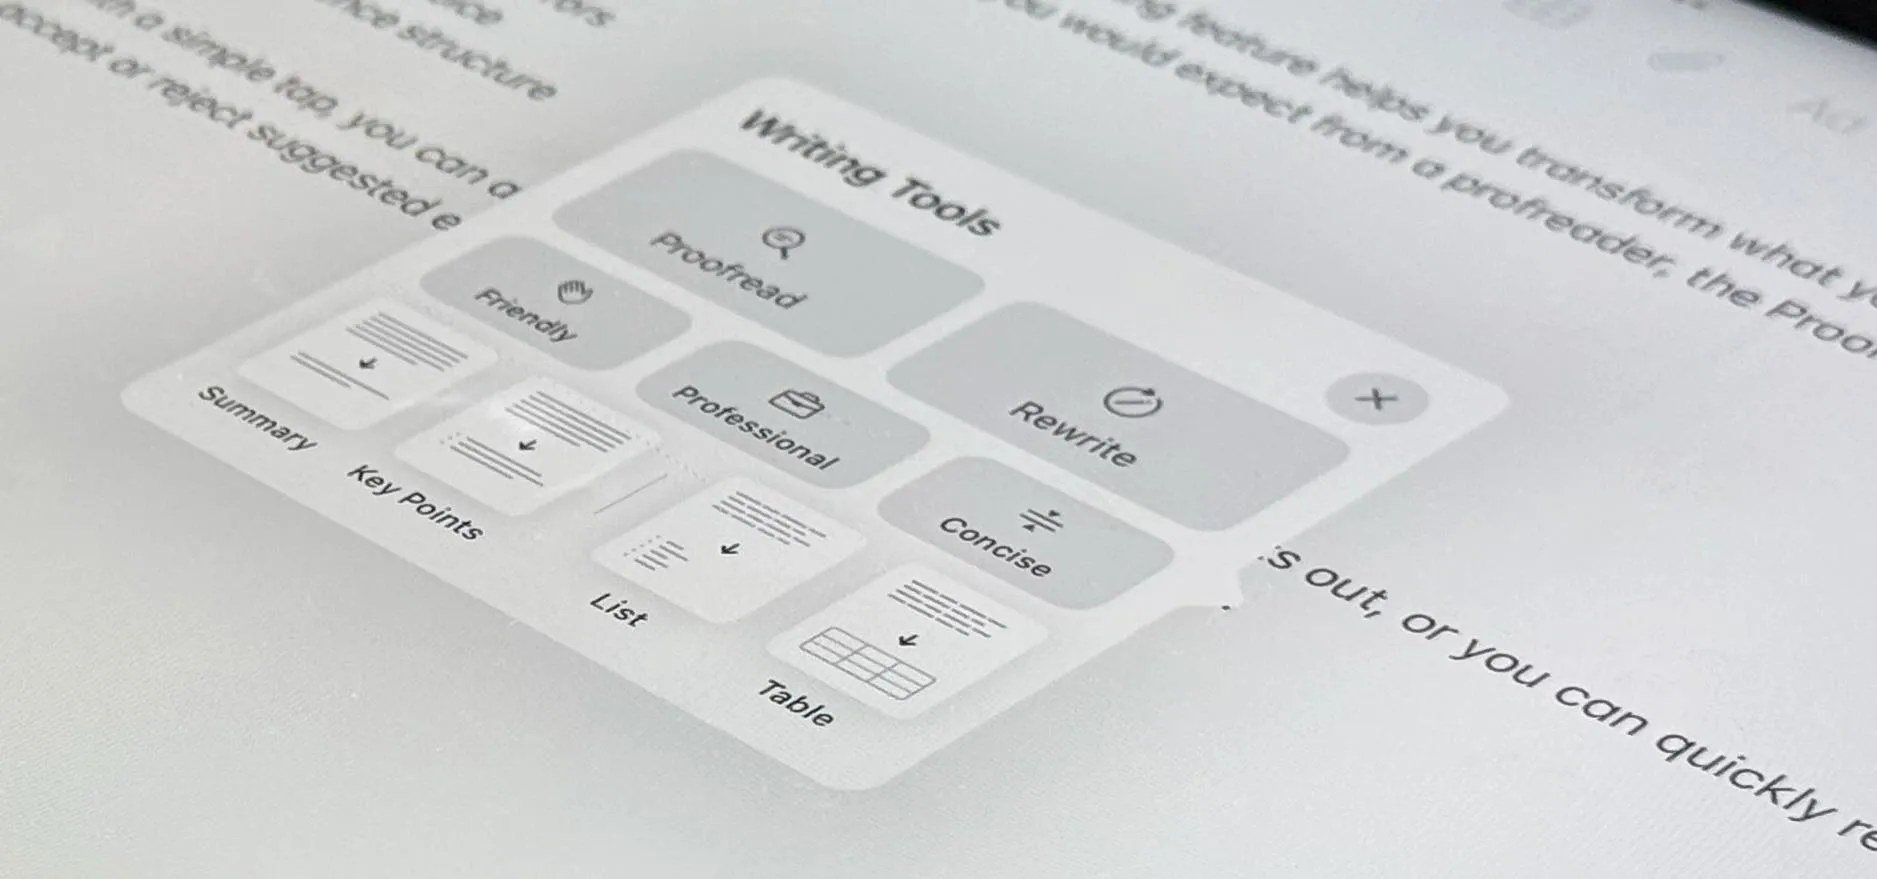
5. Summarize
The final Writing Tools option, Summary, has four different types of summaries available:
- Summary
- Key Points
- List
- Table
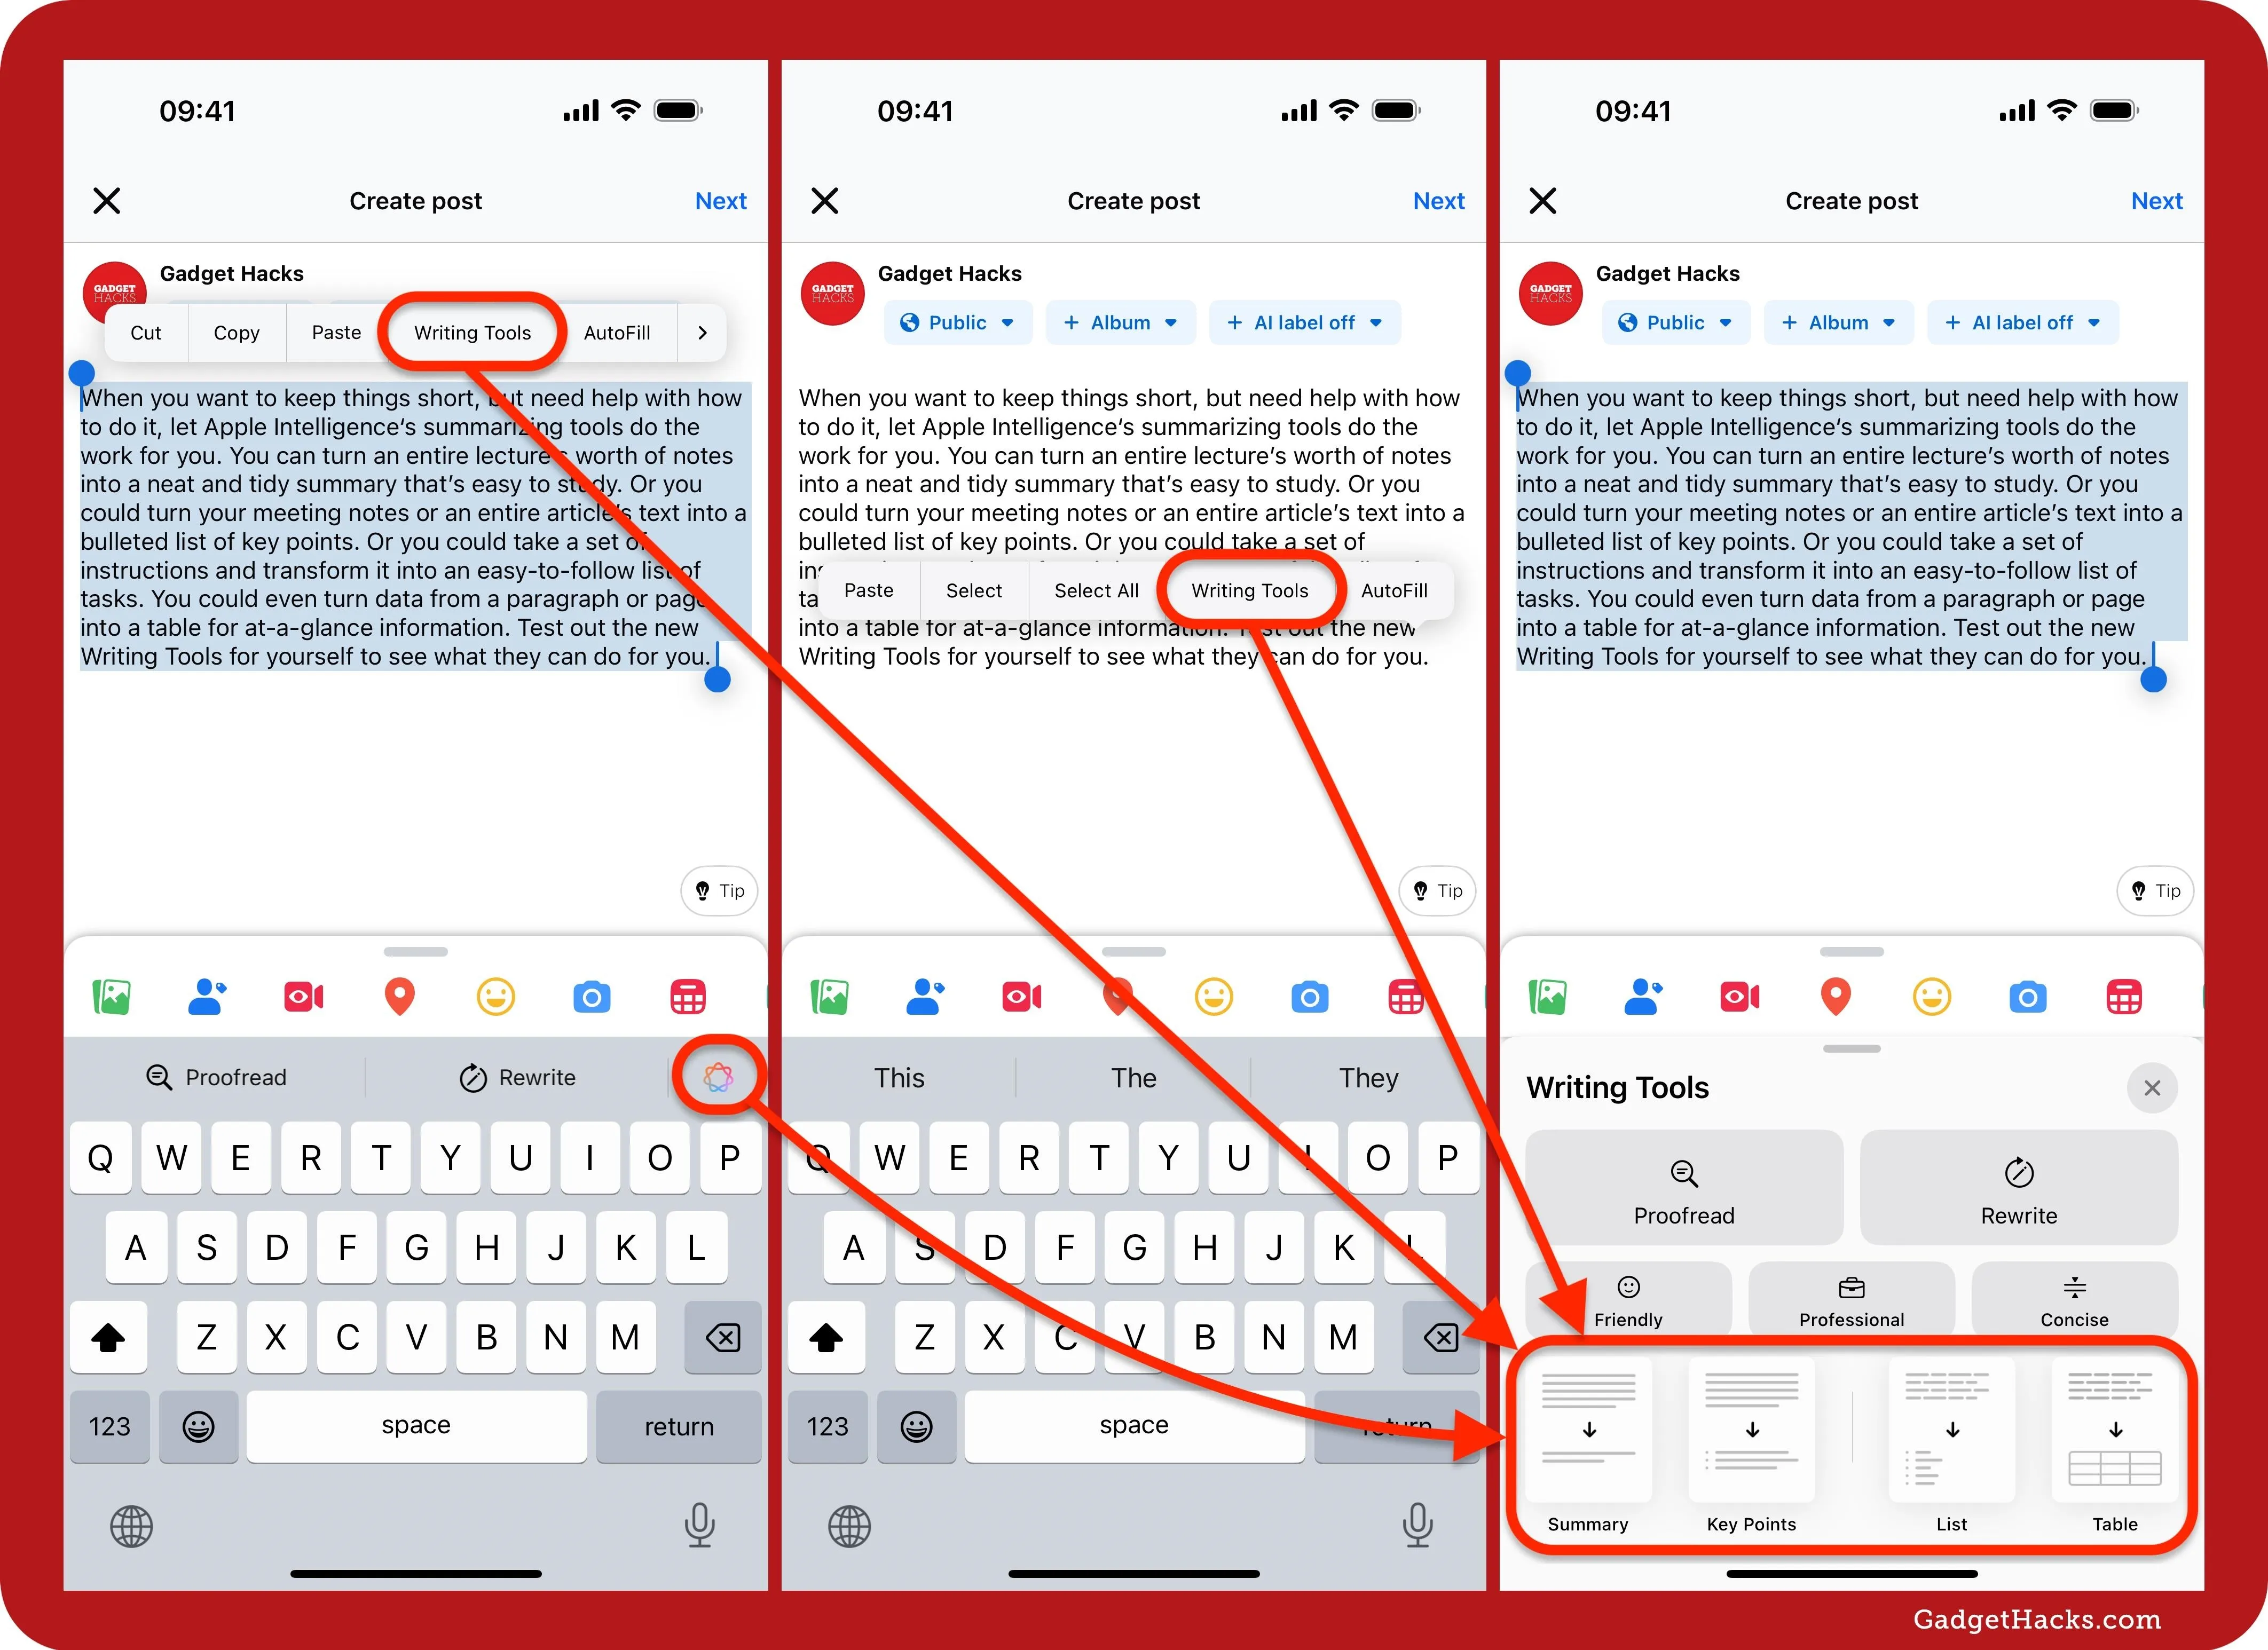
With enhanced language capabilities, you can turn an entire lecture's worth of notes into a neat and tidy one-paragraph summary that's easy to study. You could also turn your meeting notes or an entire article's text into a bulleted list of key points. Or transform a set of instructions into an easy-to-follow list of tasks. You could even turn data from a paragraph or page into a table for at-a-glance information.
There are various ways to get started with Summary:
- Select the text to summarize, tap the Apple Intelligence icon above the keyboard, and tap one of the Summary options to apply it to only the selected text.
- Select the text, tap "Writing Tools" from the context menu, and tap one of the Summary options to apply it to only the selected text.
- Tap any spot in the text to open the context menu, tap "Writing Tools," and then choose a Summary option to apply it to the whole document.
- In the Notes app, you can also select the text or tap any spot in the text, tap the Apple Intelligence icon in Notes' toolbar, and then choose a Summary option only to apply it to the selected text or the whole document. If you don't see Notes' toolbar, tap the plus (+) button to unhide it.
As with Proofread and Rewrite, Predictive Text does not need to be enabled on your device to see the bar above the keyboard with the Apple Intelligence icon. However, not all apps will show this bar. If you don't see it, use the context menu.
There are multiple ways to trigger the Summary tool on iOS/iPadOS.
On a Mac, you can select the text, click the Apple Intelligence icon next to it, and then hit one of the Summary options. Alternatively, right-click or Control-click the selected text, choose "Writing Tools" from the context menu, and then pick a Summary version. Or visit Edit » Writing Tools in the menu bar and either open the "Writing Tools" or use "Summary" right away.
What you see next also depends on the app you're using.
In most apps, the Summary tool shows you a preview of its summary without automatically replacing your original content, no matter which Summary option you choose. However, in some apps, like Notes, the Summary tool will automatically replace your original text sometimes and not other times.
Below, the "Summary" button was used in the Facebook app. You can choose to "Copy" or "Share" the summarization, or you can tap "Replace" to replace the original text with it.
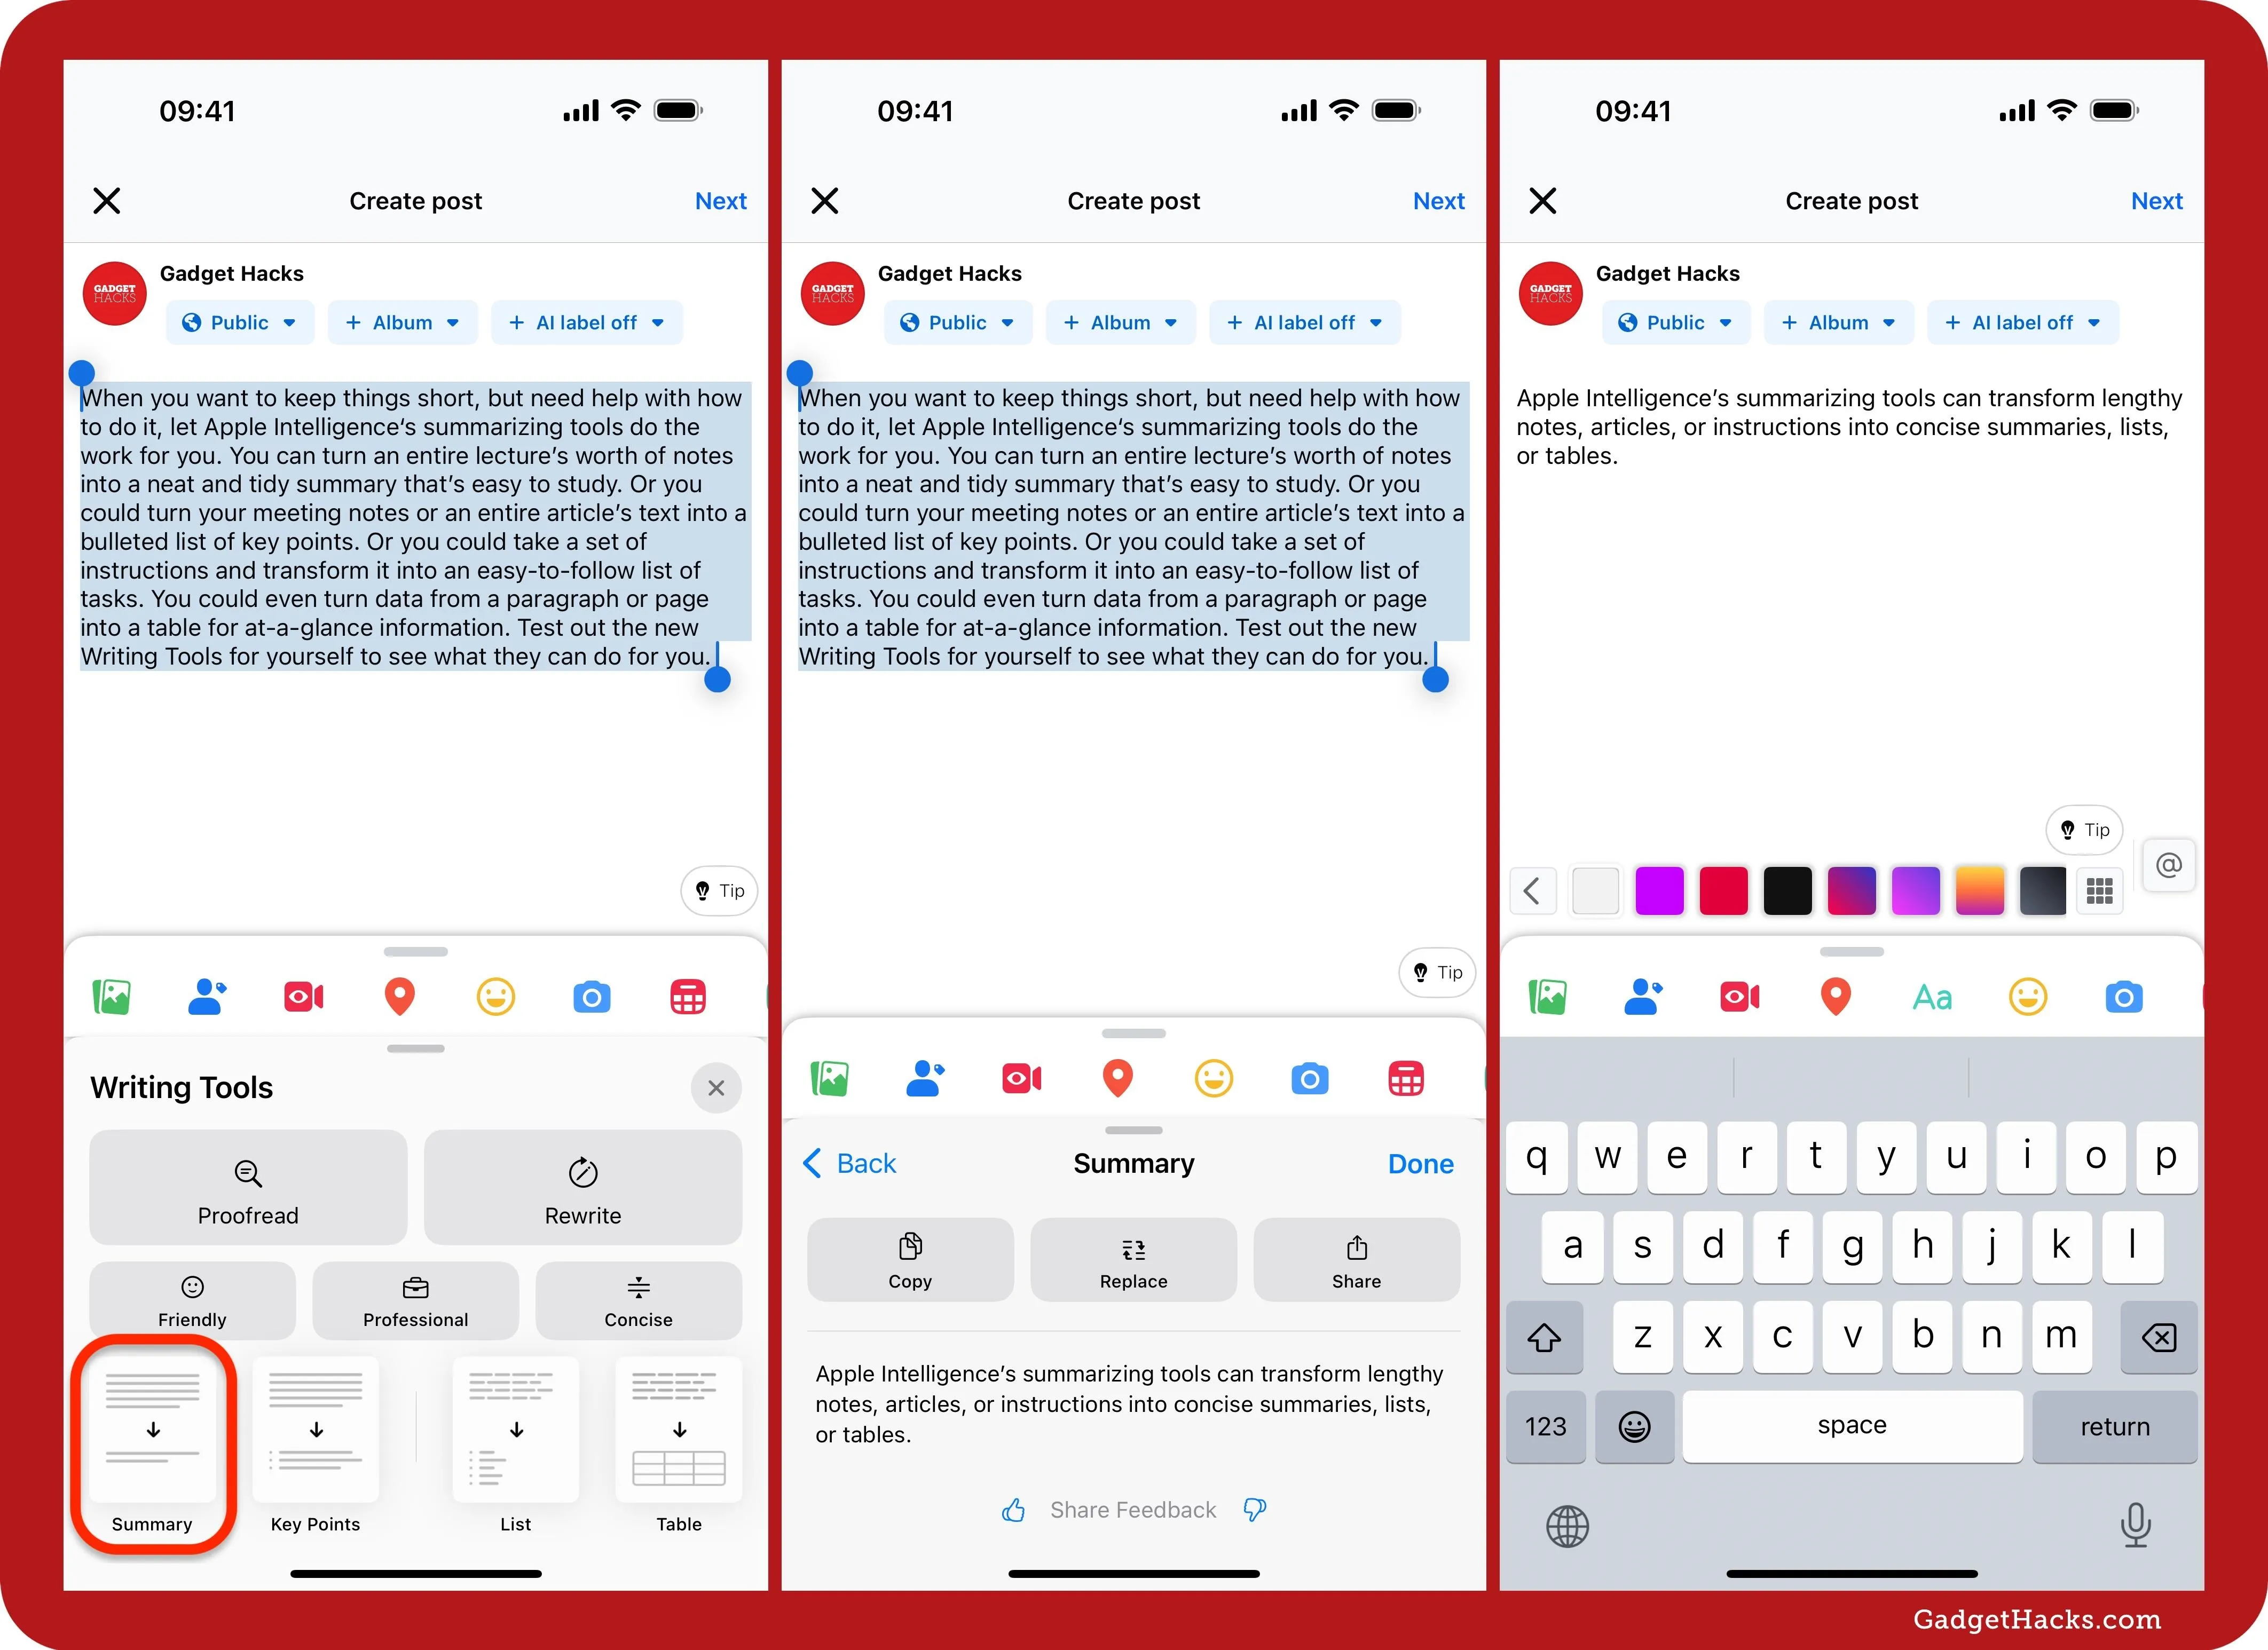
In apps like Facebook, you can try the Summary style.
Below, the "Key Points" button was used in the Facebook app. Like with Summary, you can choose to "Copy" or "Share" the summarization, or you can tap "Replace" to replace the original text with it.
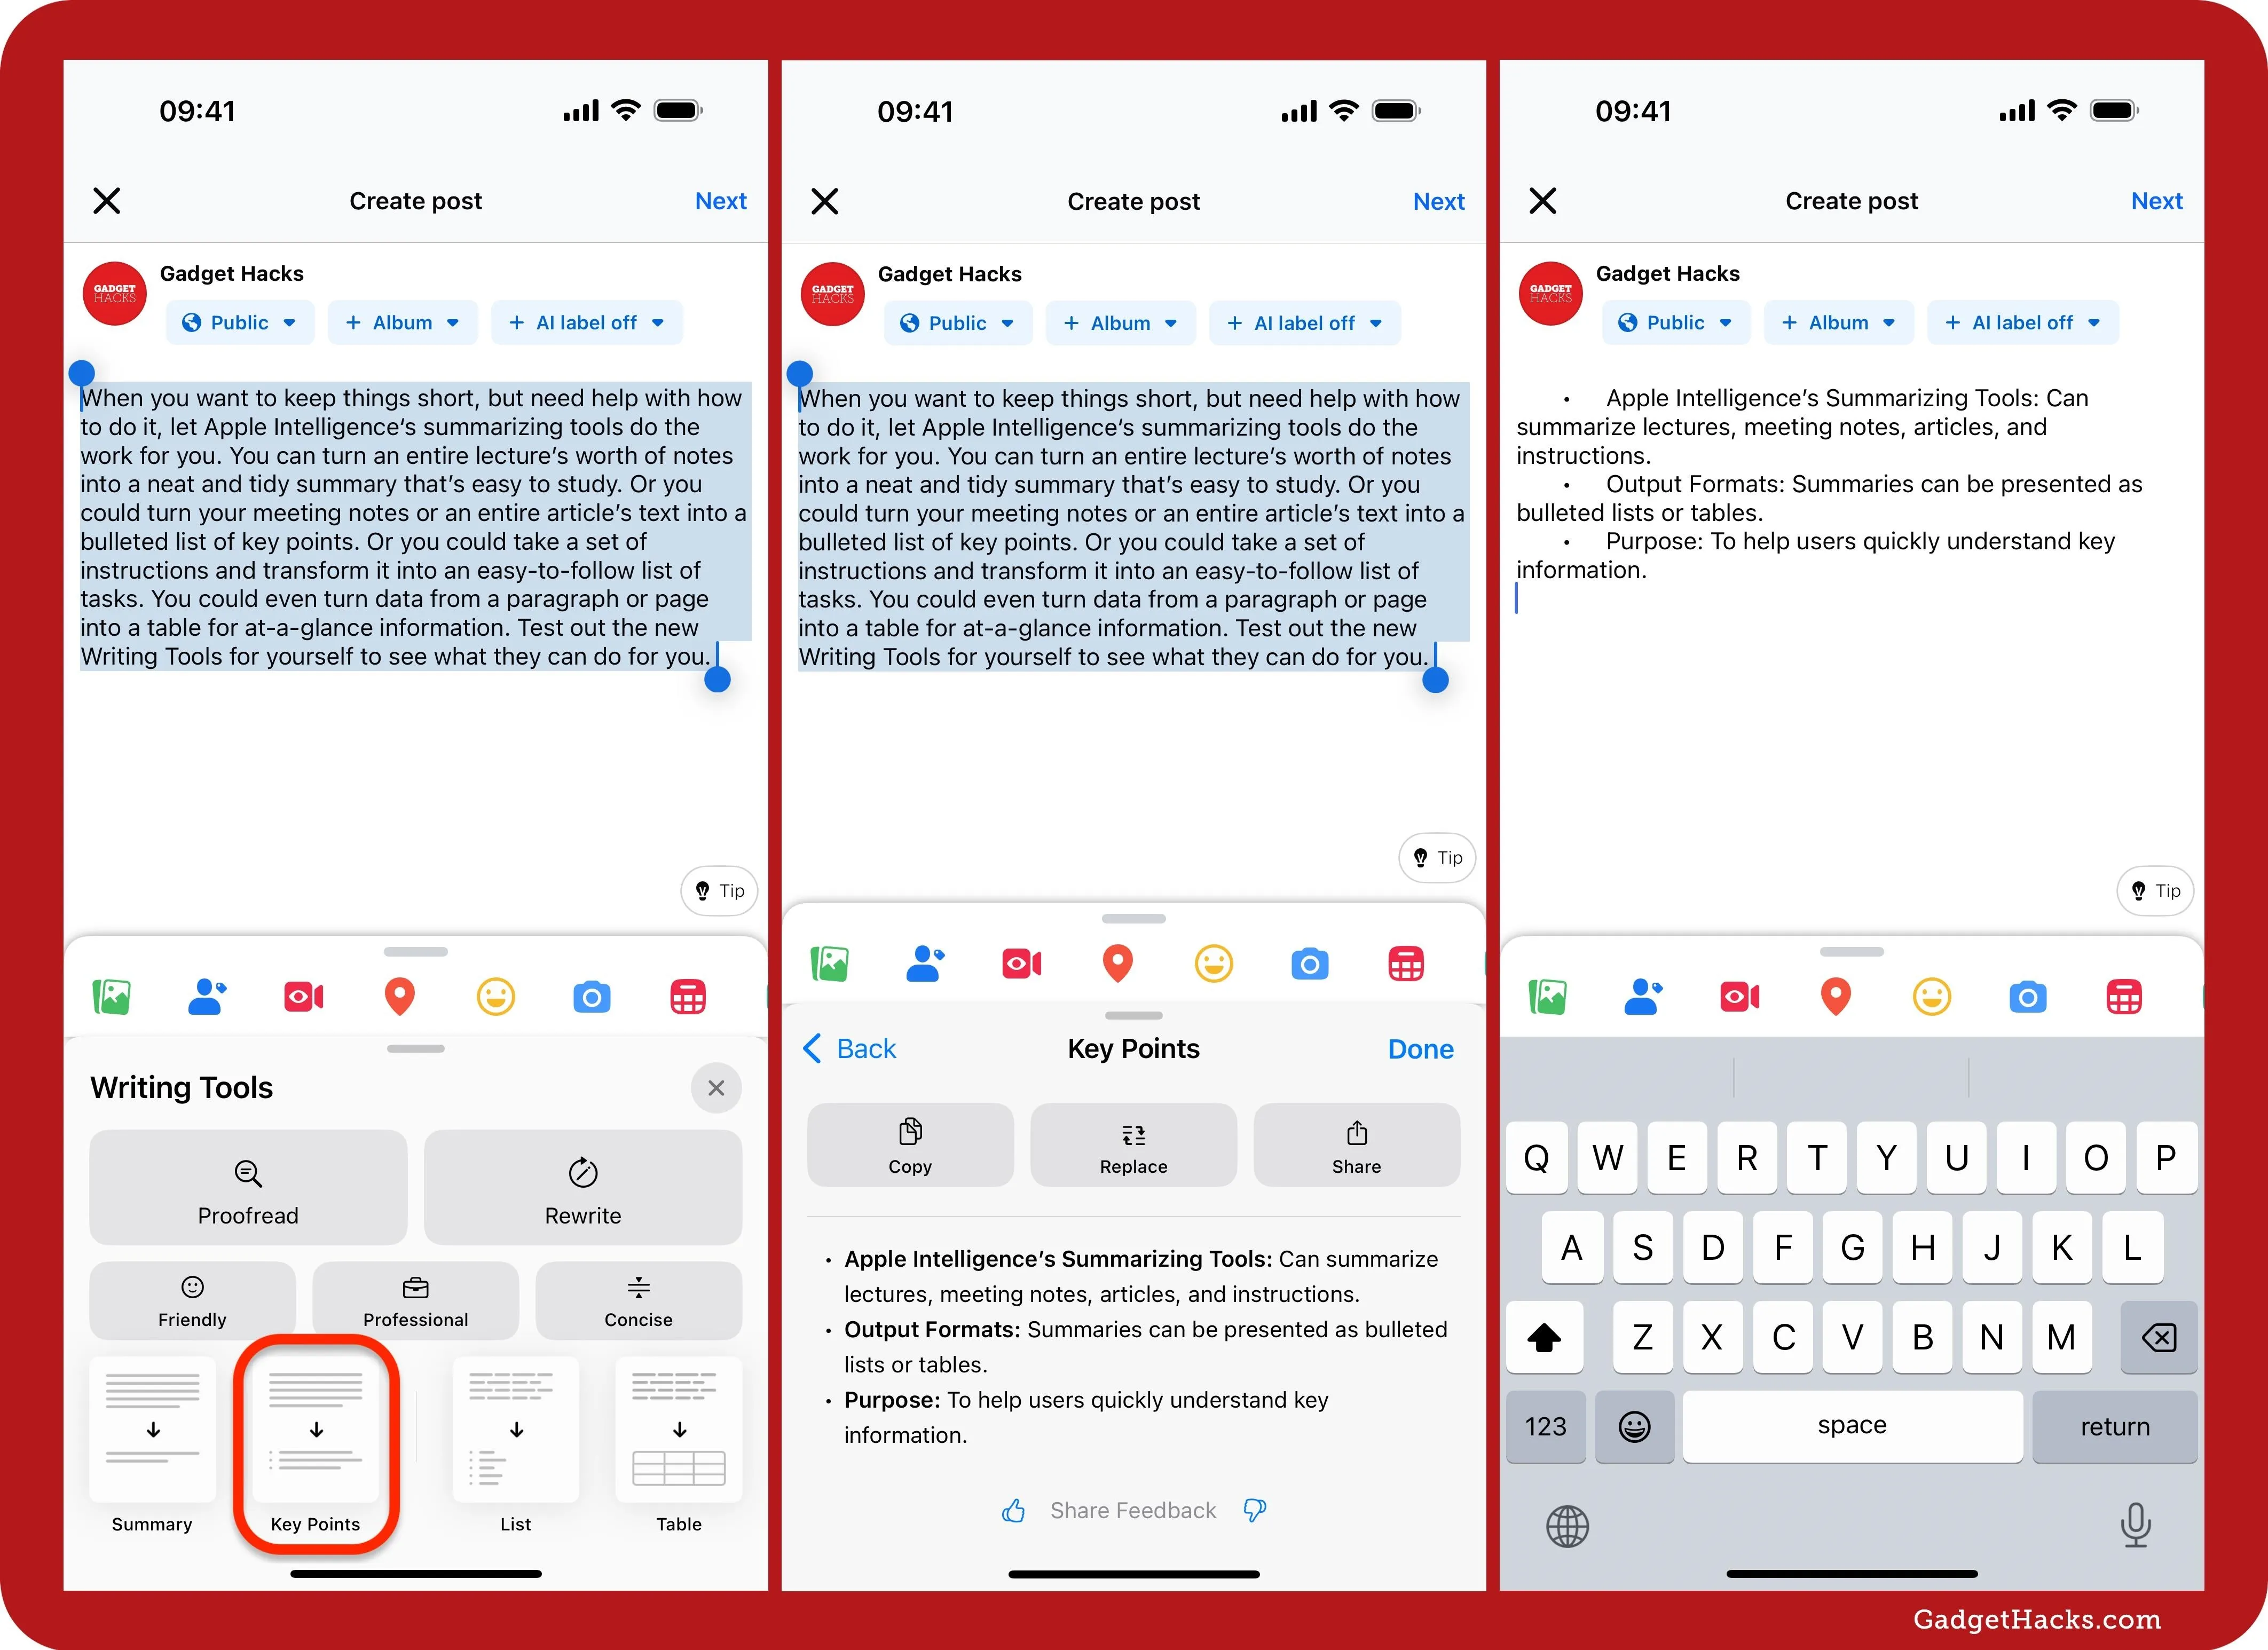
In apps like Facebook, you can try the Key Points style.
Below, the "List" button was used in the Facebook app. You can choose to "Copy" or "Share" the summarization, or you can tap "Replace" to replace the original text with it.
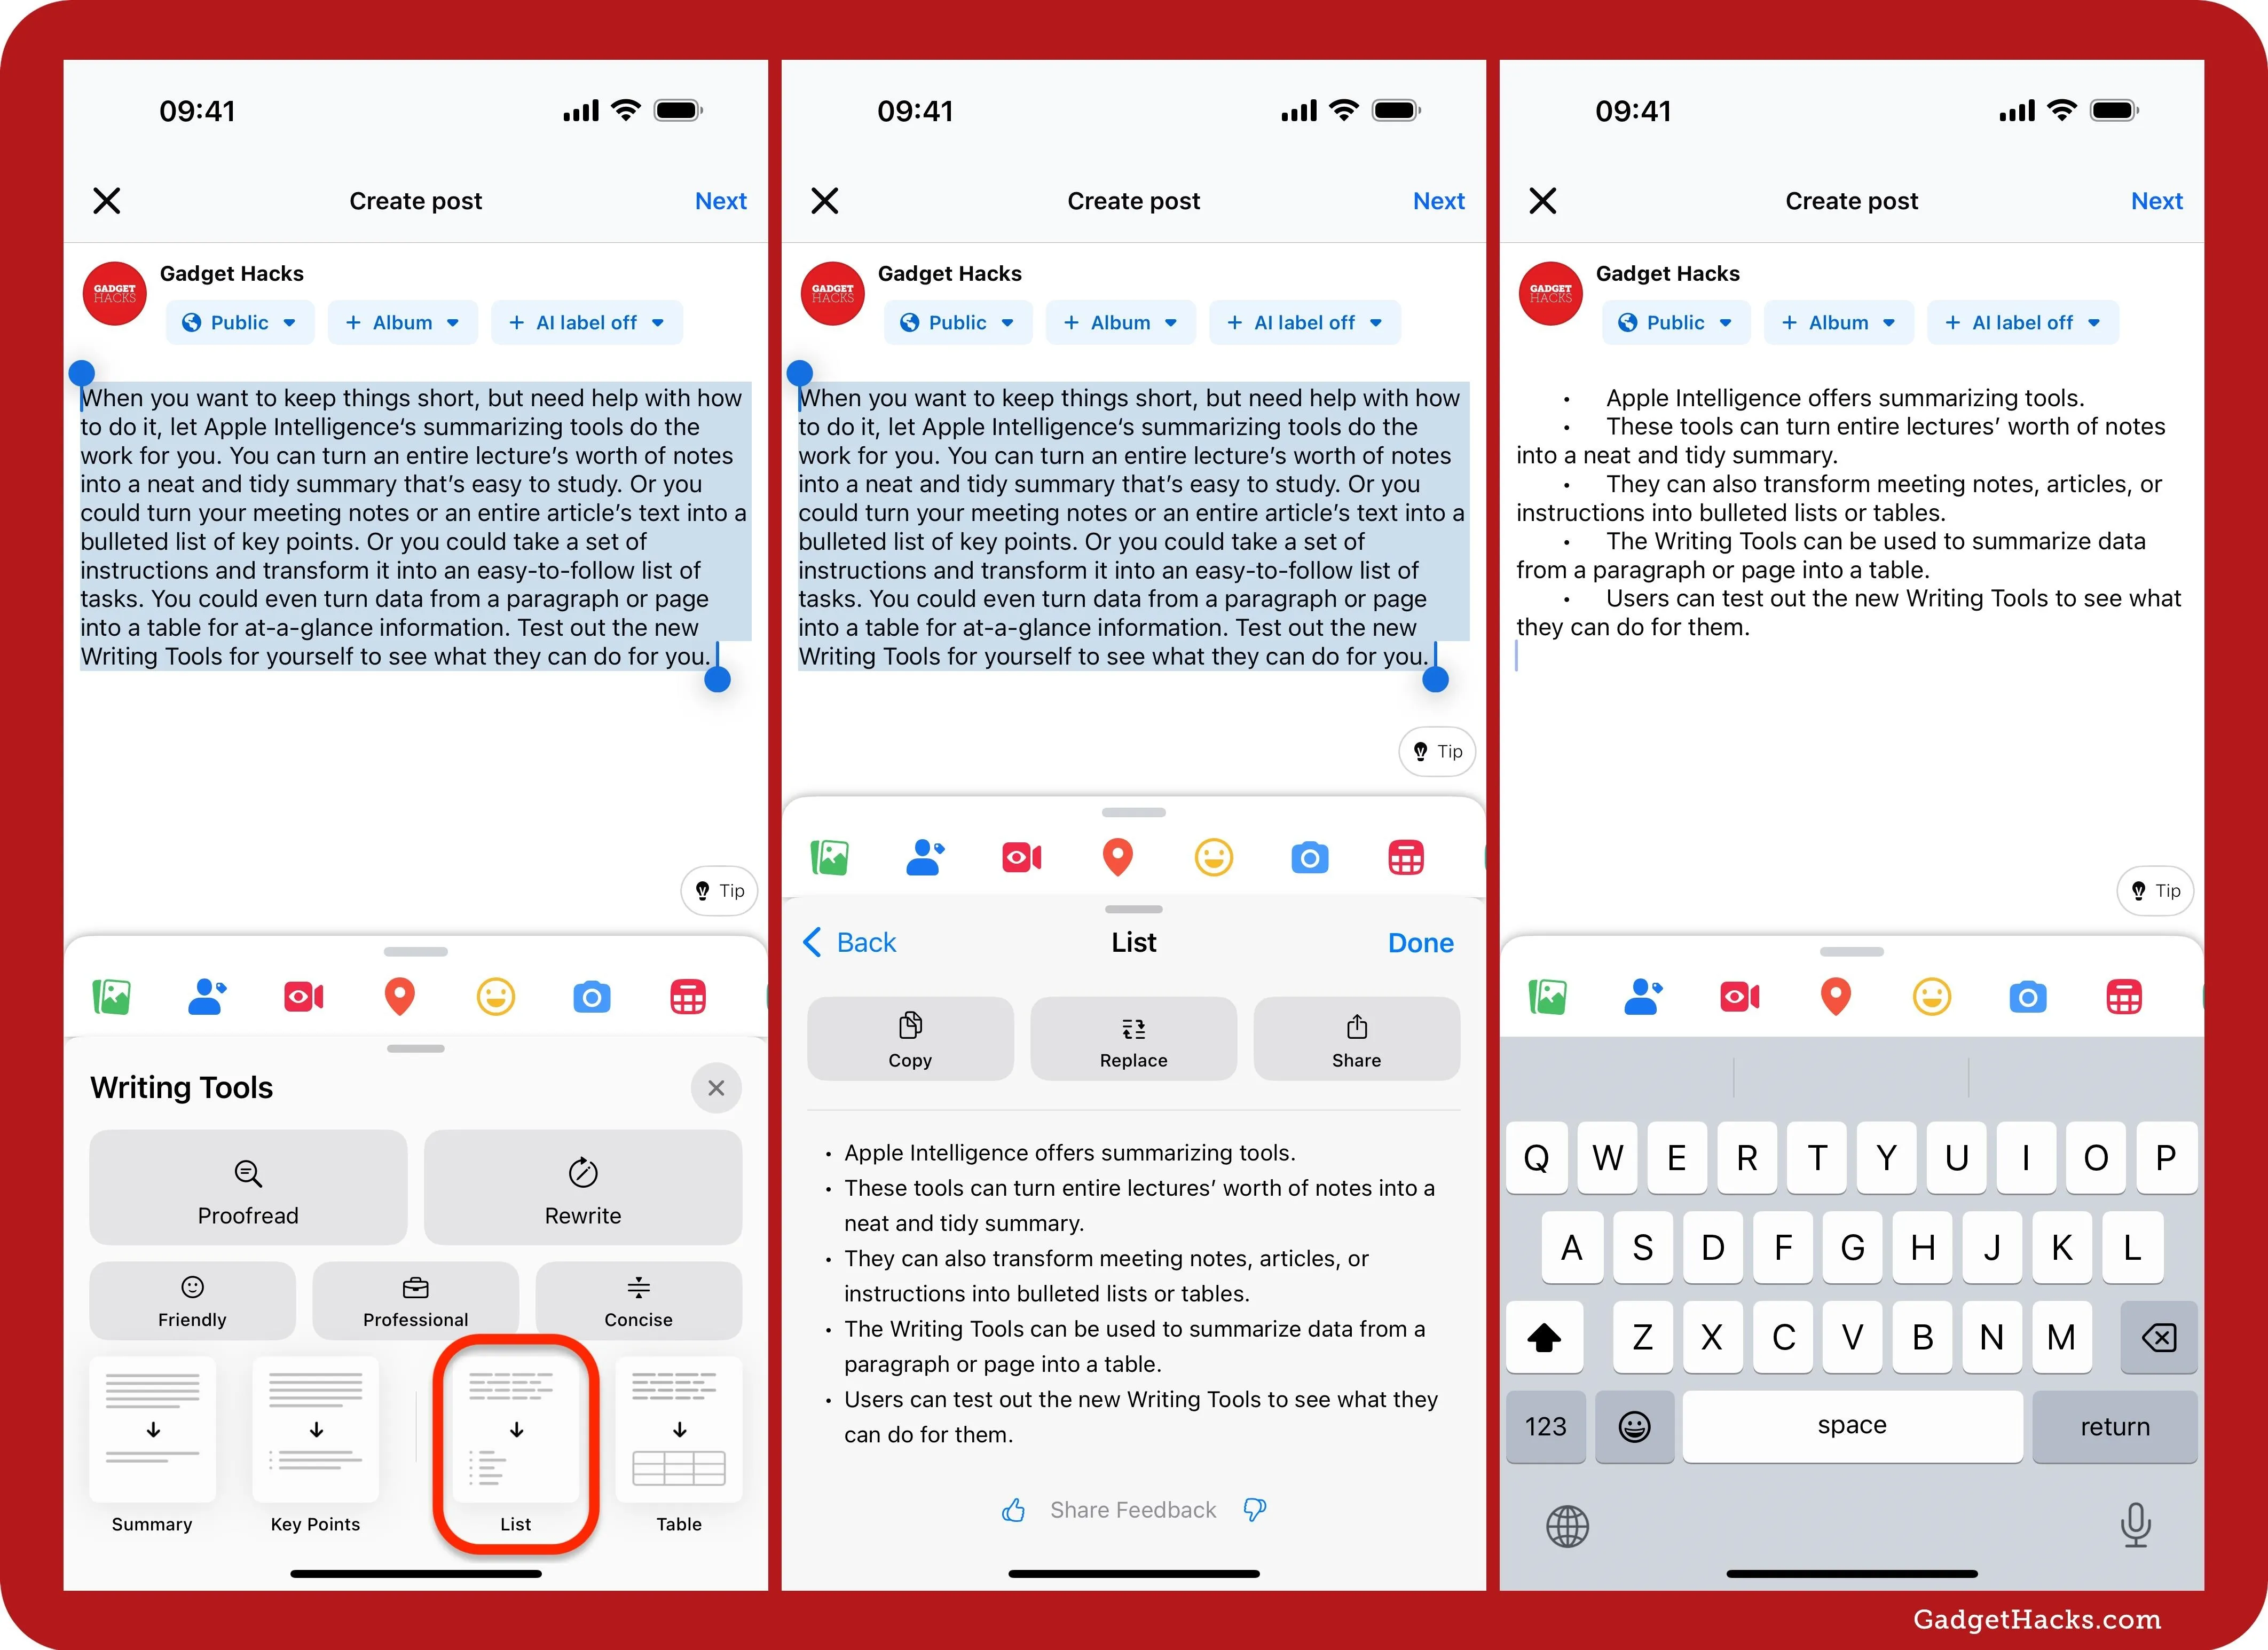
In apps like Facebook, you can try the List style.
In some apps, like Notes, List will automatically replace the original text. You can compare the two versions using the "Original" button. Hit "Done" to save or "Revert" to change it back.

The List style works better in apps like Notes.
And finally, we have the "Table" button. If a table can't be made or inserted into the app you're using, you'll only see options to "Copy" or "Share" the summarization. When a table can be inserted, it will instantly replace the original text, and you can use the "Original" button to compare the two. Hit "Done" to save or "Revert" to change it back.
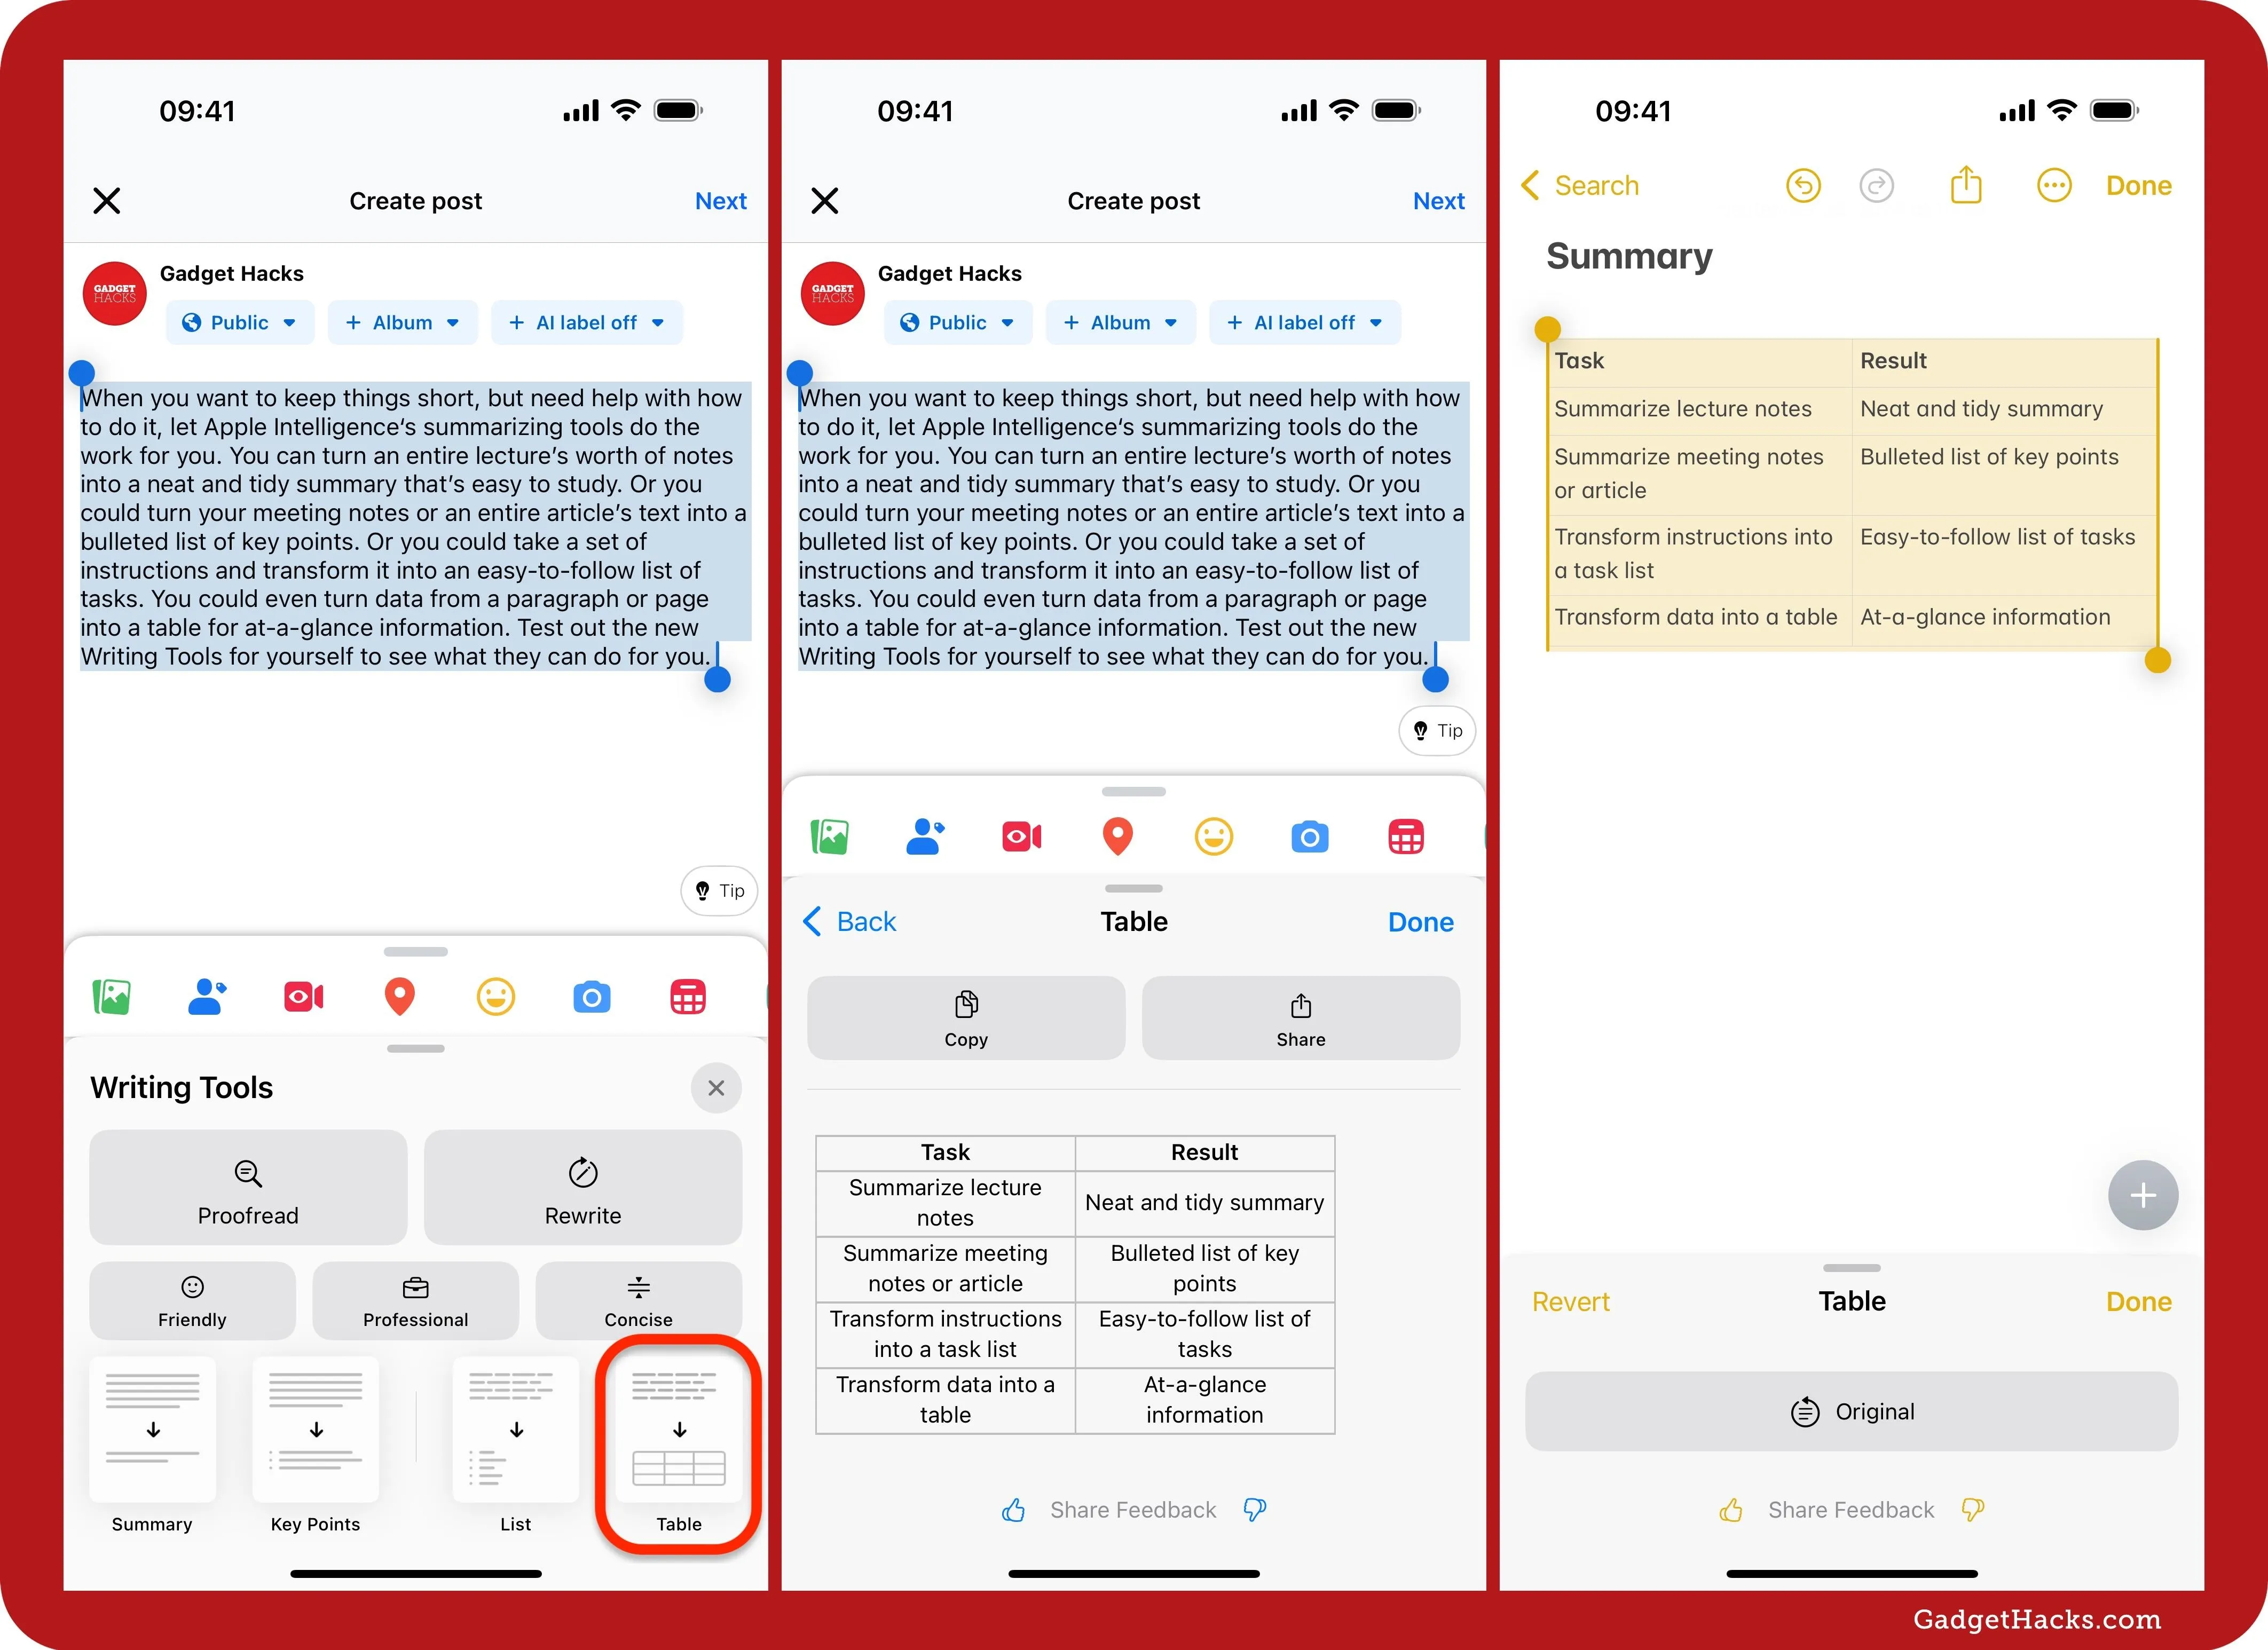
In apps like Facebook, you can try the Table style, but it works better in Notes.
The results you get with Summary will all depend on what you're trying to summarize. As you can see, a table doesn't really do any good in my example above. However, things will only improve as Apple continues to refine its Writing Tools feature.
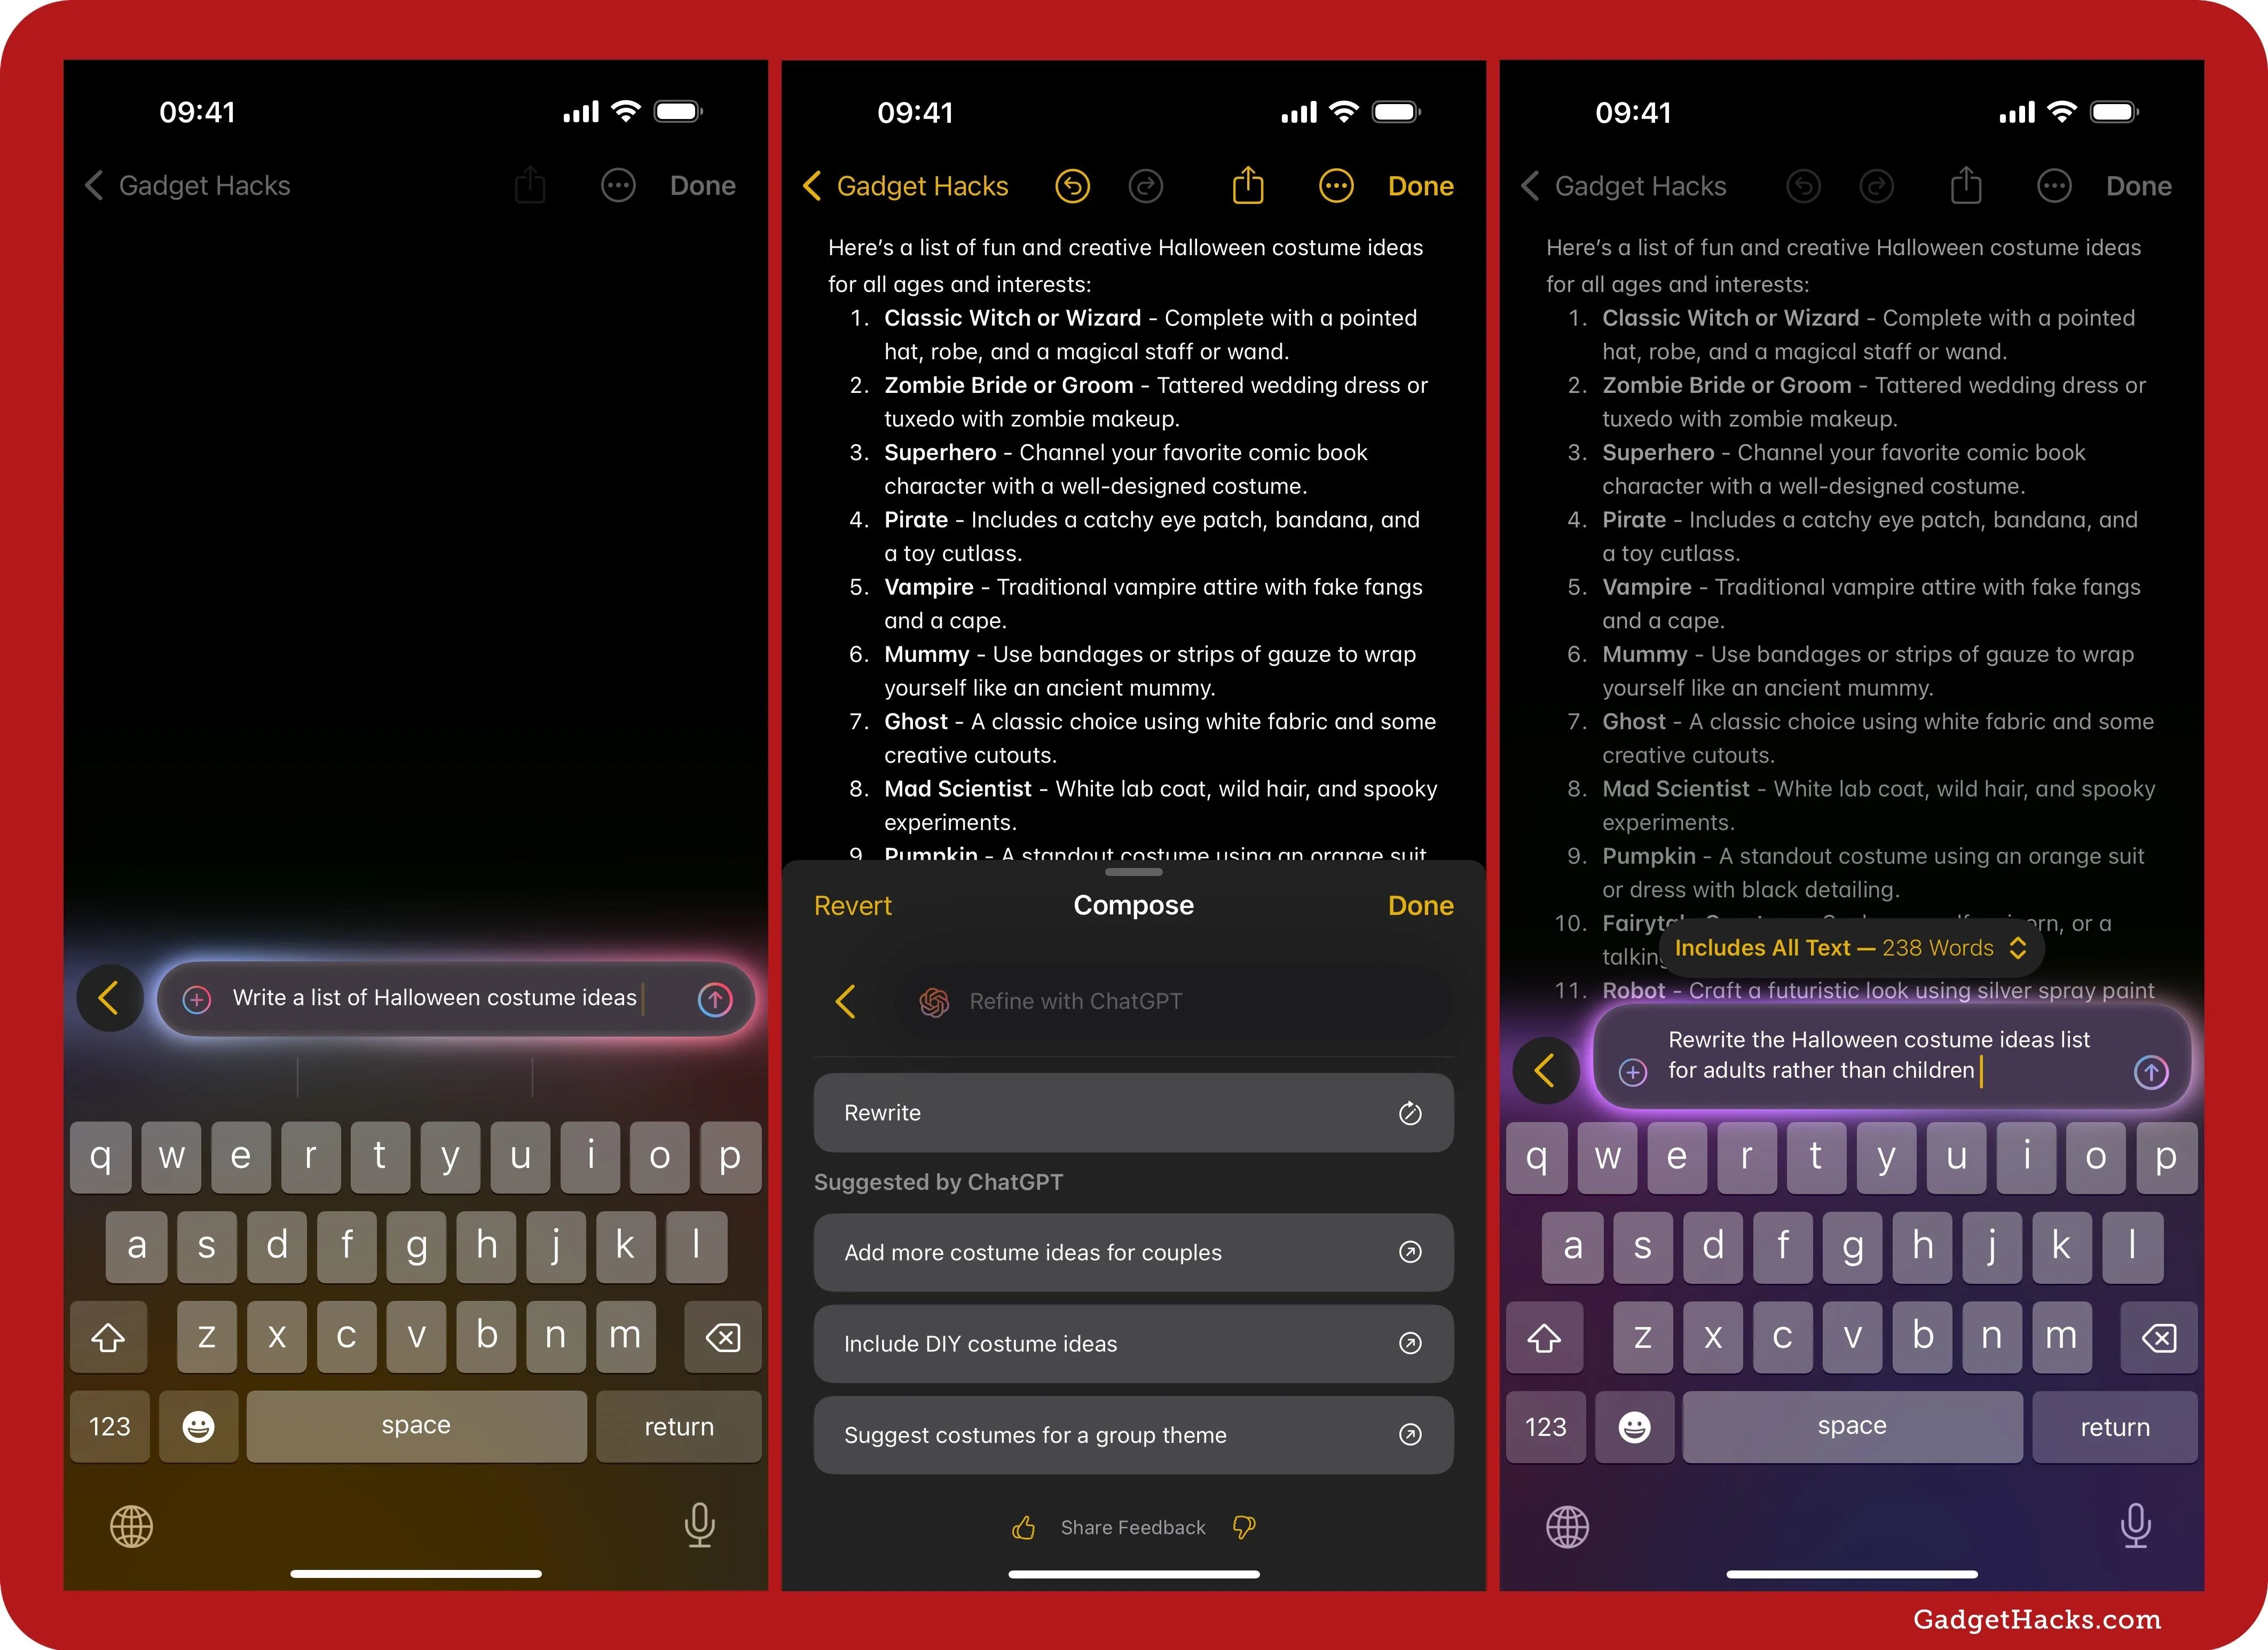
6. Compose with ChatGPT
ChatGPT, powered by GPT-4o, is not yet built into Writing Tools, but it's expected to join the other options later this year in iOS 18.2, iPadOS 18.2, and macOS Sequoia 15.2, which are currently in beta. When it does become available, you'll see a "Compose" option in the Writing Tools, which will help you generate unique content for anything you need to write about. The feature will also give you access to ChatGPT's image creation tools, allowing you to create images to complement your writing.
Privacy protections are built in for users who access ChatGPT — their IP addresses are obscured, and OpenAI won't store requests. ChatGPT's data-use policies apply for users who choose to connect their account.
ChatGPT will be available to everyone for free without creating any special accounts. If you subscribe to ChatGPT, you can connect your account to access advanced paid features.
- Full Guide: How to Generate Text, Images, and Insights with Apple Intelligence's Built-in ChatGPT Integration
Cover photo, screenshots, and GIFs by Justin Meyers/Gadget Hacks (unless otherwise noted)


Comments
Be the first, drop a comment!