


Your iPhone is fairly secure by default, but Apple's Lockdown Mode takes it to Fort Knox levels of protection. If you're a high-value target for spyware, phishing attempts, and other sophisticated cyberattacks, it's an essential feature. But for almost everyone else, it's an extreme move. If you simply want to verify someone's identity when chatting, Contact Key Verification is a more practical option.
Contact Key Verification is an additional layer of security that can further protect your already end-to-end encrypted iMessage conversations. With it, you can verify iMessage contacts to ensure you're really chatting with them and not any imposters. This is done using public keys. You'll receive the contact's public key to verify them, and you'll send them yours so they can verify you. It's that simple.
Public keys are tied directly to each user's Apple ID and are only for use with the Contact Key Verification system. If you already have someone in your contacts with the correct email address or phone number, you'll be able to see their public key in the settings for your iMessage conversation. But you'll still have to verify them by comparing and matching the public verification code with the one shared by the contact.
When the system detects an anomaly, you'll receive an alert and a potential reason, such as the contact disabling Contact Key Verification, an unrecognized device appearing on the contact's account, a system outage, or a sophisticated attack against iMessage servers.
After receiving an alert, you can stop messaging the contact until you can reverify them. You can also just ignore it. But that's not a good idea if there are sensitive topics you'll be discussing in future chats with the contact.
Requirements
Before you begin, you should know the prerequisites for using Contact Key Verification. First, it's available on all of the following devices and software versions:
- iOS 17.2 or later for iPhone
- iPadOS 17.2 or later for iPad
- watchOS 10.2 or later for Apple Watch
- macOS 14.2 or later for Mac
- visionOS 1.1 or later for Apple Vision Pro
Devices signed in to iMessage with your Apple ID must be running the software listed above. Contact Key Verification will let you know during setup if they aren't. You're also required to:
- Be signed in to iCloud and iMessage with the same Apple ID.
- Have iCloud Keychain turned on on all devices.
- Use two-factor authentication for your Apple ID.
- Have a passcode or password for all of your devices.
Once you've met these requirements, you can begin using Contact Key Verification. Note that the instructions below use iOS as an example, but the process is nearly identical to that of iPadOS. It's also very similar on macOS. However, while supported, you cannot yet set up or manage Contact Key Verification settings on watchOS or visionOS.
Enabling Contact Key Verification in Settings
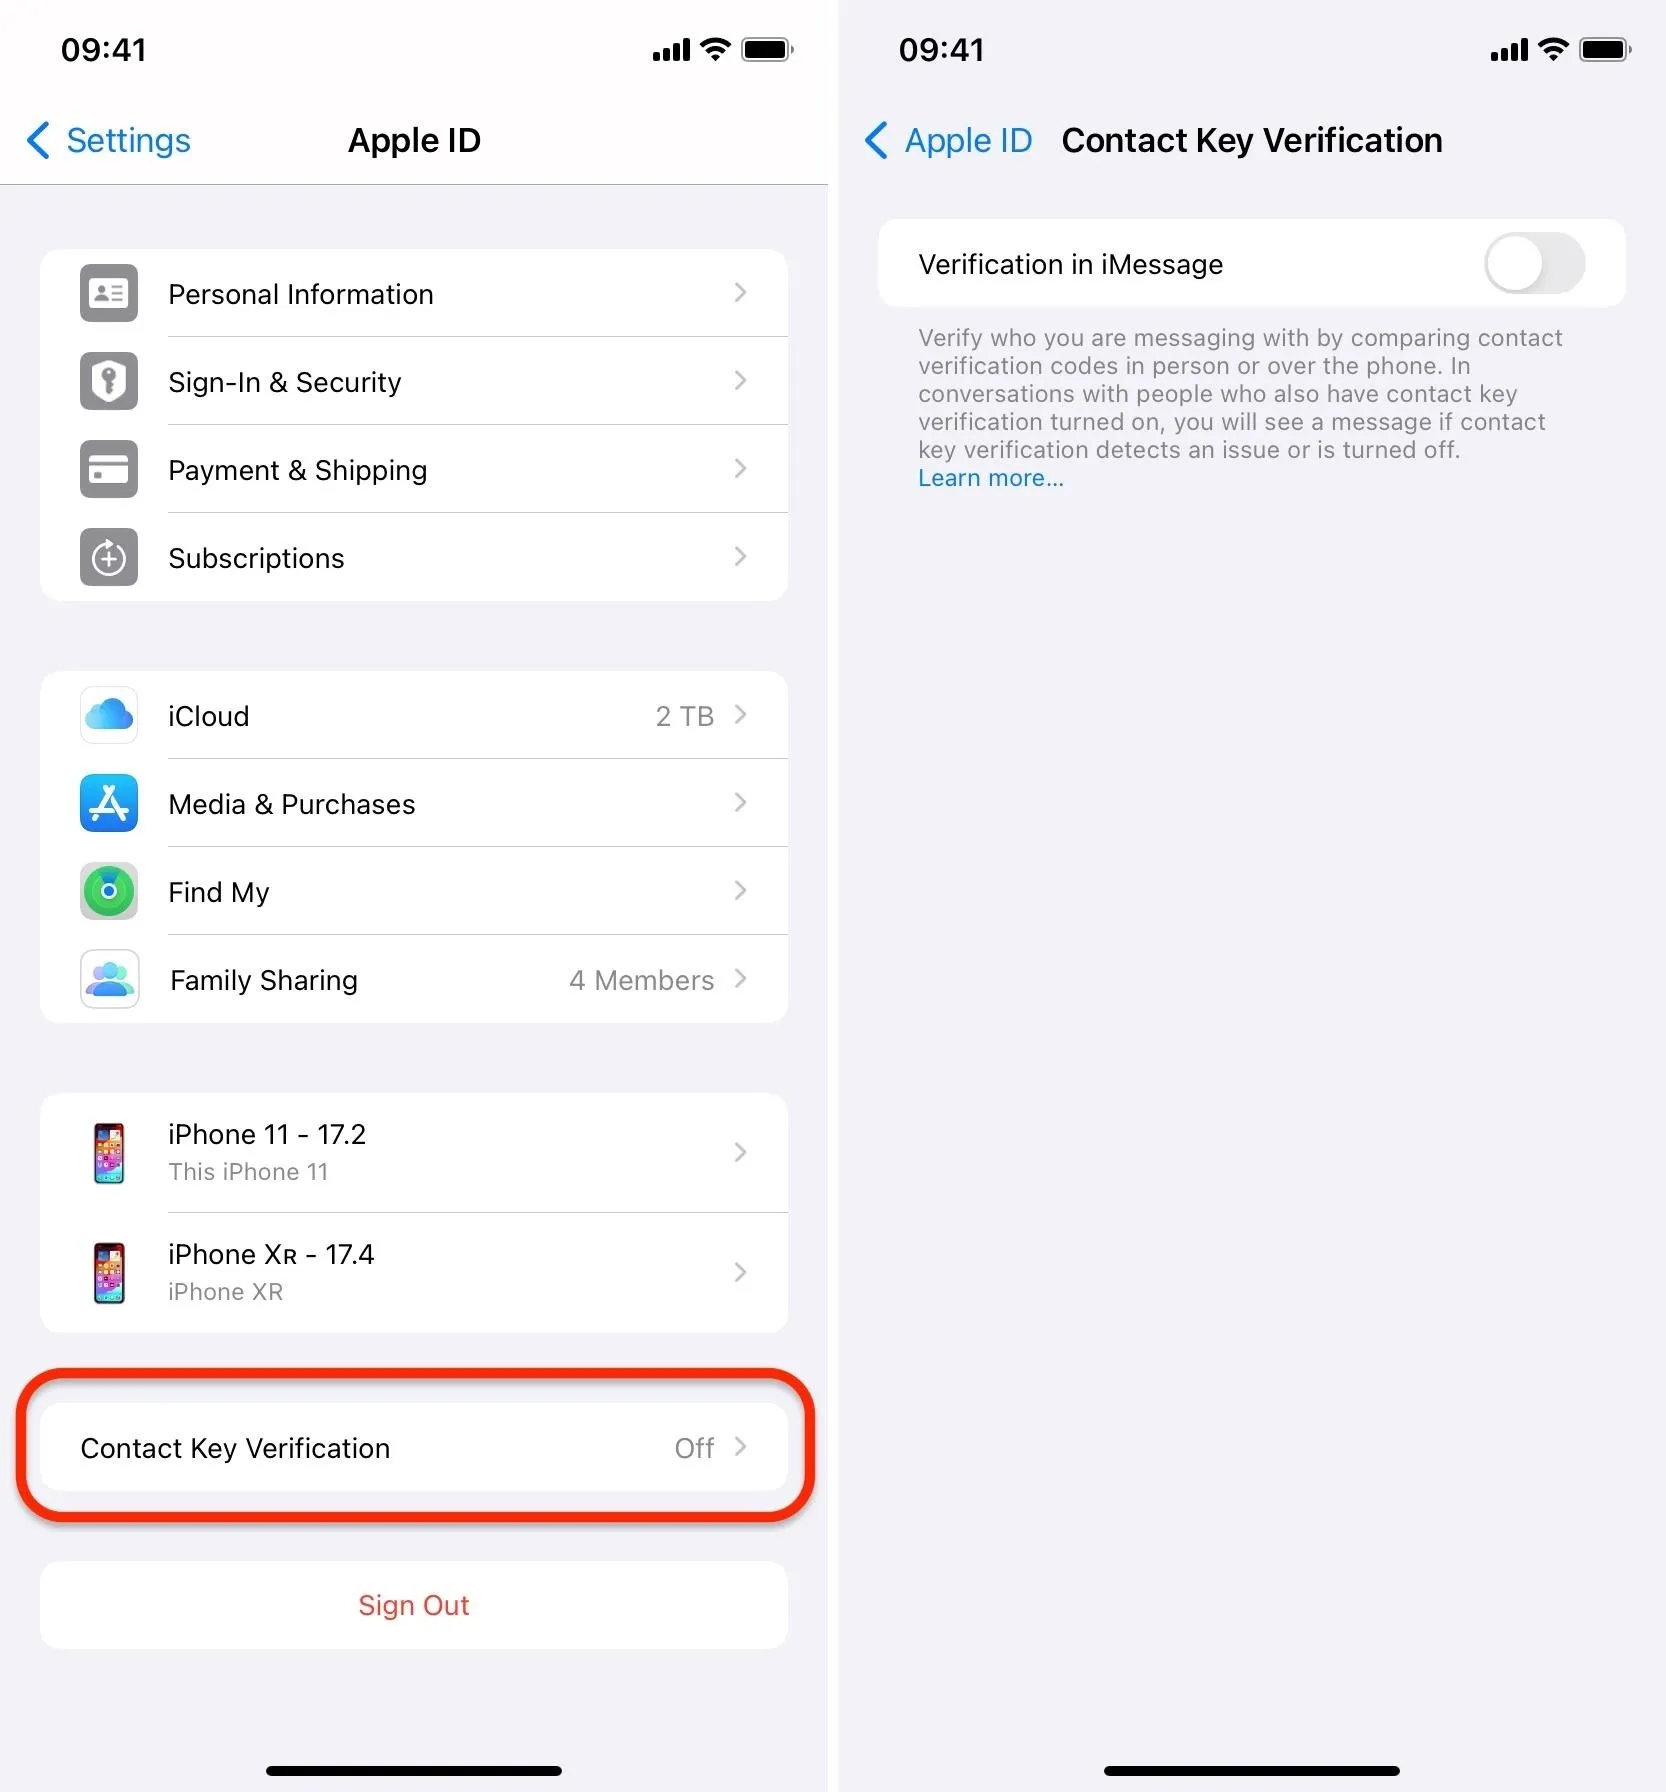
Contact Key Verification is not on by default, so you'll have to flip the switch in the Settings app. So, navigate to Settings » Apple ID [your name] » Contact Key Verification. Then, simply toggle on the "Verification in iMessage" switch.
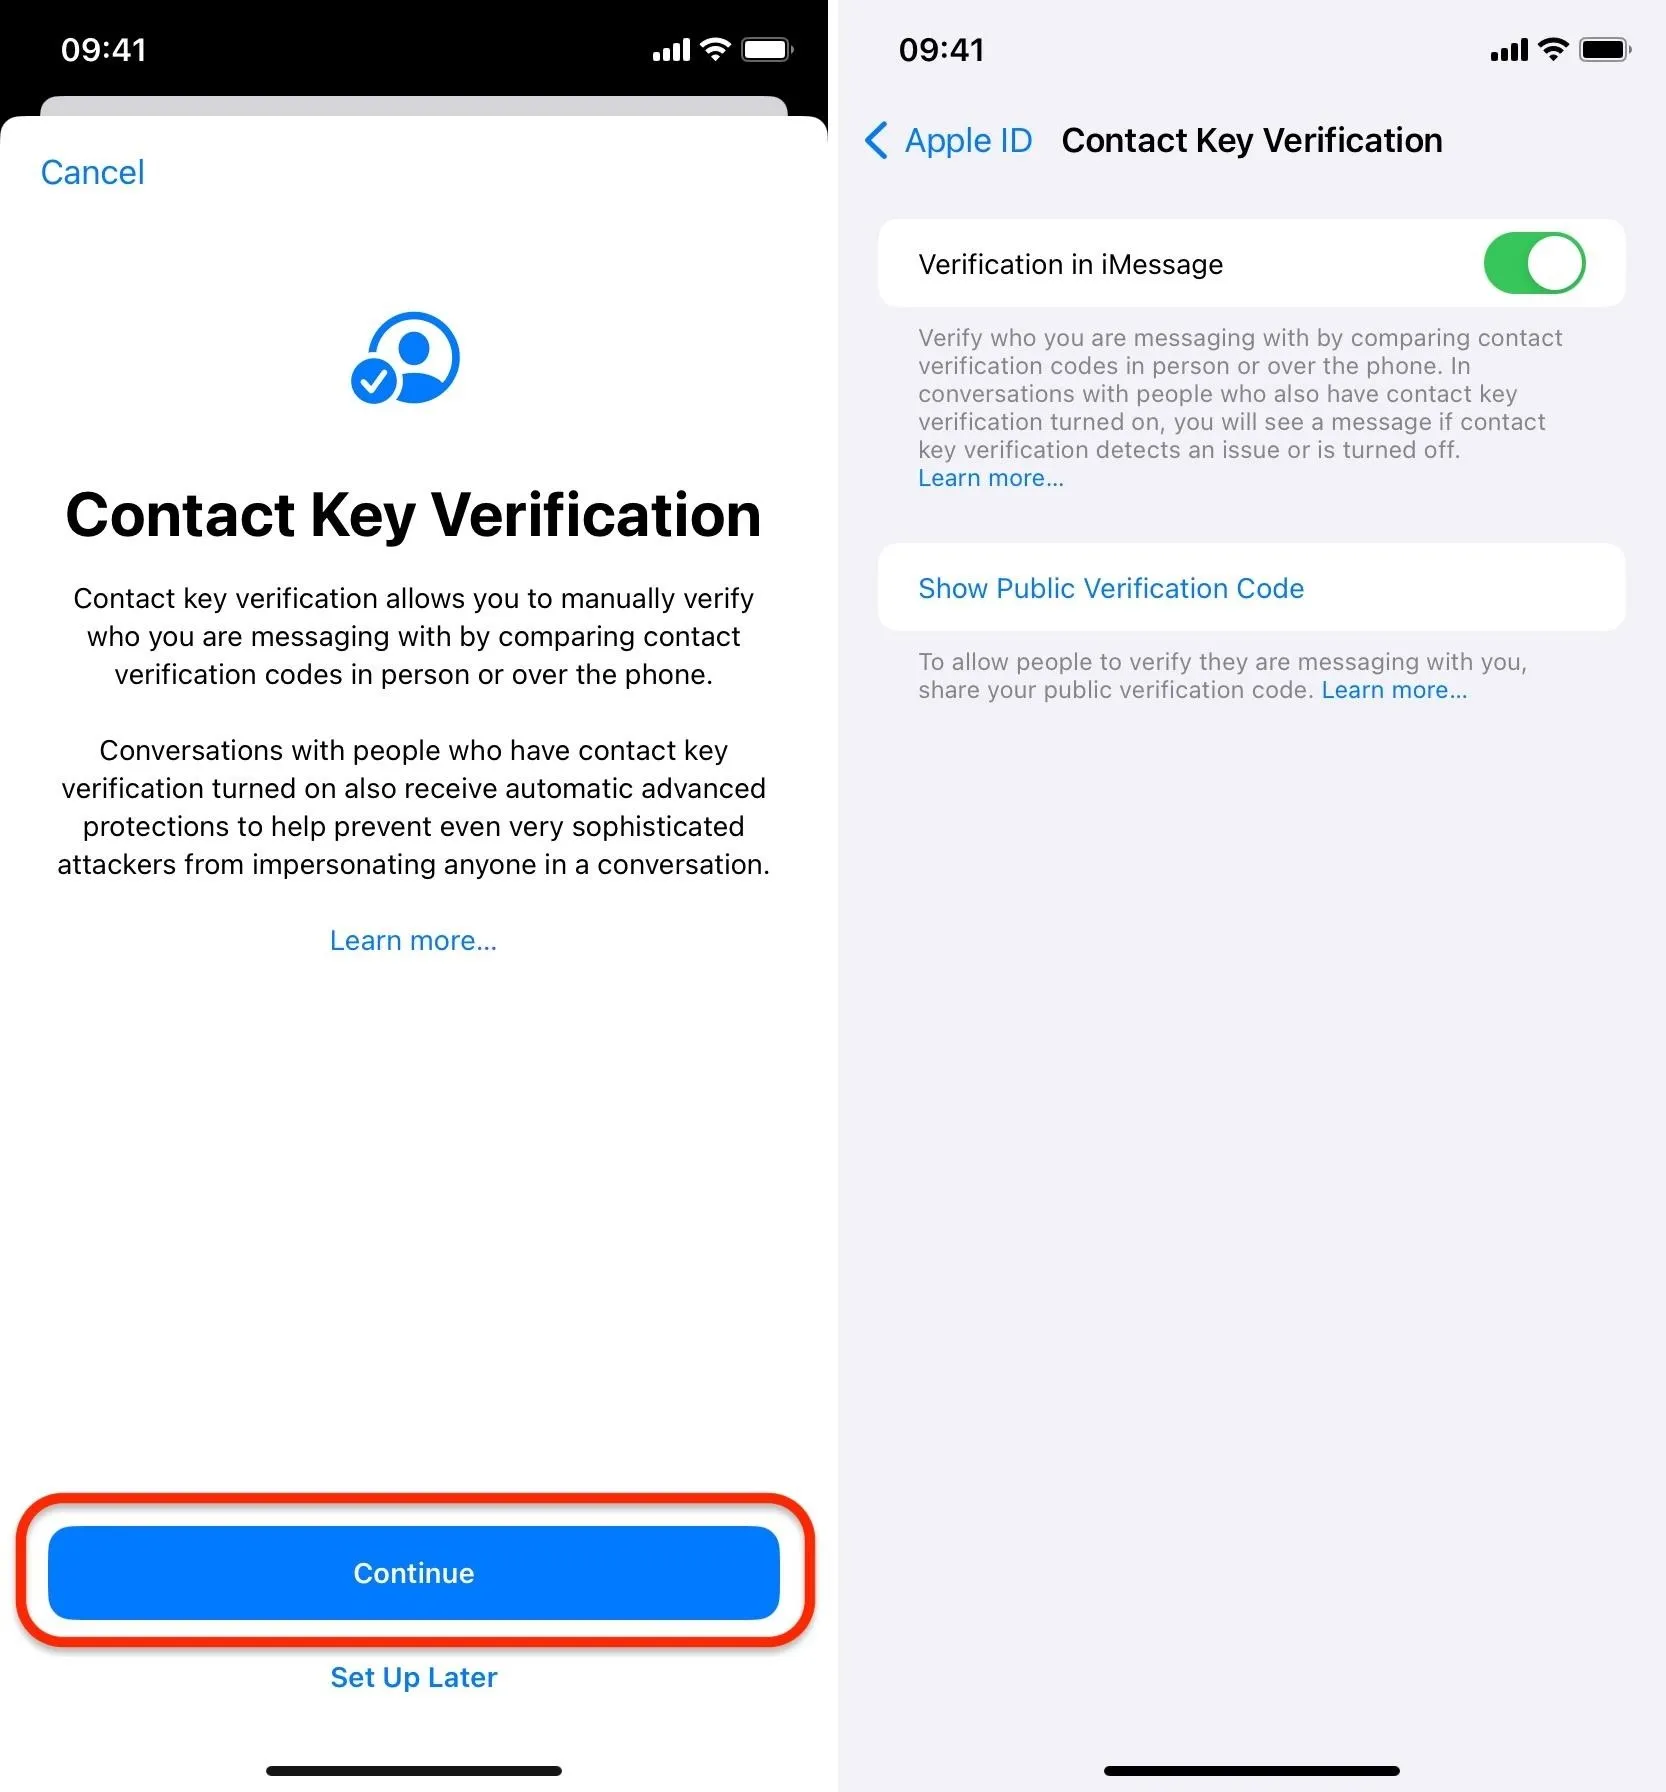
When you do this, a new dialog will appear describing how the Contact Verification Key system works in iMessage.
Contact key verification allows you to manually verify who you are messaging with by comparing contact verification codes in person or over the phone.
Conversations with people who have contact key verification turned on also receive automatic advanced protections to help prevent even very sophisticated attackers from impersonating anyone in a conversation.
If you change your mind, choose "Set Up Later" or "Cancel." Otherwise, tap "Continue." As long as all your iCloud-connected devices meet the Contact Key Verification requirements, you can start swapping keys with your contacts.
When some of your other devices connected to your Apple ID are running older software versions, it will let you know which devices they are so you can update them before returning to enable Contact Key Verification.
When enabled, Contact Key Verification will be on for all your iCloud-connected devices. However, only contacts in iMessage conversations with iCloud accounts can be verified; contacts in regular text conversations cannot.
Sharing Your Public Verification Code
If you want to appear verified for any of your contacts or even for anyone you message who is not in your contacts, you'll need to share your verification code. There are a few ways to get your assigned code.
From the Settings App
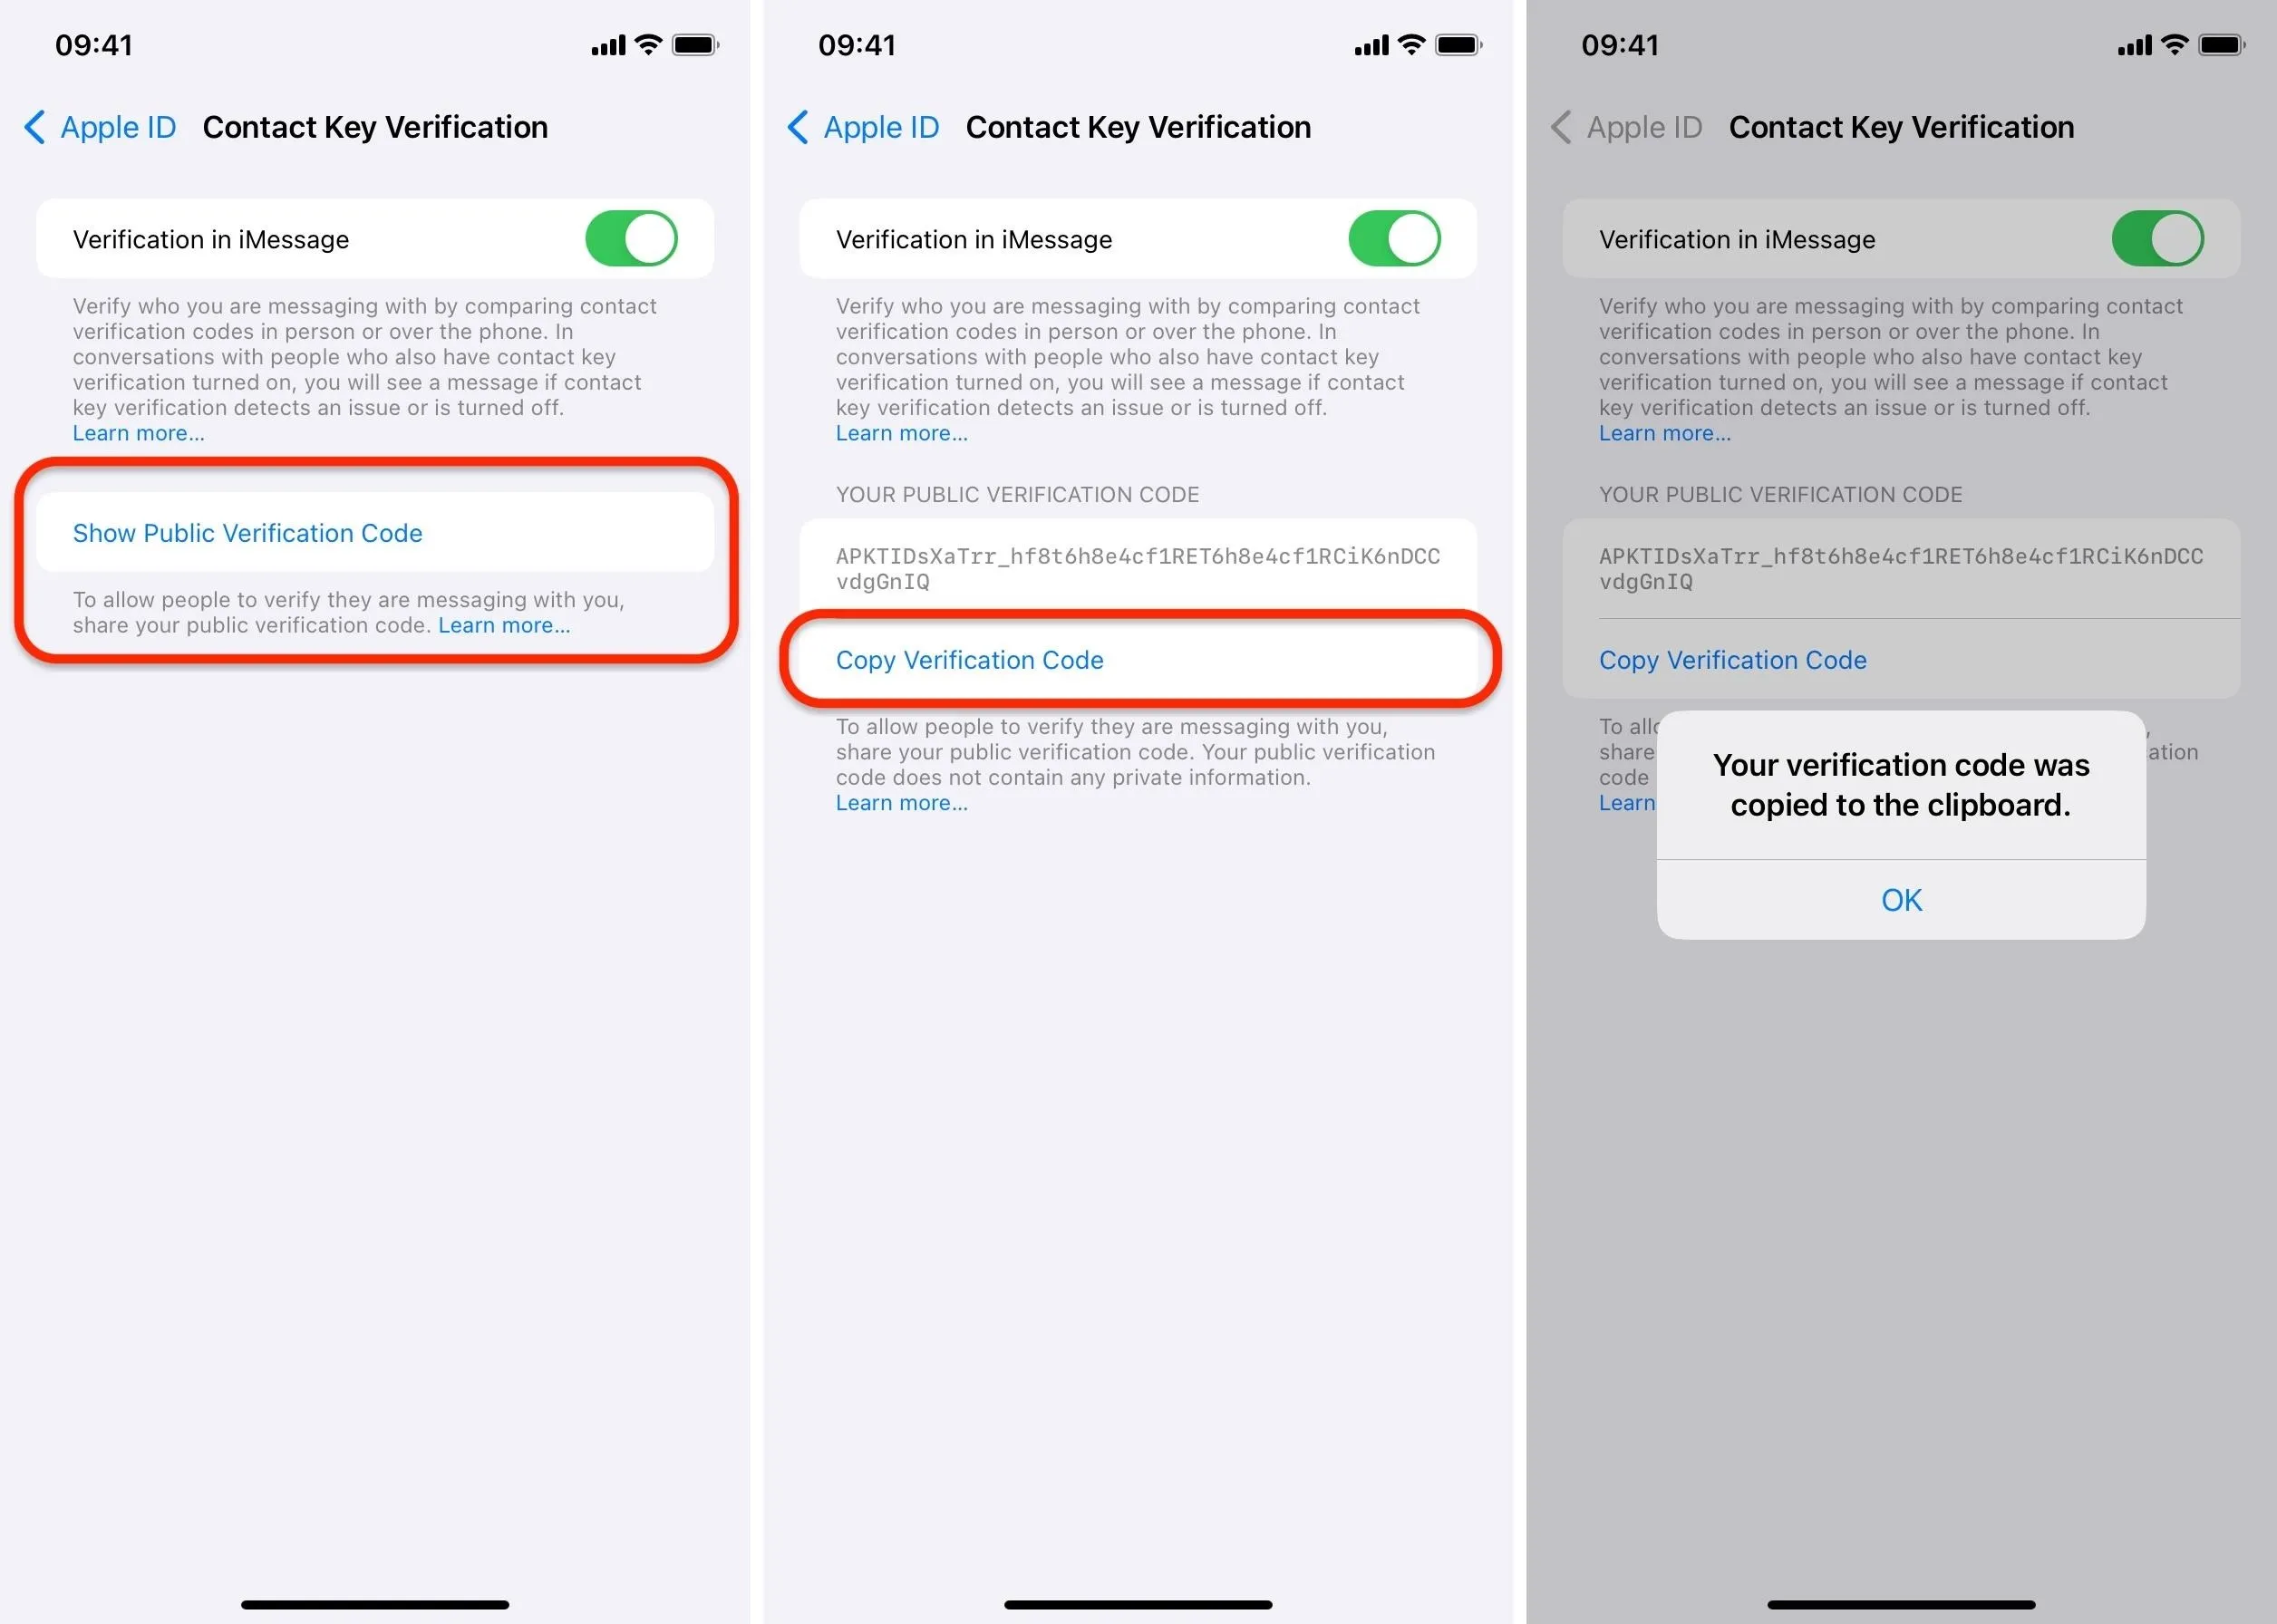
The default method for getting the verification code is as follows:
- Navigate to your Contact Key Verification menu in Settings.
- Select "Show Public Verification Code."
- Tap "Copy Verification Code."
- Tap "OK" on the confirmation: "Your verification code was copied to the clipboard."
Now, you can paste the public verification code wherever people can find it, such as on social media, on a website, in an iMessage conversation, in an email, or through another means.
From the Messages App
While getting your public verification code from the Settings app is the most straightforward method, you can also view and copy it from an iMessage conversation's settings in Messages.
Open a conversation with the contact in the Messages app, tap their profile photo at the top, and look for the Advanced Message Security section. Tap "Verify Contact," and the Verify Contact window will appear.
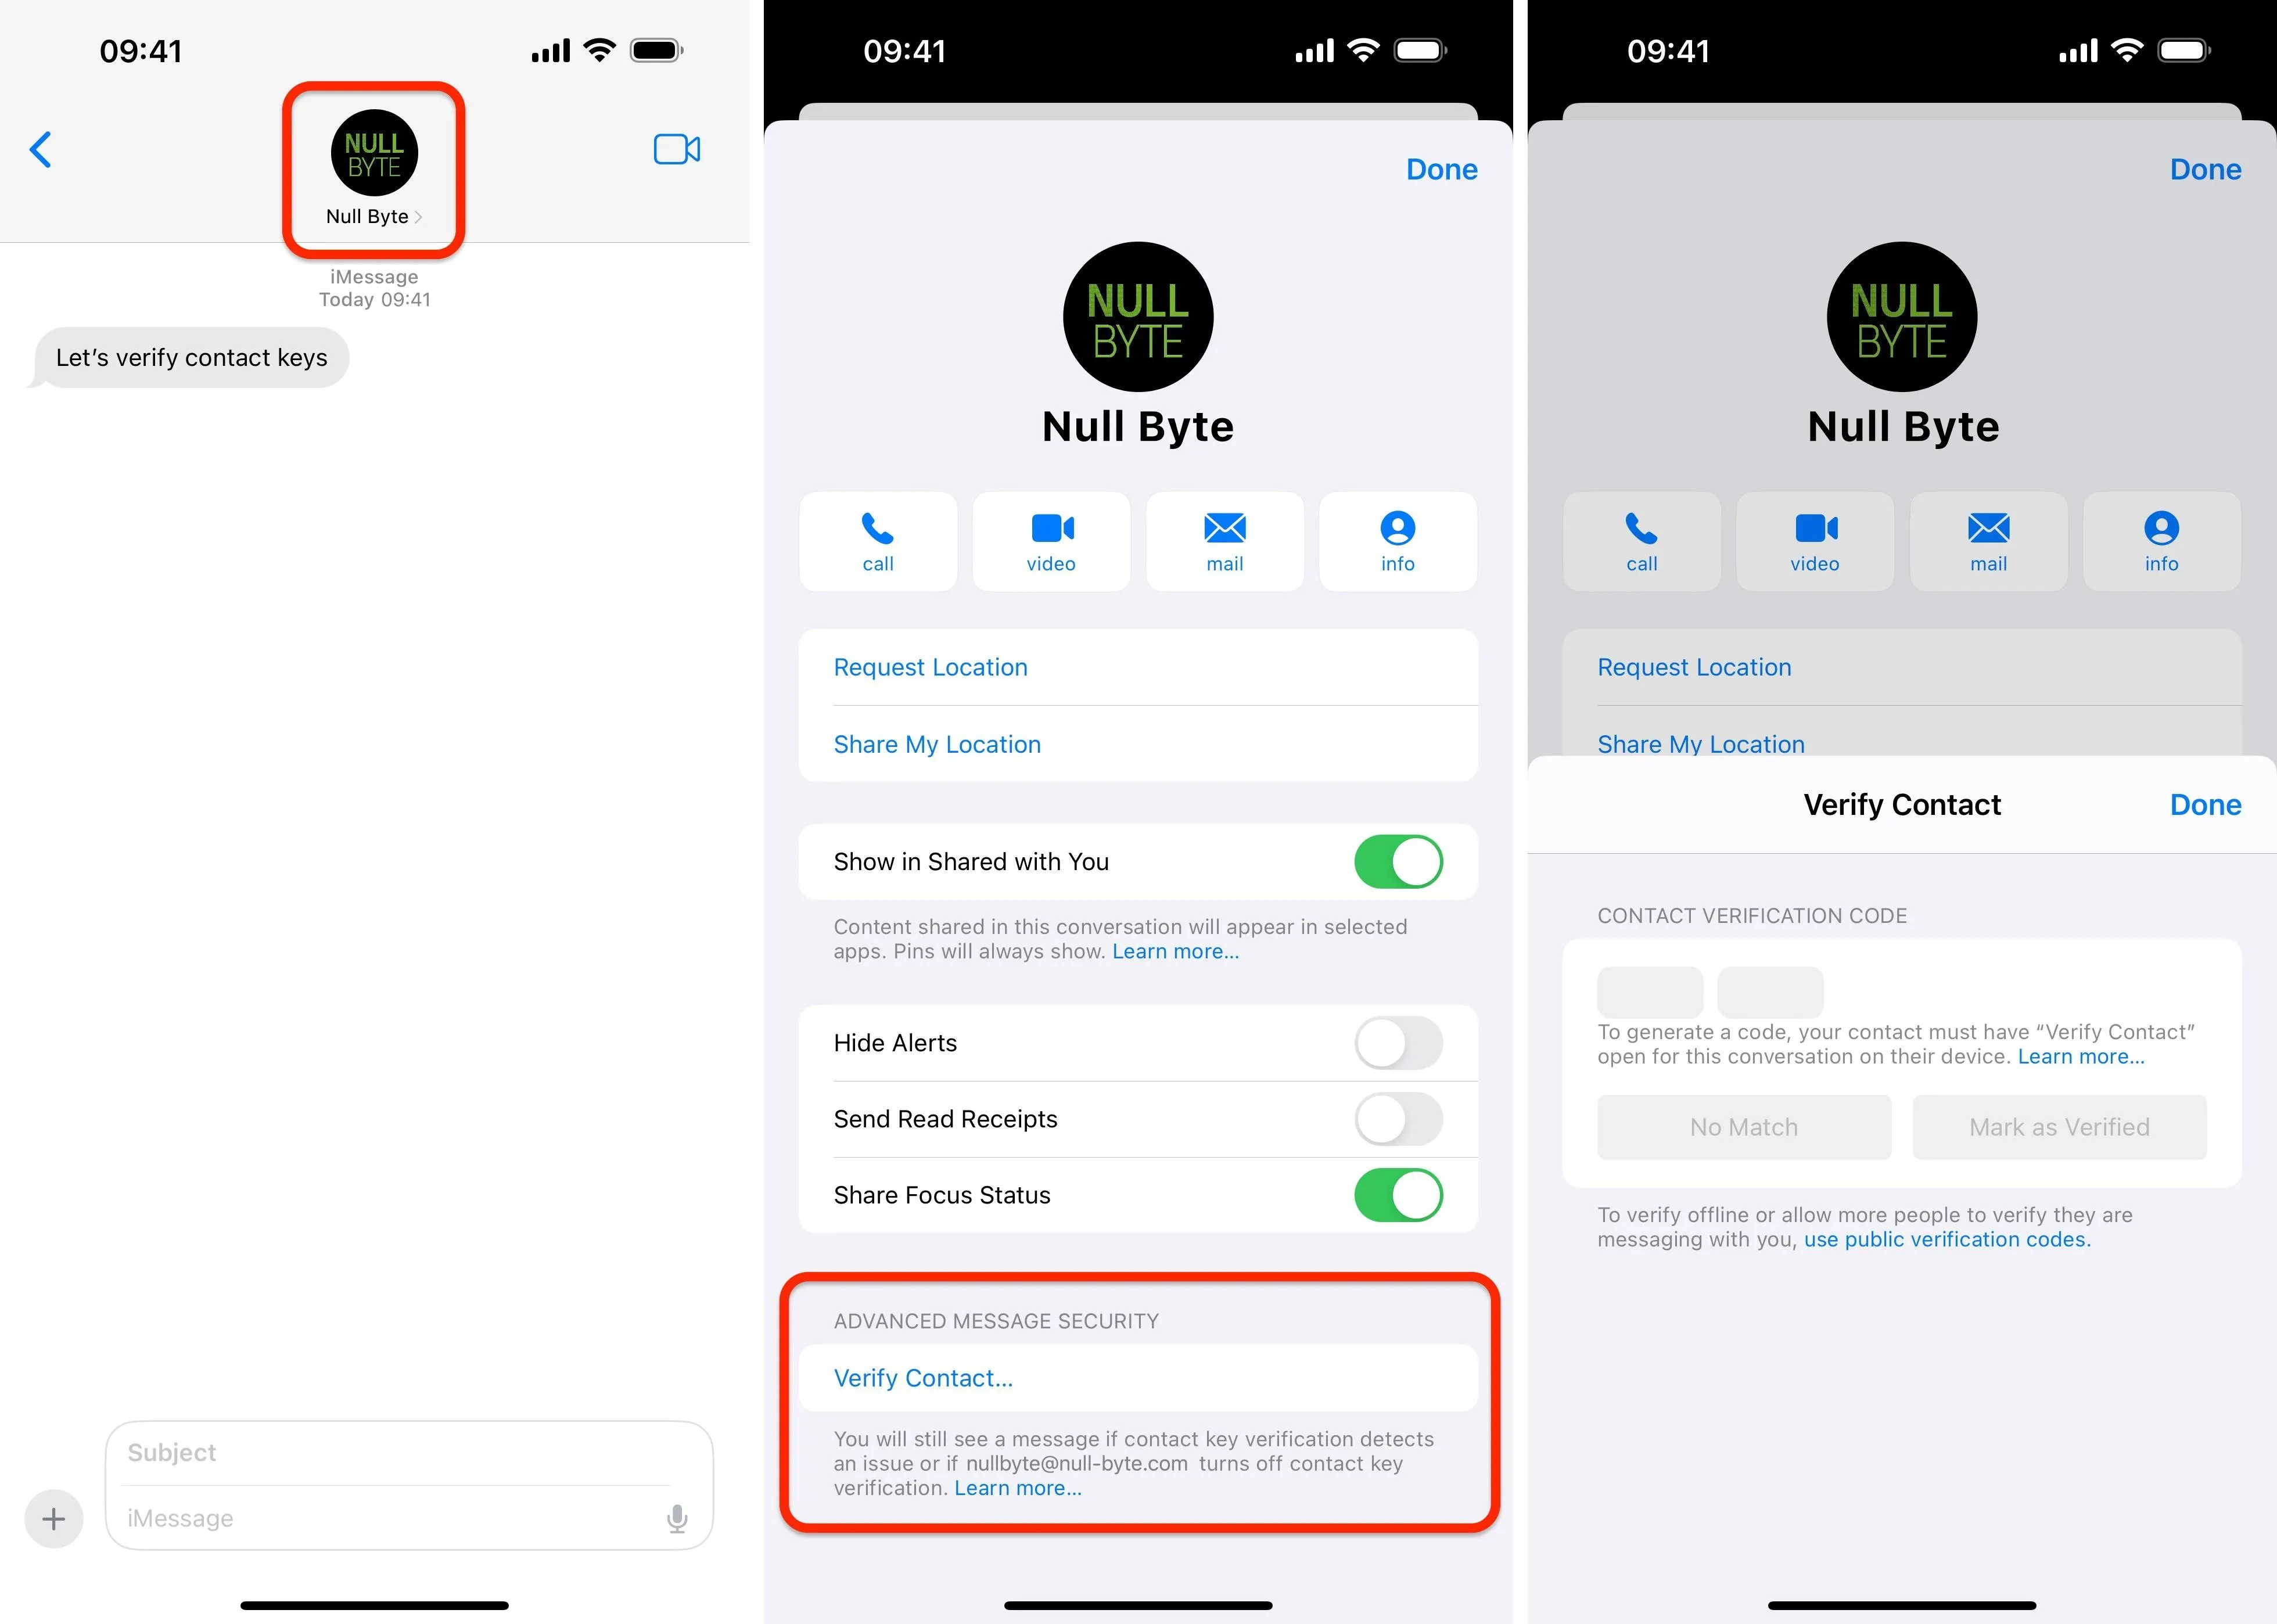
Next, select "use public verification codes," which opens a view with both your and your contact's public keys. Tap "Copy Verification Code," then "OK" on the "Your verification code was copied to the clipboard" confirmation.
Now, you can paste the public verification code wherever people can find it, such as on social media, on a website, in an iMessage conversation, in an email, or through another means.
Verifying a Contact with a Public Verification Code
There are three ways to verify a contact with a public verification code.
- You can copy the contact's public verification code from wherever they shared it and add it to their contact card on your device.
- You can verify someone in person, over a call, or in a chat by matching an eight-digit code on your device with the eight-digit code on the contact's device.
- You can compare a contact's assigned public verification code with the public verification code they shared via social media, email, direct message, or even in person, over a call, or in a chat.
Verify Using a Copied Public Verification Code
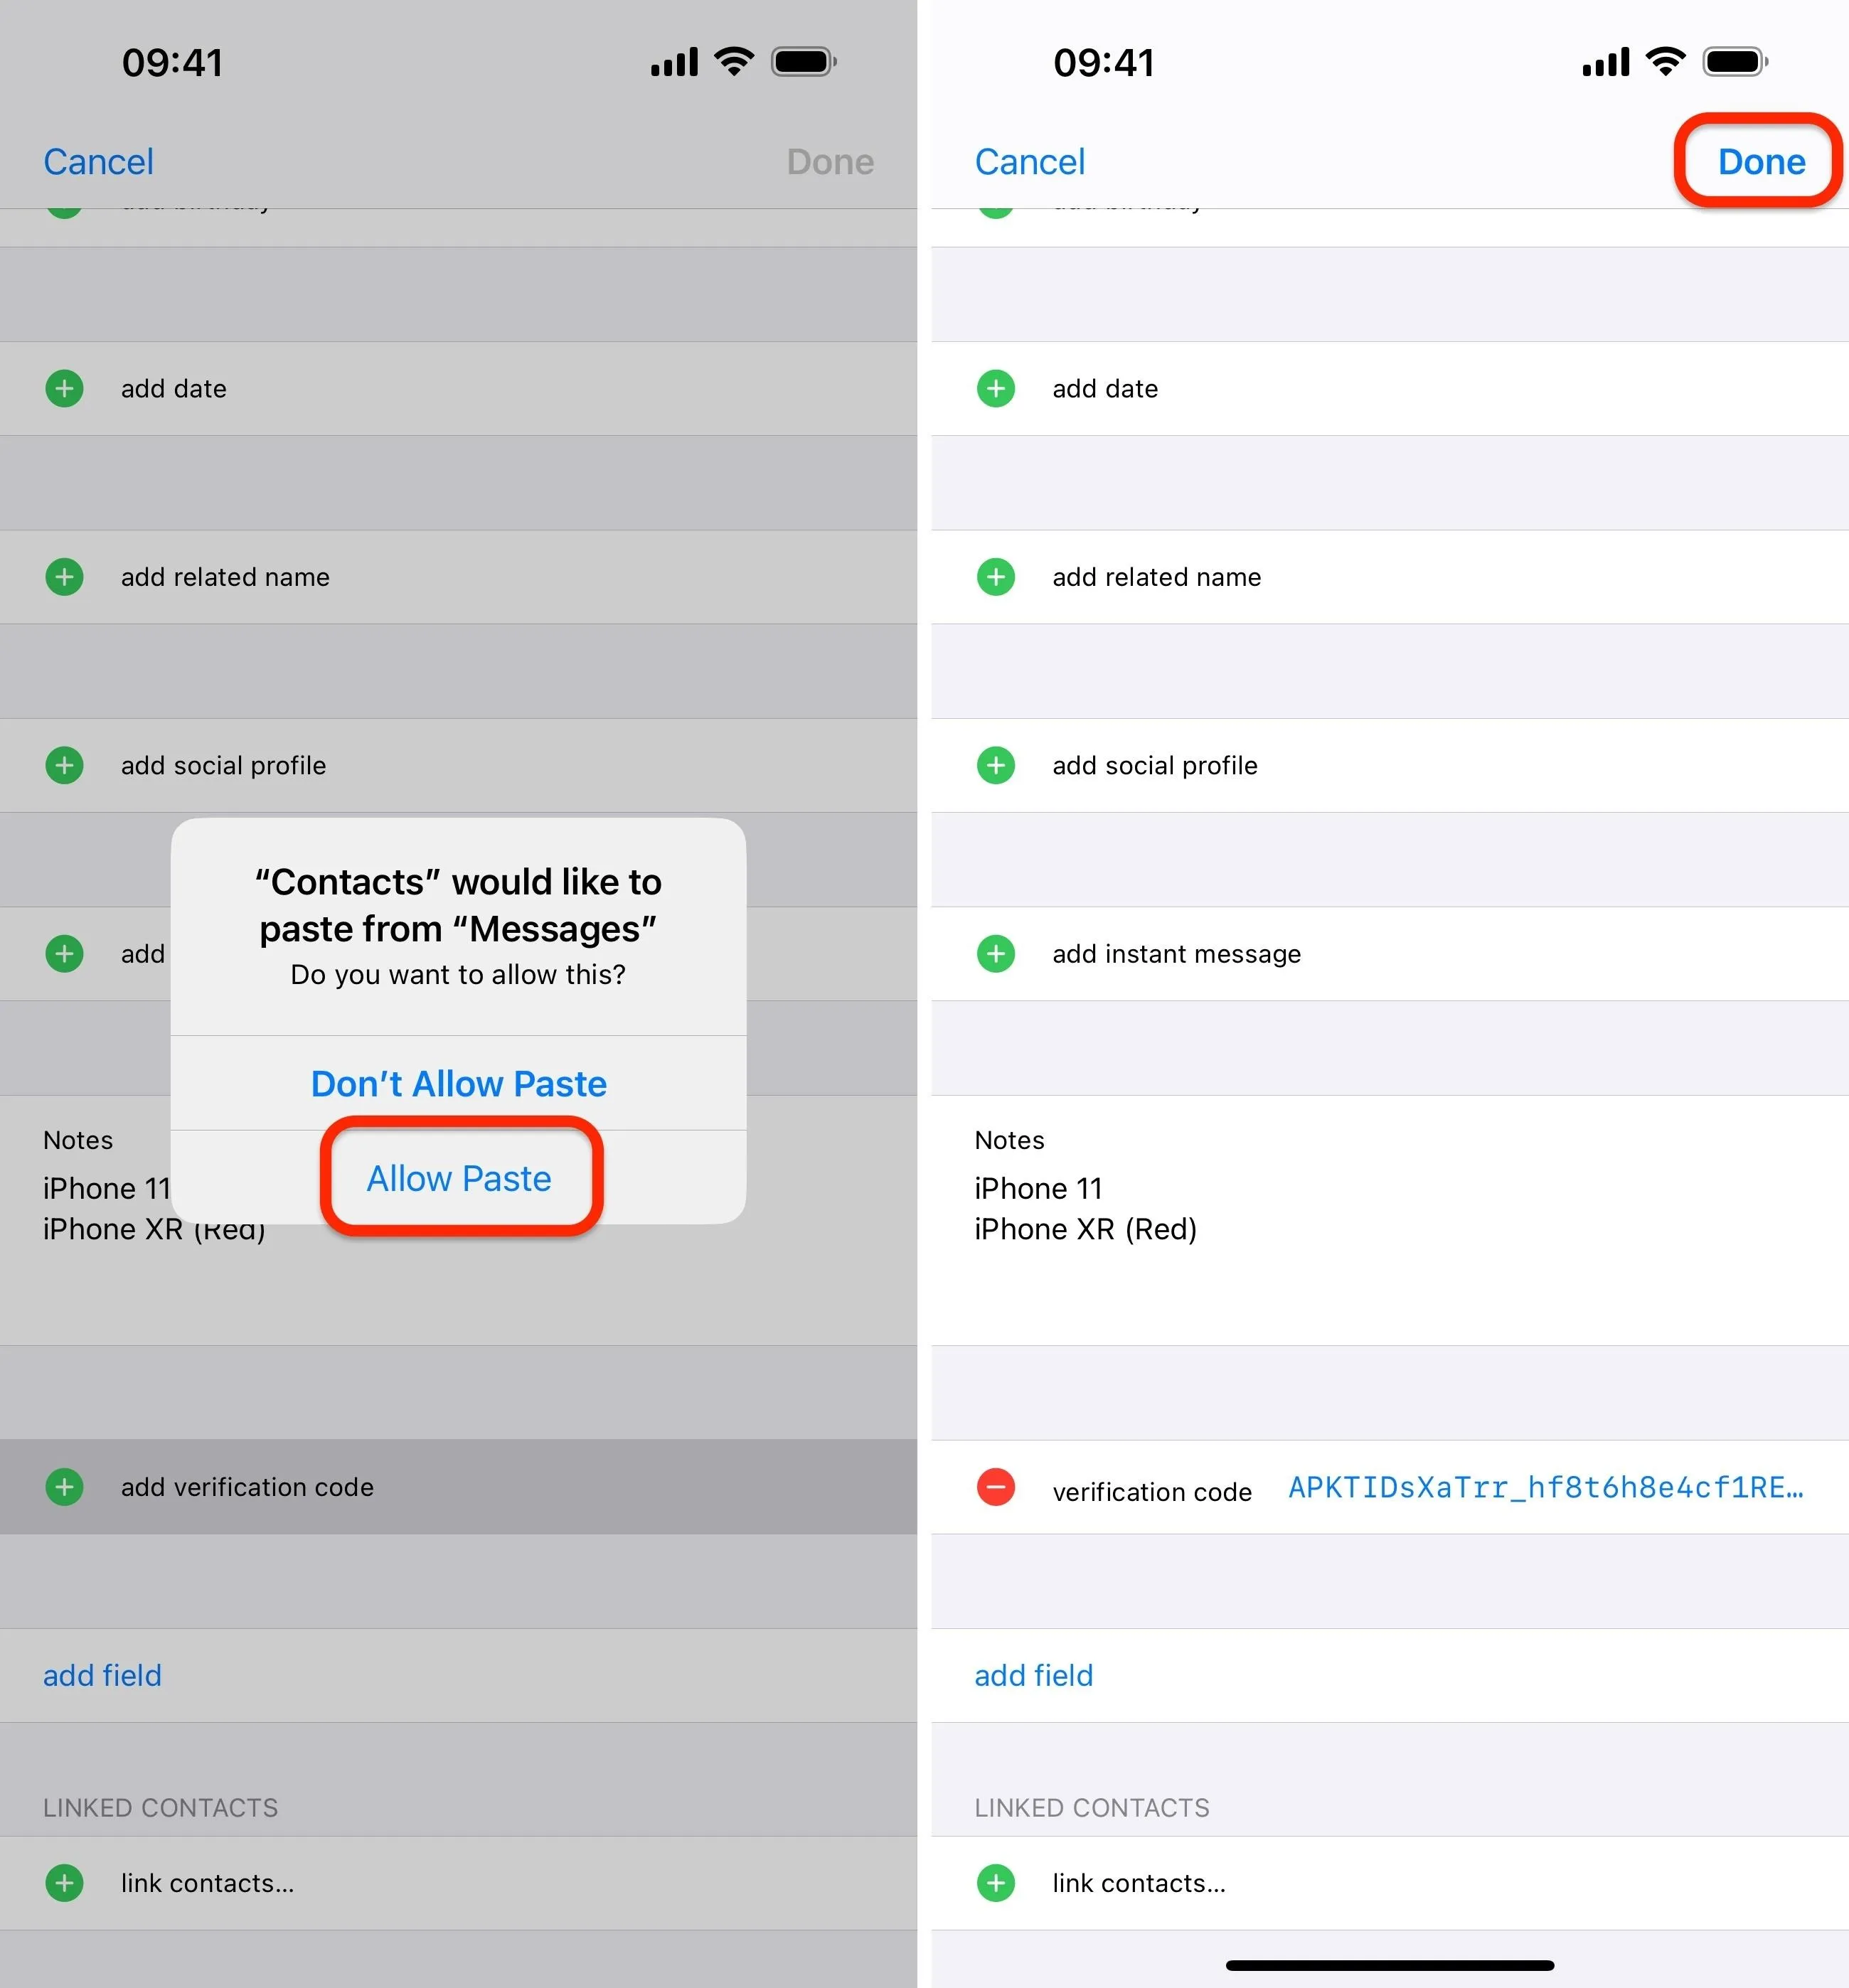
After copying the contact's public verification code, open their contact information in the Contacts app or via another app, such as Phone, Messages, or FaceTime. Then, hit "Edit" and find the "add verification code" field.
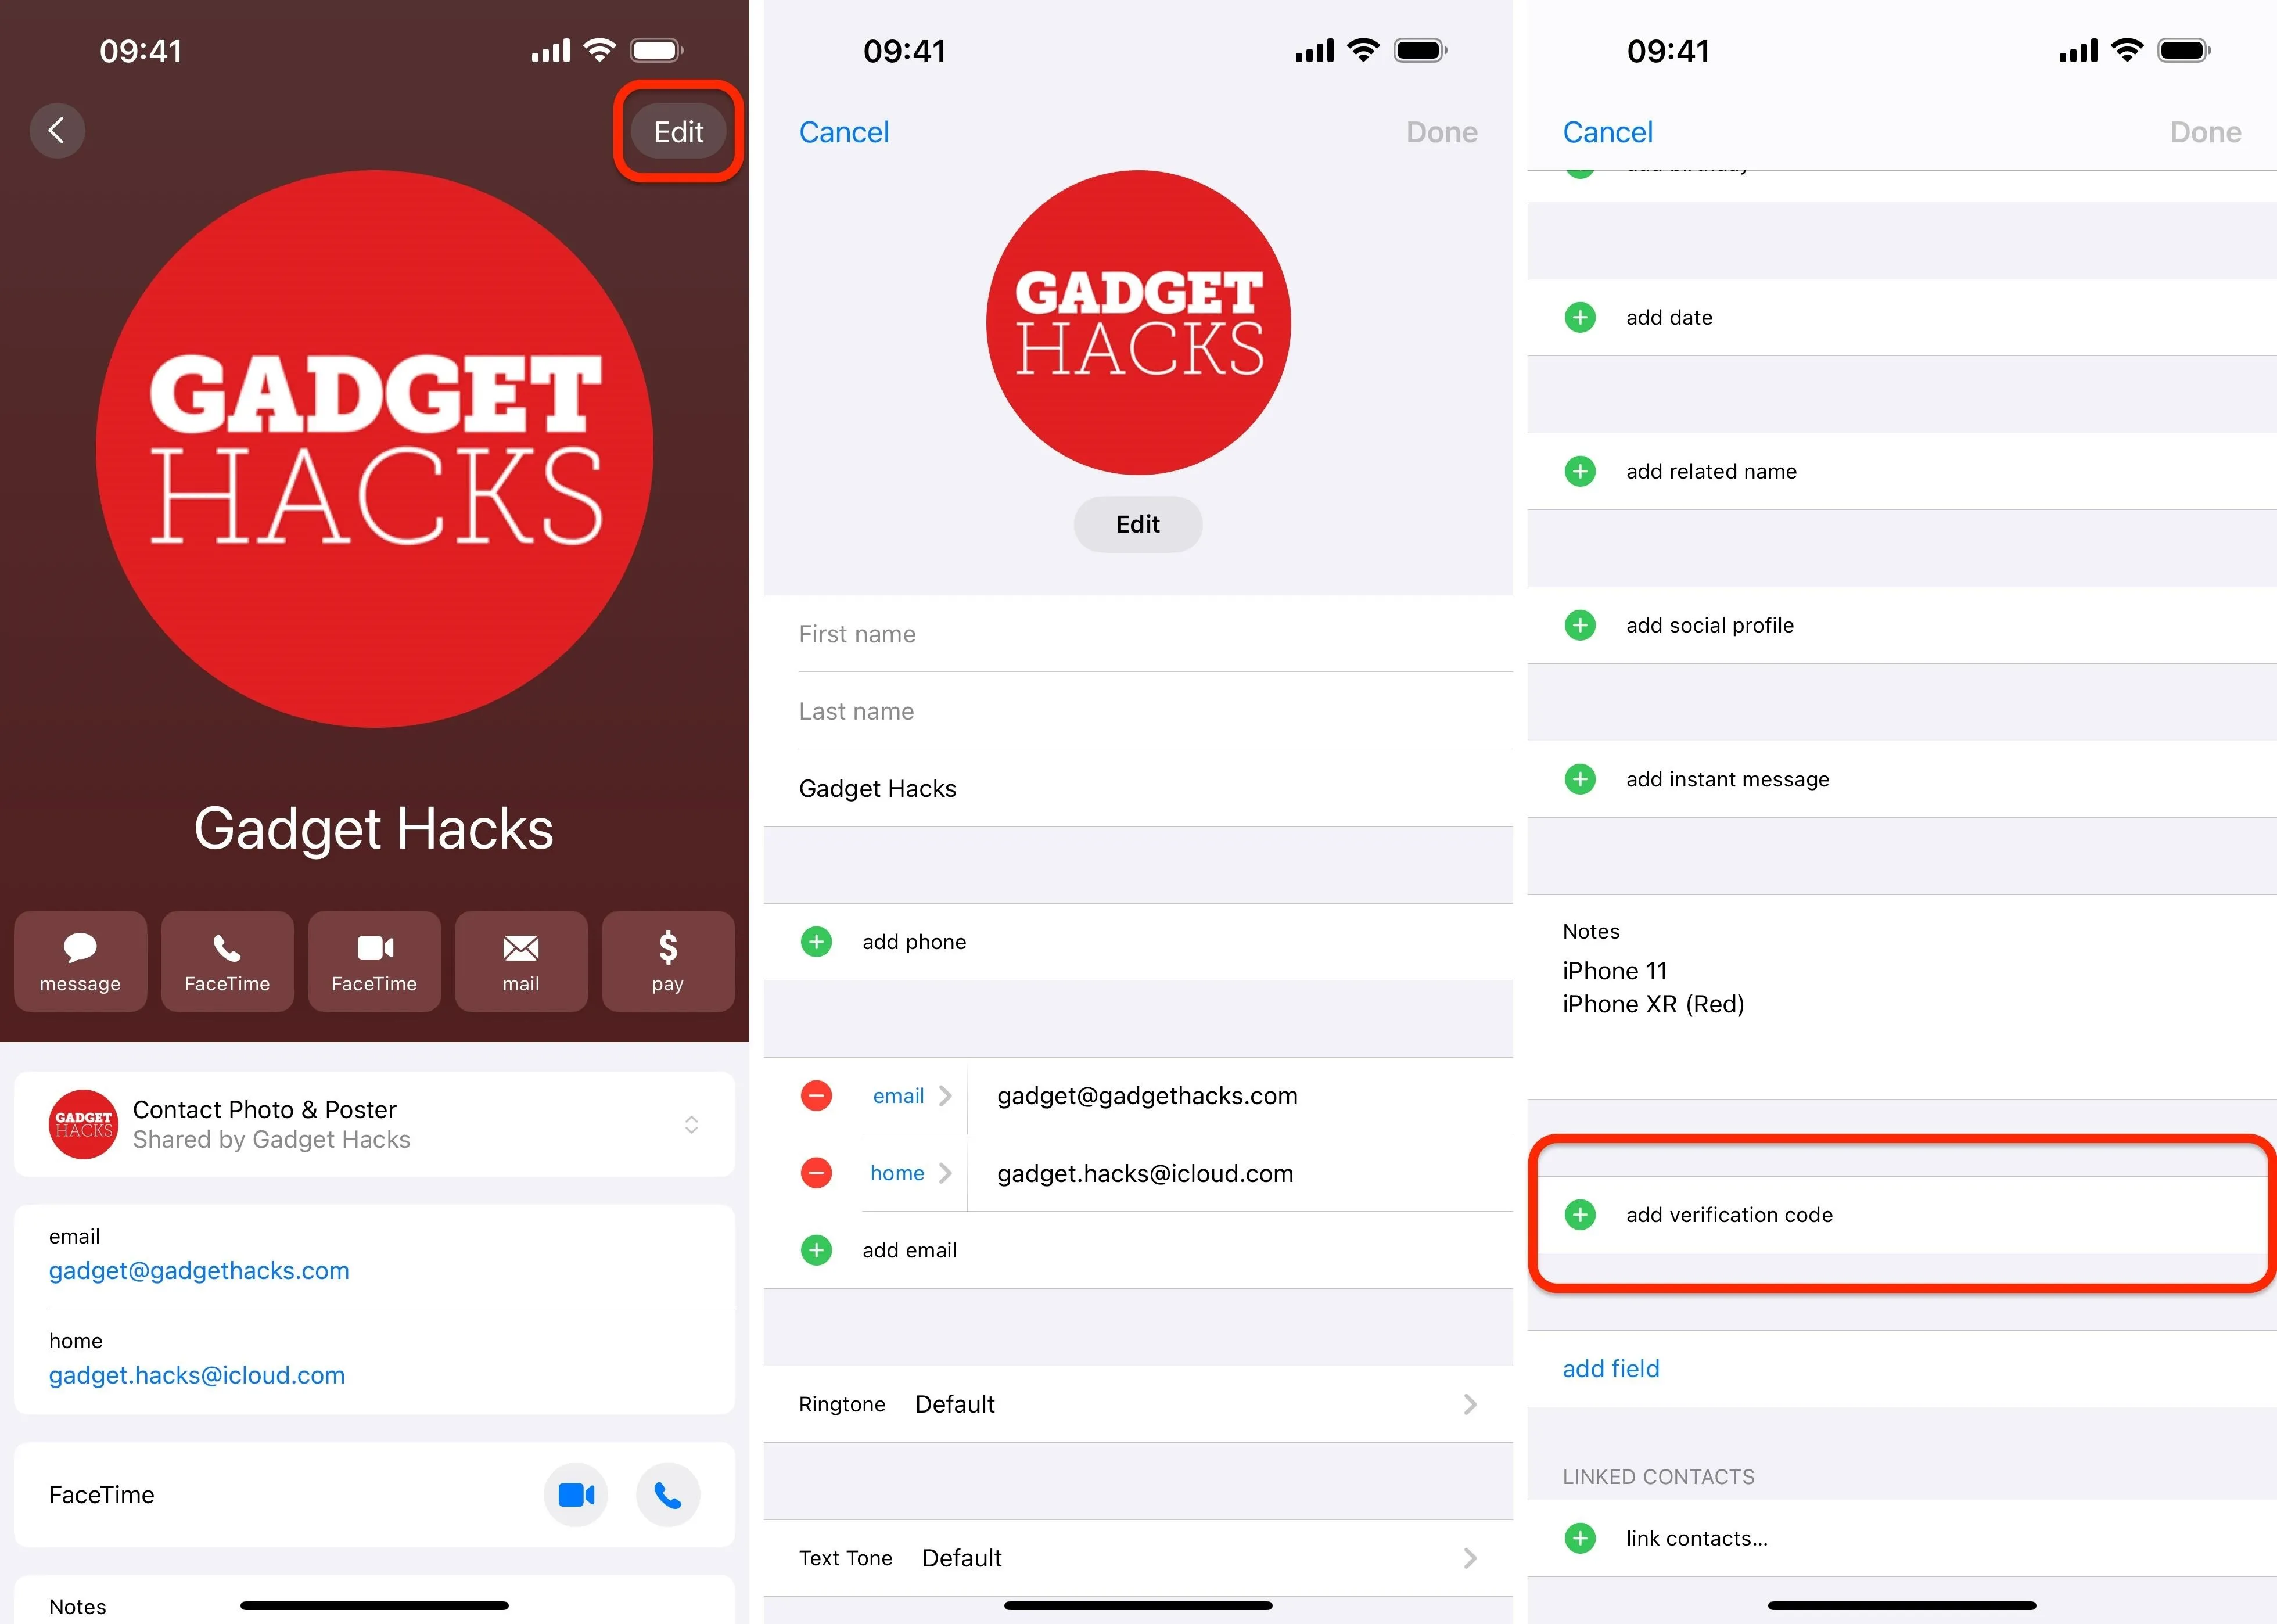
Next, tap the "add verification code" field. If it's your first time pasting something into the Contacts app from the app you pasted the code from, tap "Allow Paste" on the prompt. The code should automatically insert itself into the field. Tap "Done" to save the updated contact information.
Verify by Matching an 8-Digit Numeric Code
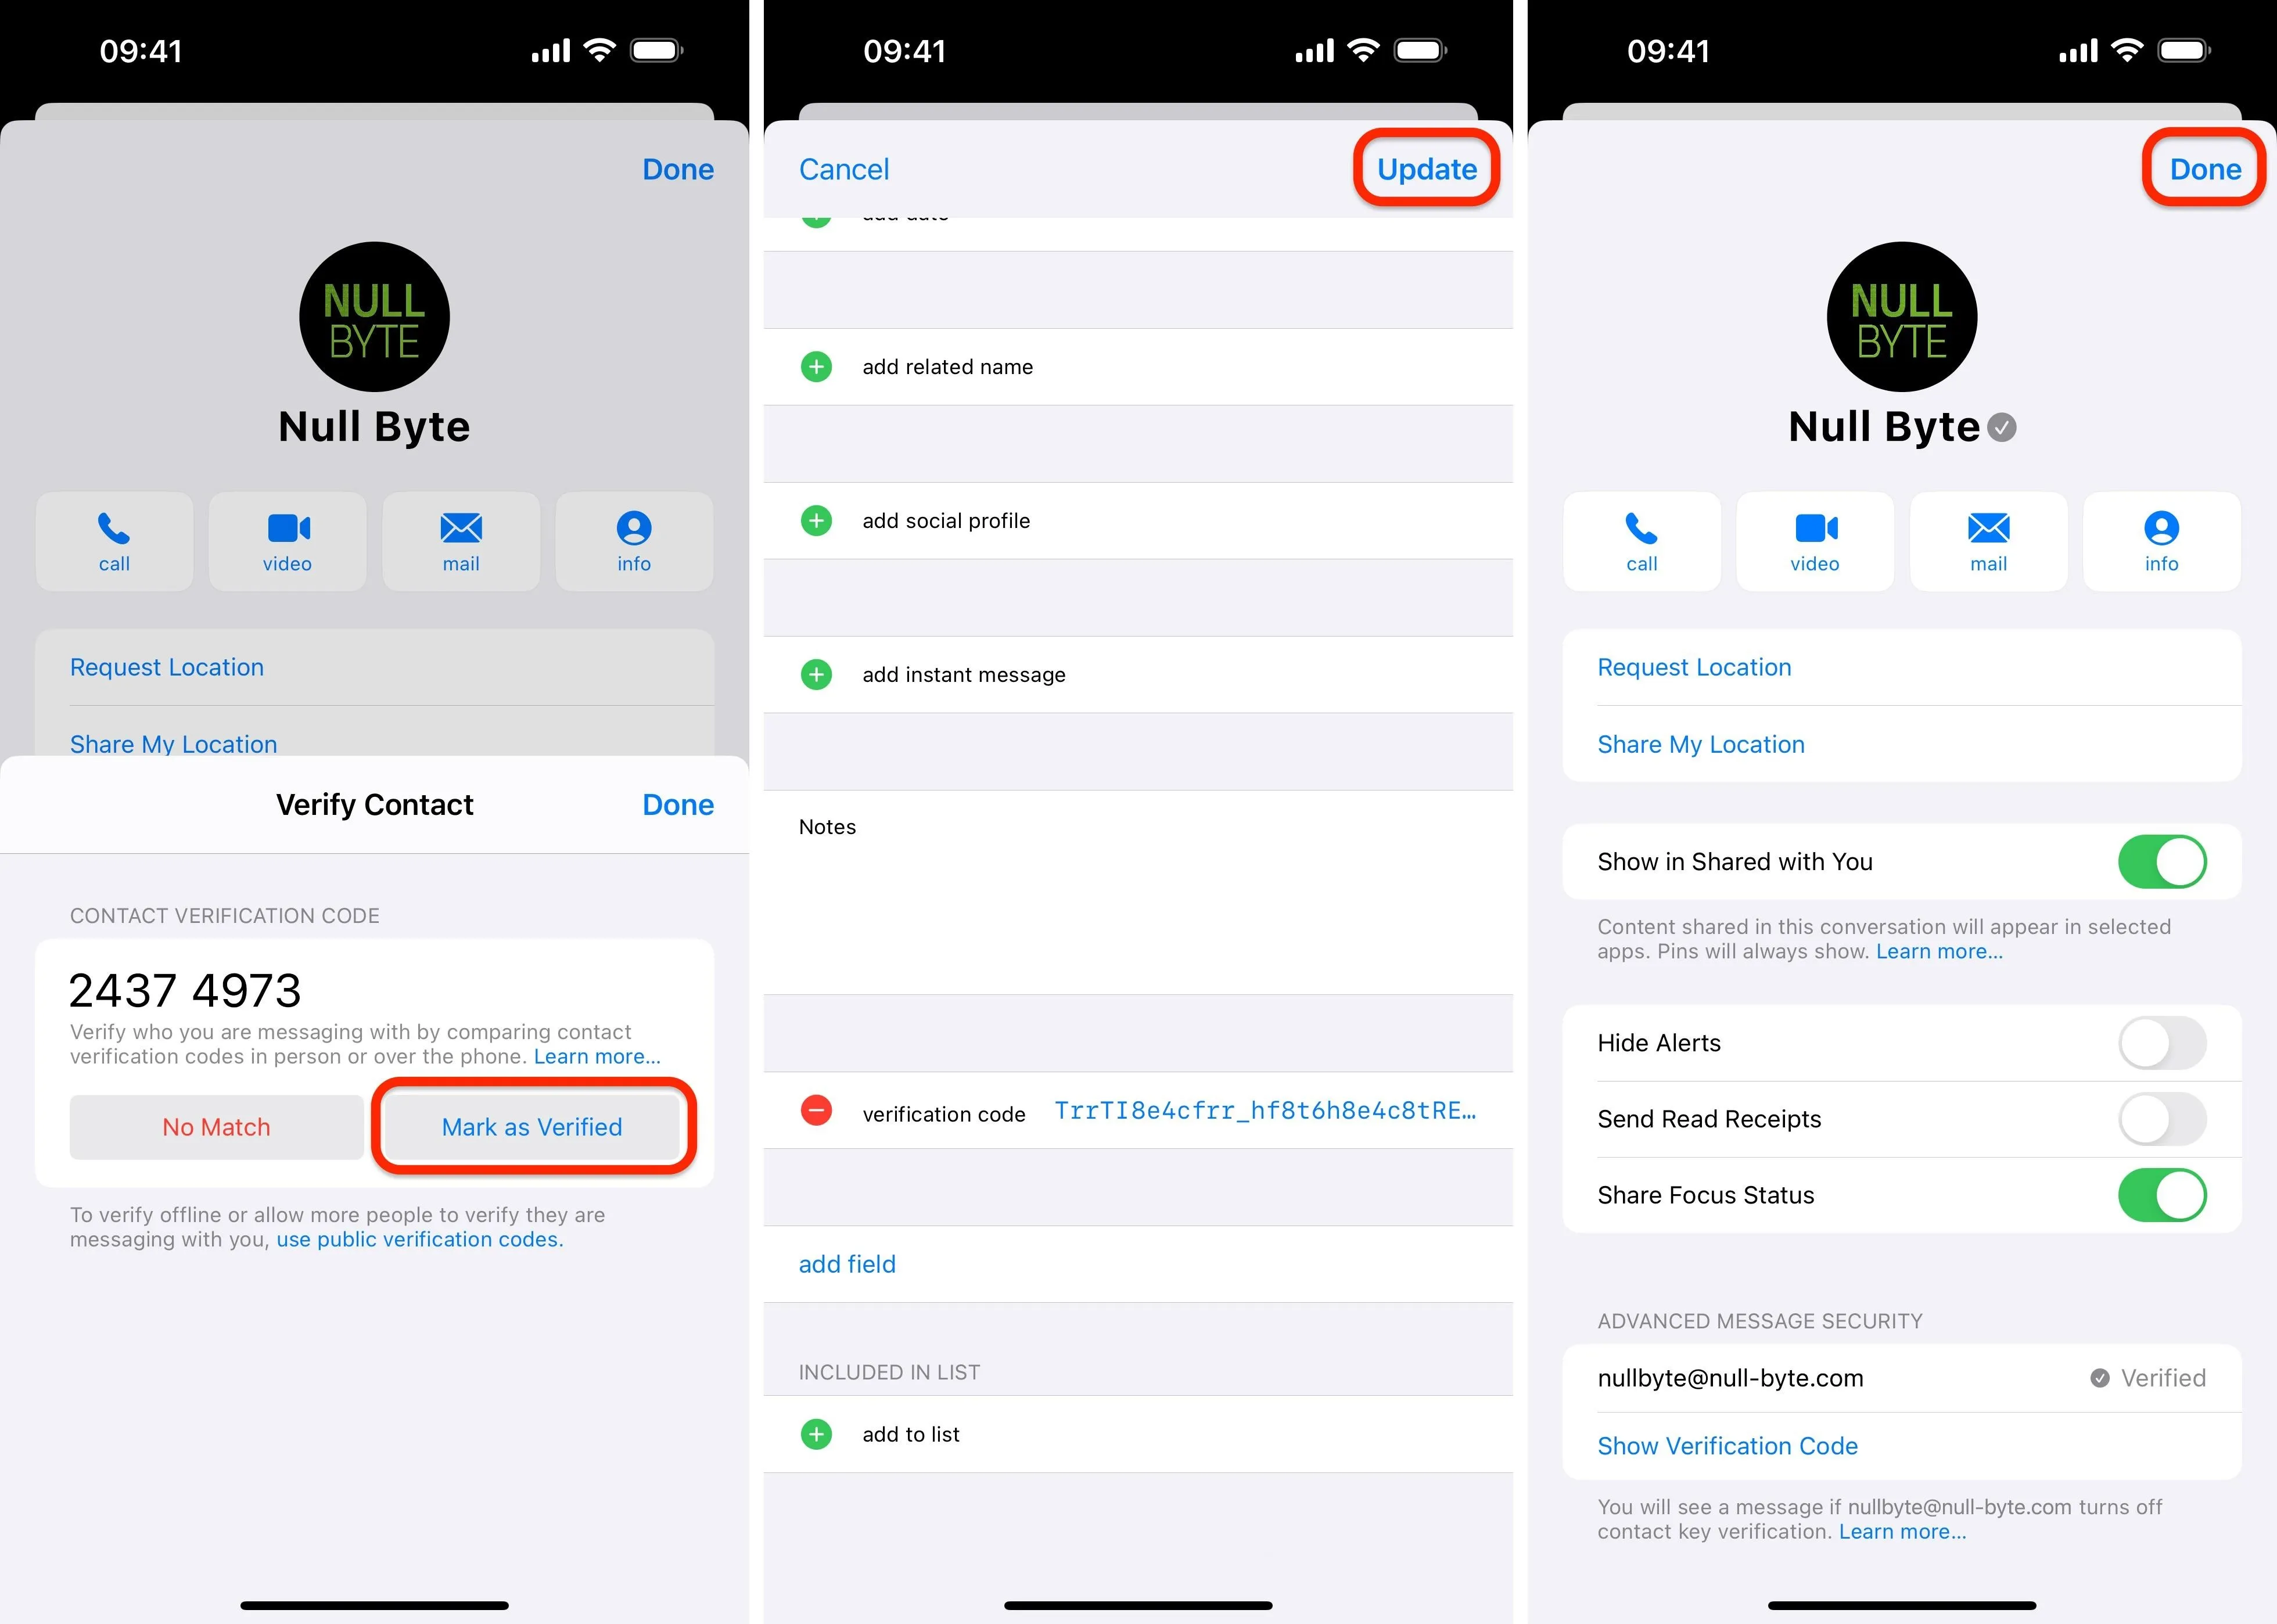
If the contact you want to verify is physically near you, comparing the codes on your devices is the easiest way to verify them. You can also use this method over a phone or FaceTime call.
Open a conversation with the contact in the Messages app, tap their profile photo at the top, and look for the Advanced Message Security section. Tap "Verify Contact," and the Verify Contact window will appear.
If no eight-digit code appears in the window, instruct the contact to open a conversation with you in the Messages app, tap your profile photo at the top, and choose "Verify Contact" if you're not already verified in their system or "Show Verification Code" if you are.

When the eight-digit code appears, compare it with the one on the contact's end. If the eight numbers do not match, tap the "No Match" button. However, if they do, tap "Mark as Verified." Once verified, the person's contact card will open with the public verification code automatically pasted into the "verification code" field. Simply tap "Update" to save it and "Done" to exit the conversation settings.
Your contact can use the same process simultaneously to verify you on their end.
Once verified, a checkmark will appear next to the contact's name under their profile photo, and the verified phone number or email address in the Advanced Message Security section of the conversation settings will also have a checkmark as well as "Verified" written next to it.
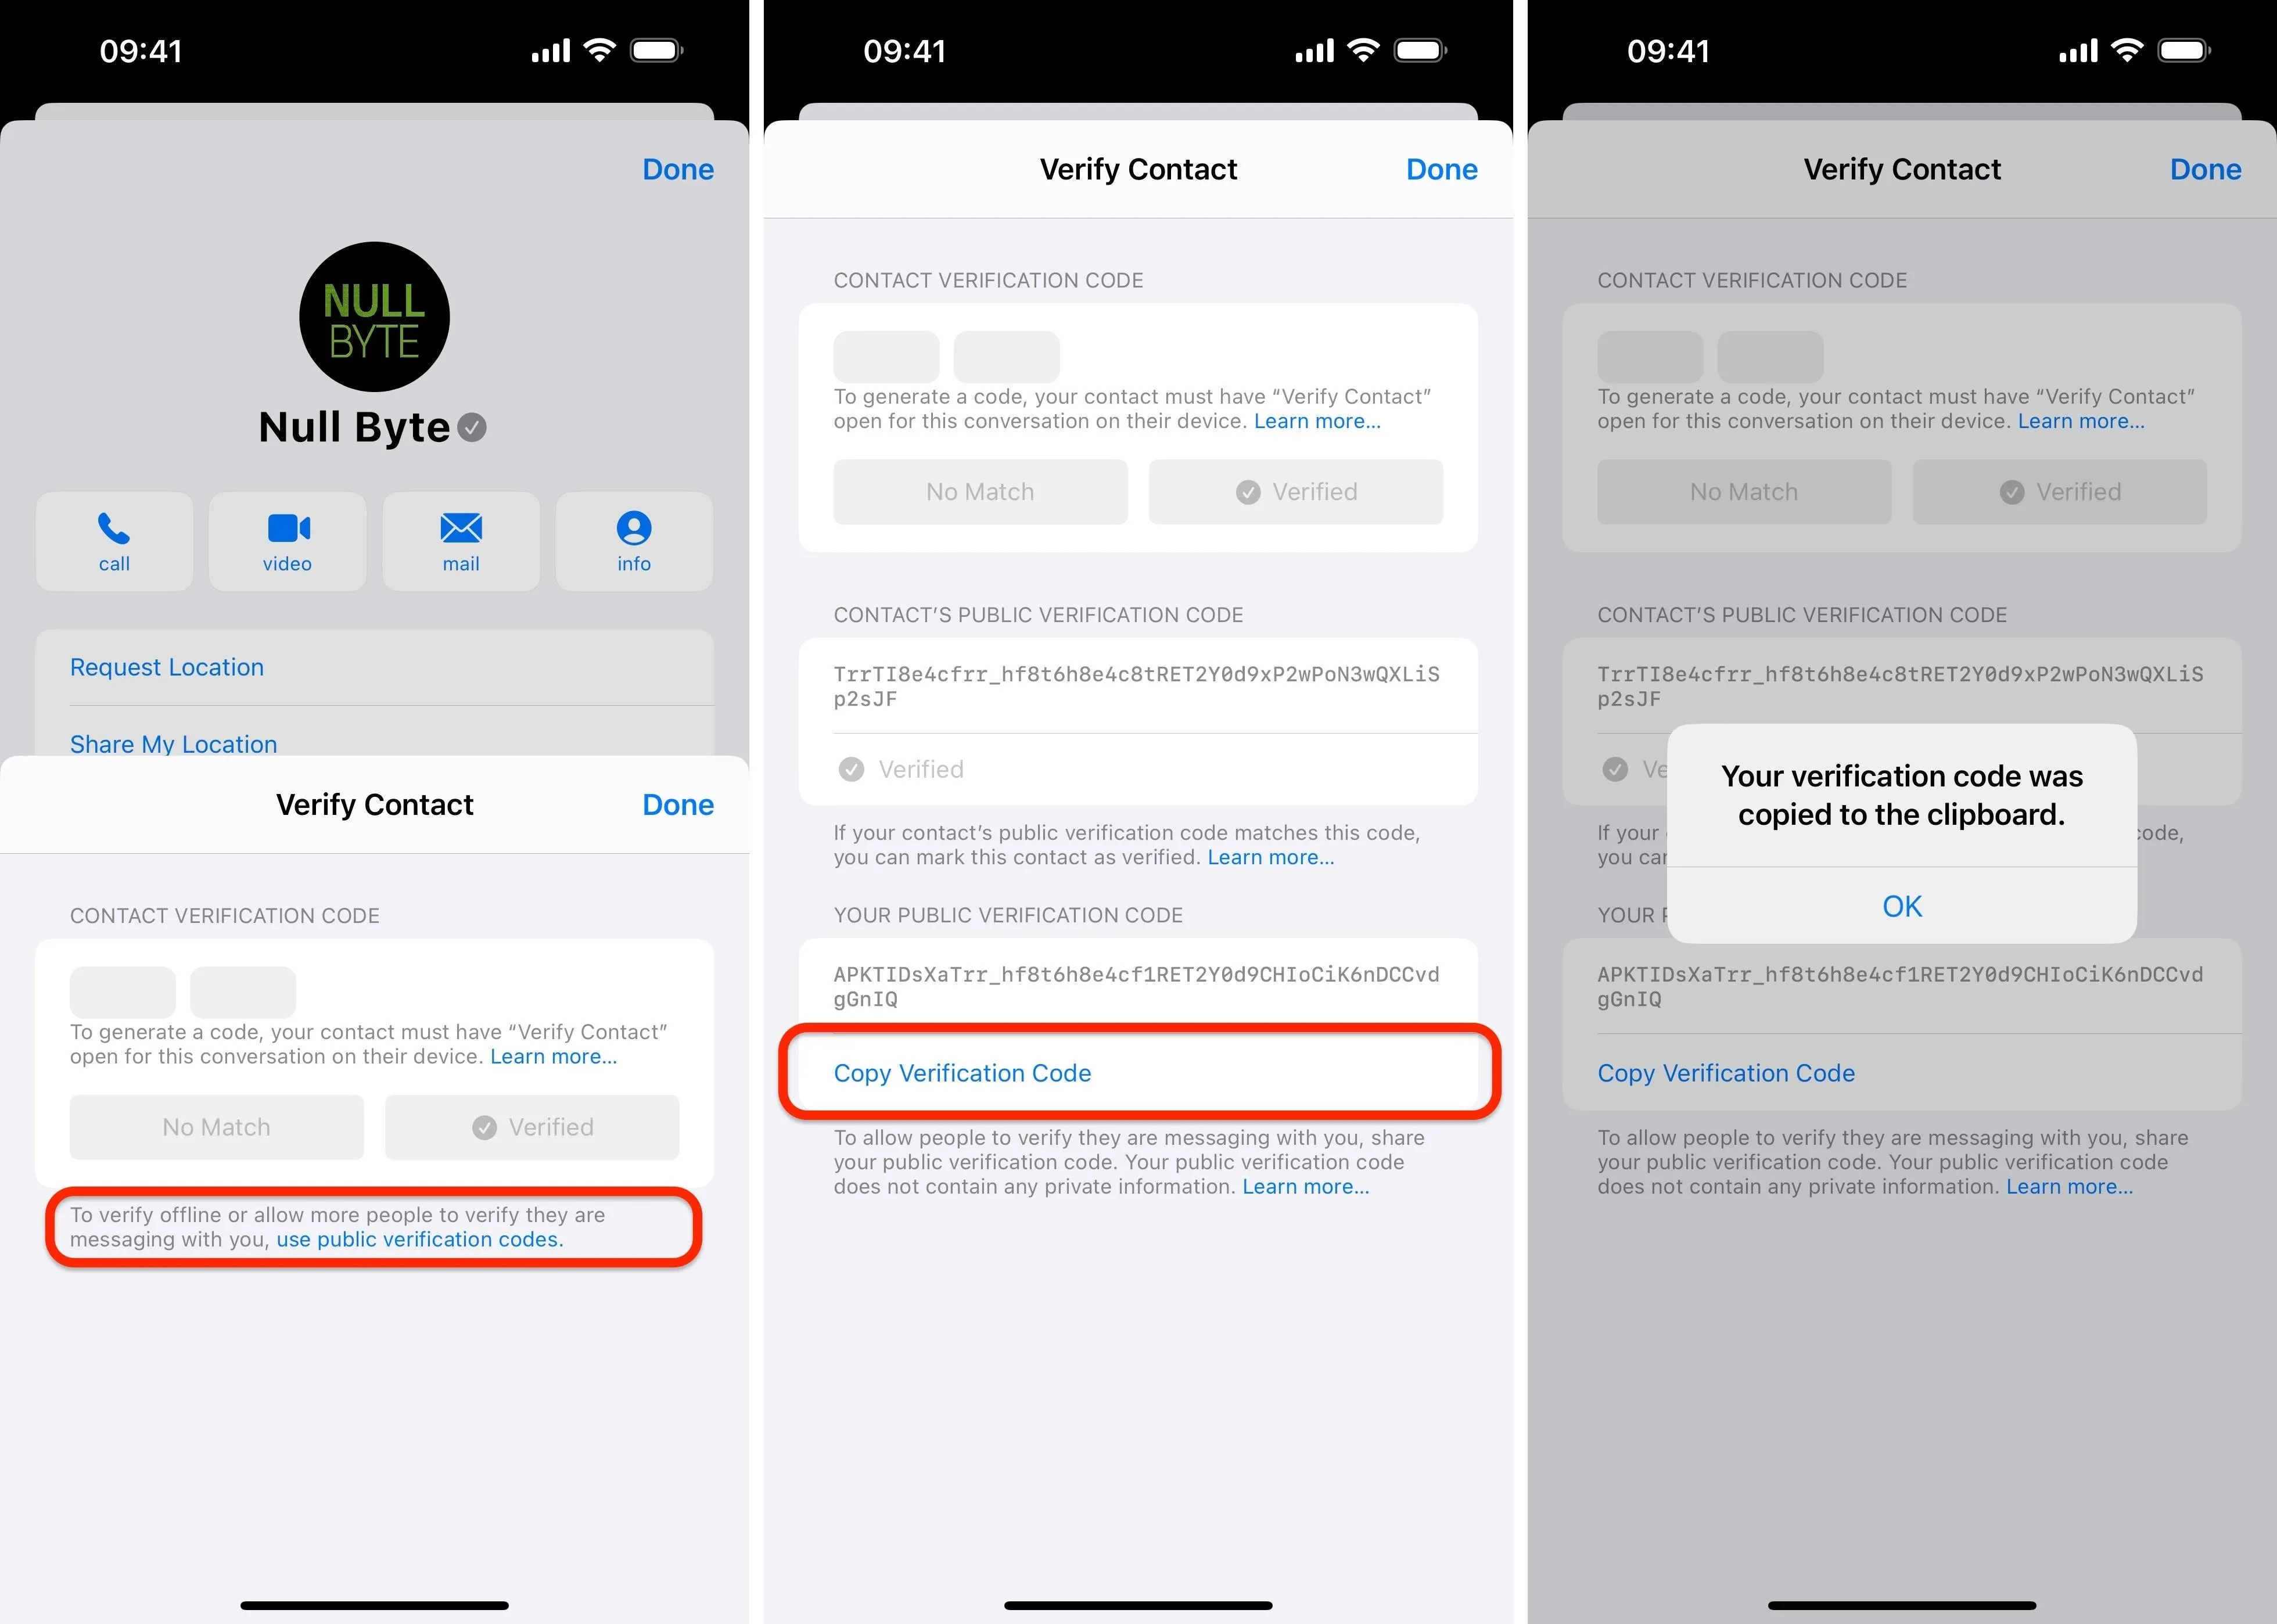
Verify by Matching a Public Verification Code
If the eight-digit code in Method 2 above isn't a good option for your situation, you can still verify the contact from Messages. As with Method 2 above, open a conversation with the contact in the Messages app, tap their profile photo at the top, and look for the Advanced Message Security section. Tap "Verify Contact," and the Verify Contact window will appear.
Next, select "use public verification codes," which opens a view with both your and your contact's assigned public keys. Compare the contact's code against the one you're referencing, then tap "Mark as Verified" if it matches.
Once verified, the person's contact card will open with the public verification code automatically pasted into the "verification code" field. Simply tap "Update" to save it and "Done" to exit the conversation settings.
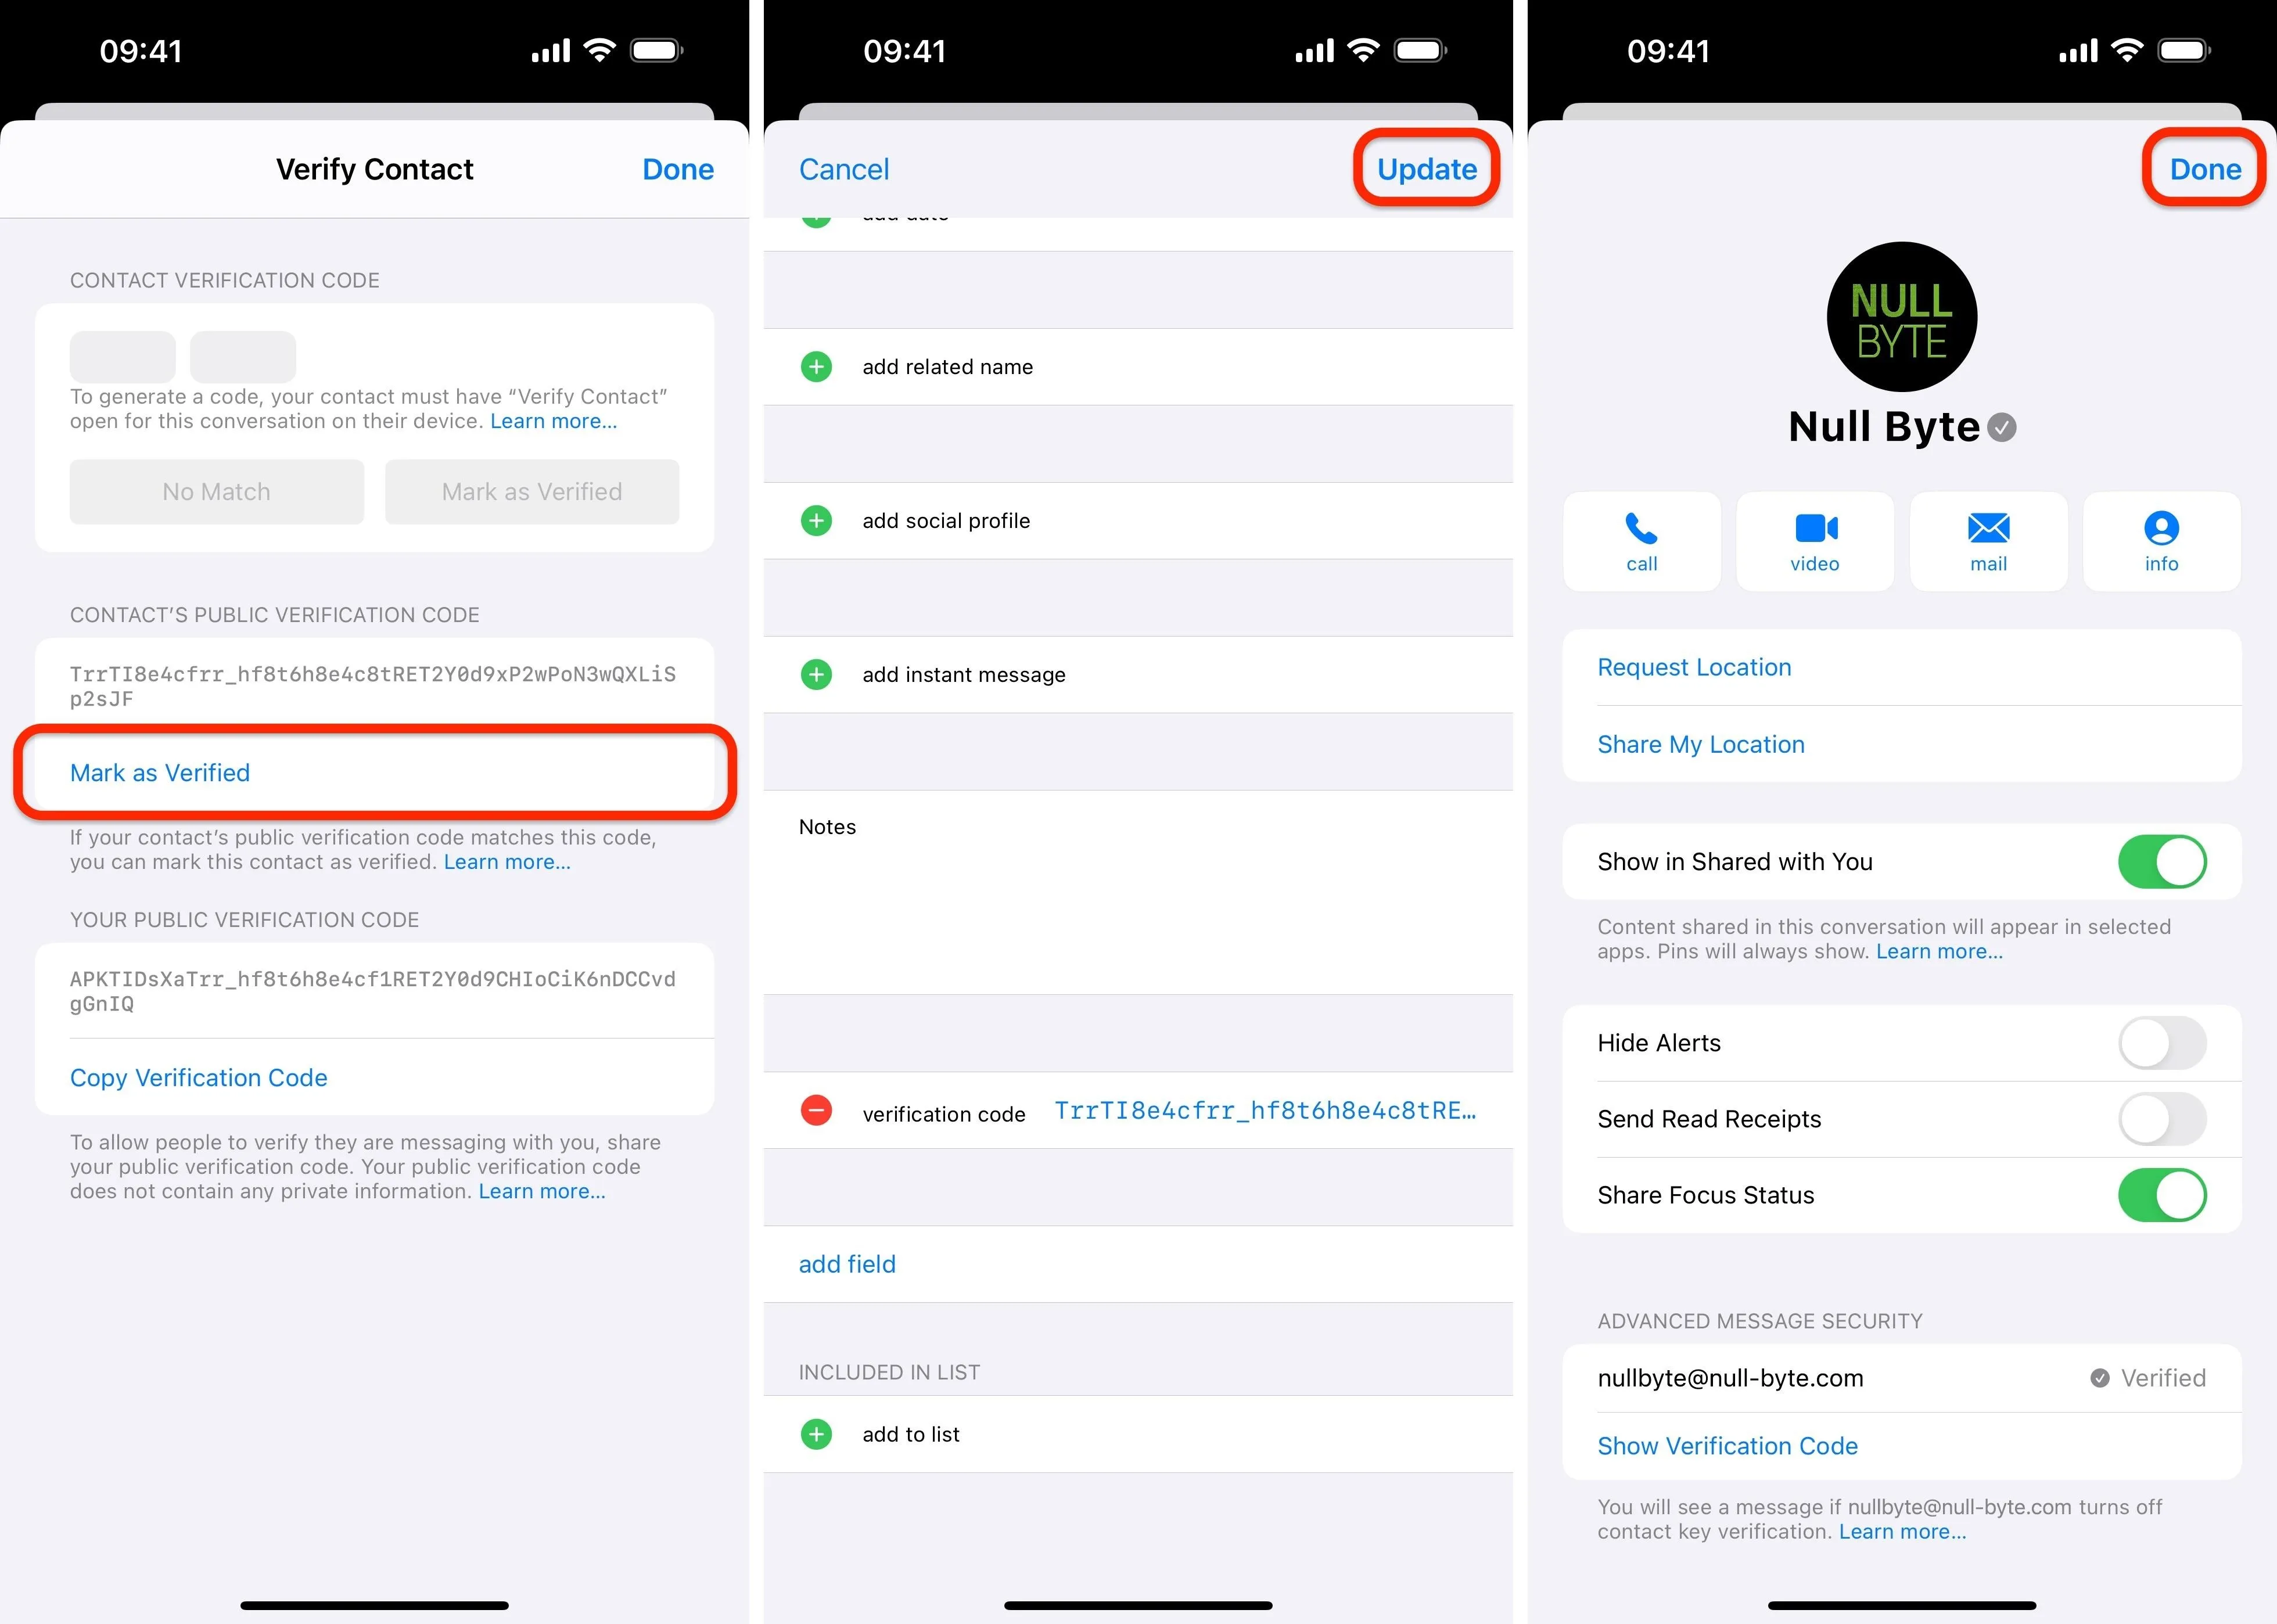
Your contact can use the same process simultaneously to verify you on their end.
Once verified, a checkmark will appear next to the contact's name under their profile photo, and the verified phone number or email address in the Advanced Message Security section of the conversation settings will also have a checkmark as well as "Verified" written next to it.
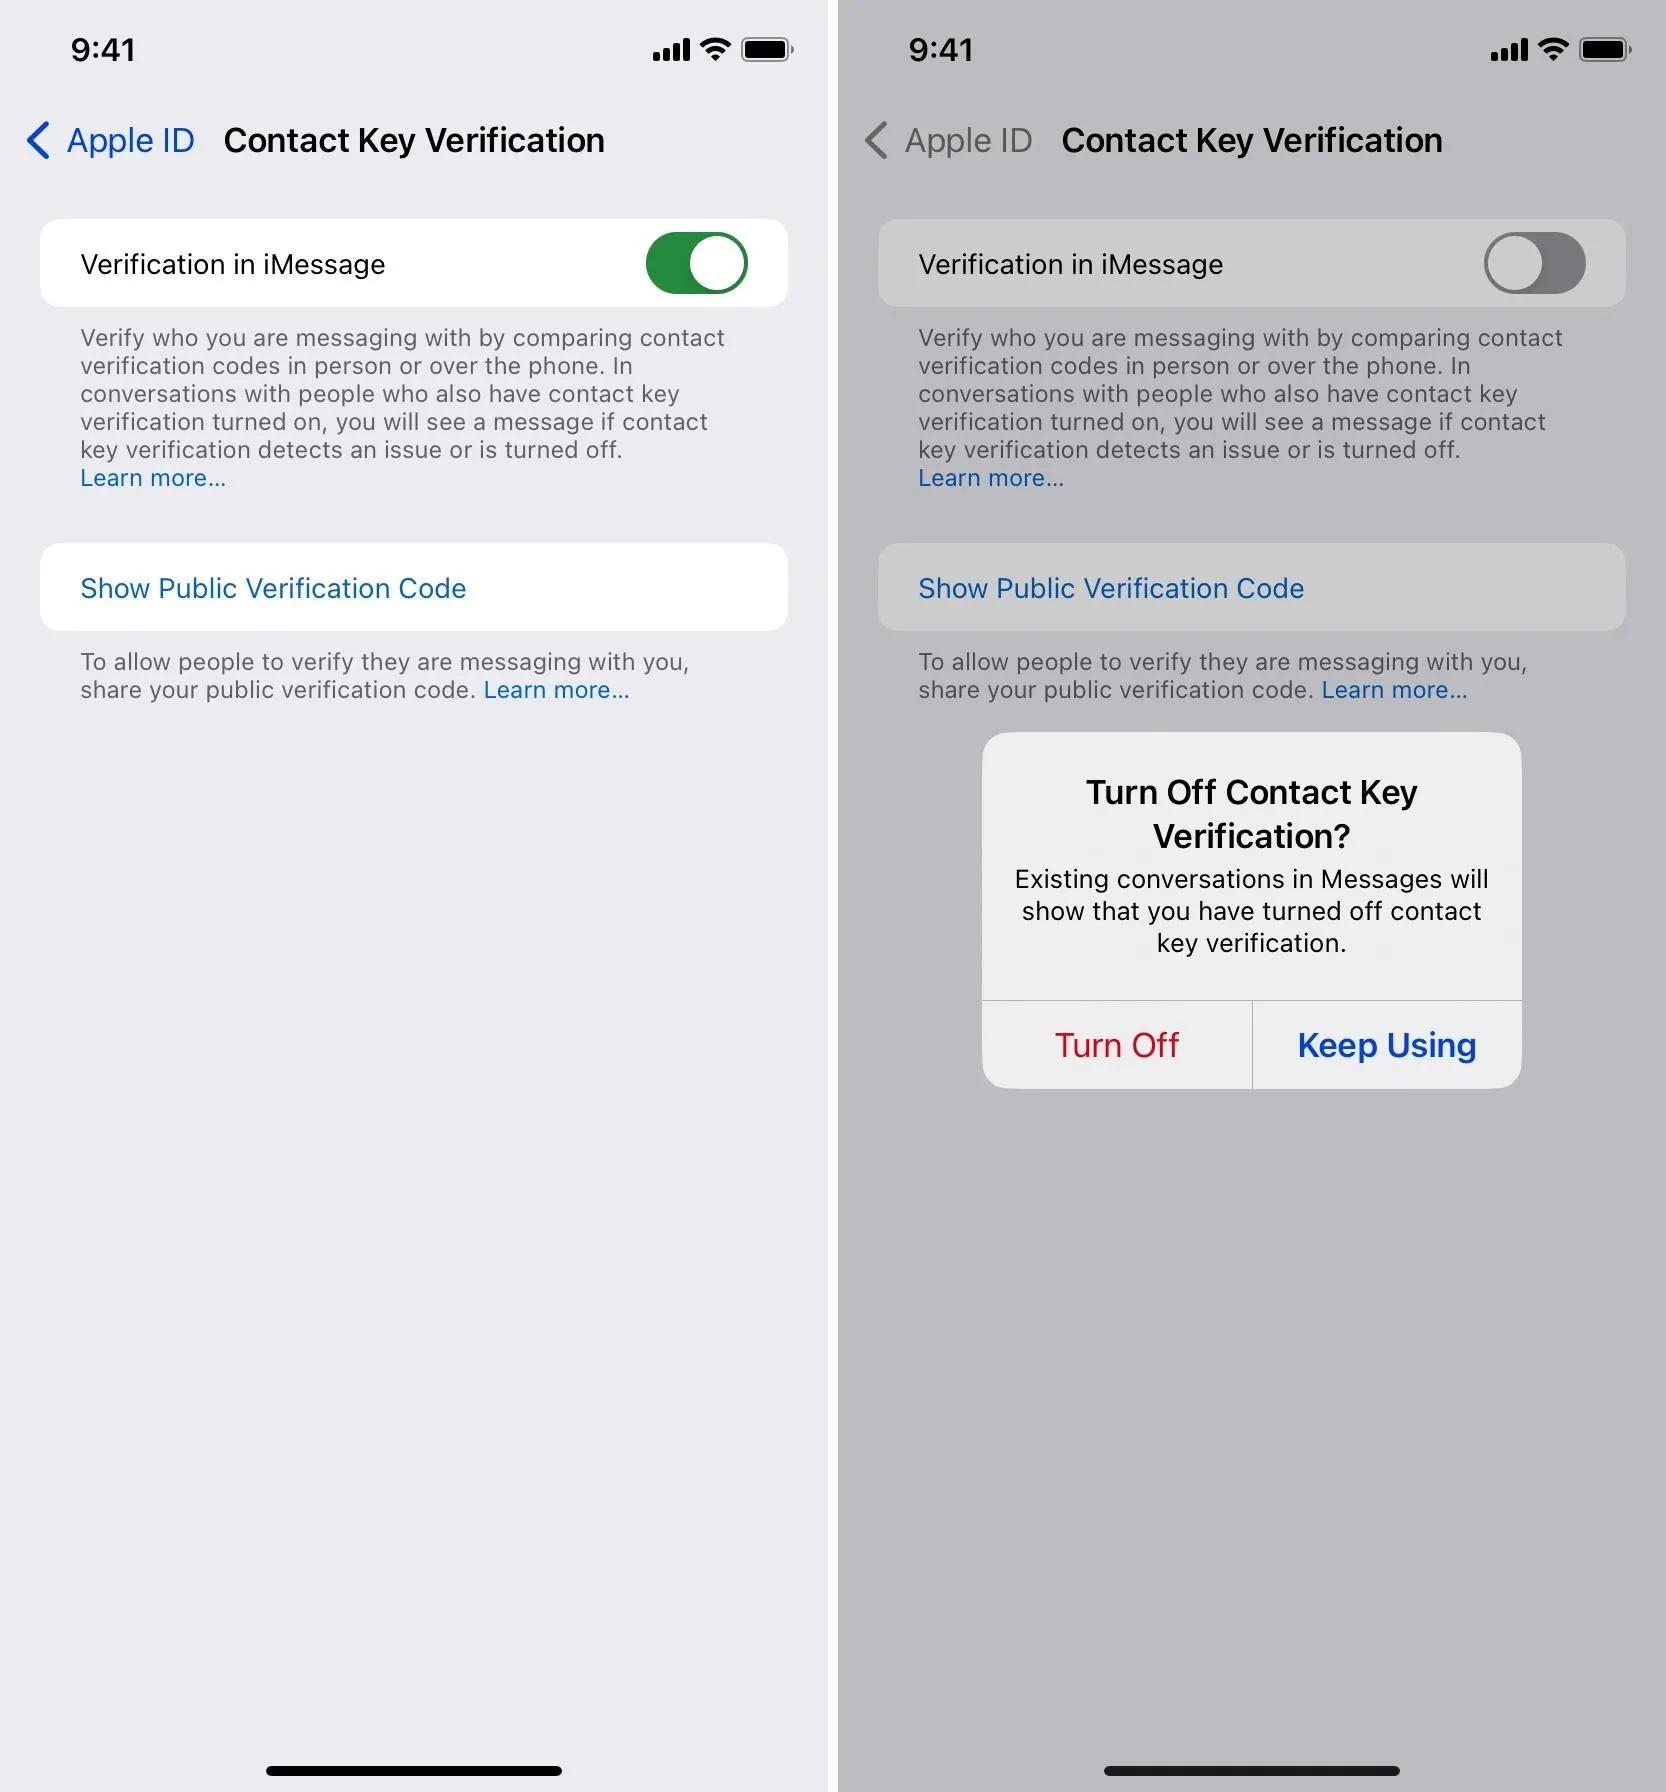
Disabling Contact Key Verification
If you no longer want Contact Key Verification enabled on your iMessage account, you can easily disable it and discontinue using it. To do so, navigate to Settings » Apple ID [your name] » Contact Key Verification. Next, toggle off the "Verification in iMessage" switch. It will then warn you: "Existing conversations in Messages will show that you have turned off contact key verification." Tap "Turn Off" to disable it or "Keep Using" to cancel.
Getting Contact Key Verification Alerts
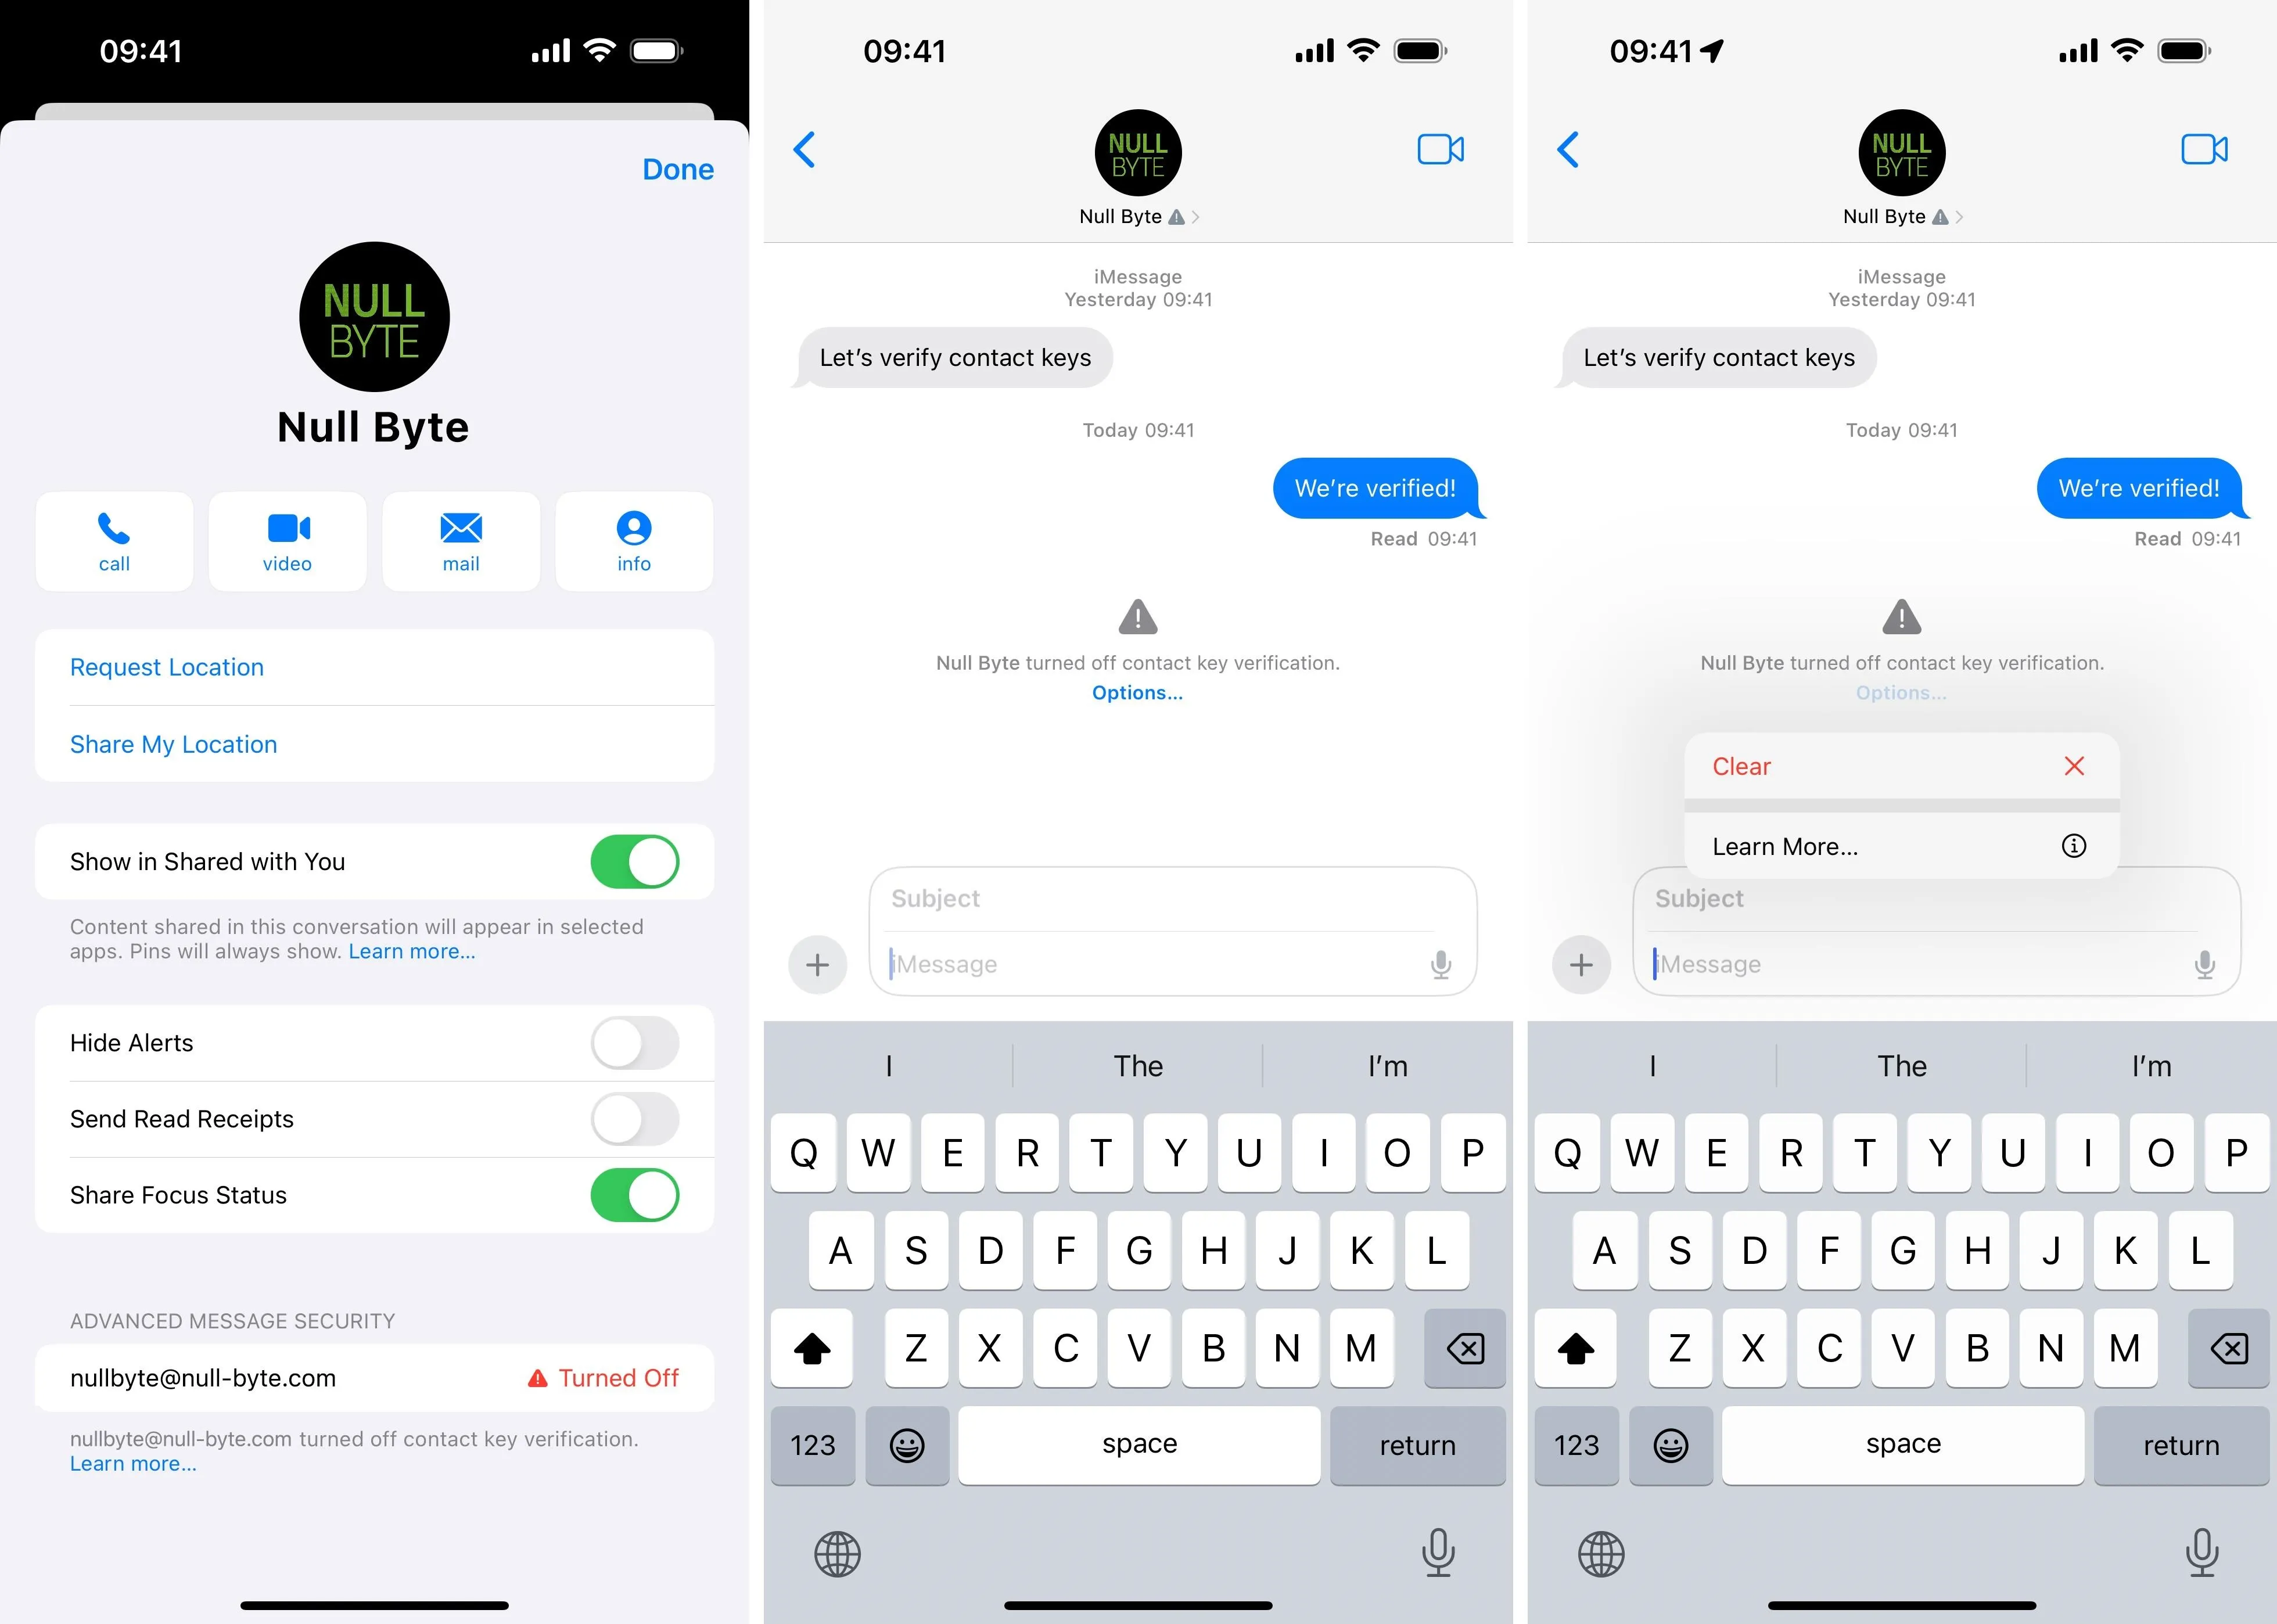
When someone you've verified turns Contact Key Verification off, you will get an alert in the iMessage conversation with them telling you so. Their name up top will have an exclamation sign next to it, and you'll see the same exclamation mark in the conversation at the point it was disabled. To clear the exclamation mark, tap "Options" under "[Name] turned off contact key verification," and then tap "Clear."
According to Apple, you'll also get alerts for:
- An unrecognized new device was added to that person's Apple ID. This alert might mean that the person you are messaging has an issue with one of their devices, or that a sophisticated attacker might be attempting to eavesdrop on the conversation.
- iMessage Contact Key Verification is unavailable. This alert might mean that there's a service outage or that iMessage Contact Key Verification is temporarily unavailable.
- There's an issue with iMessage Contact Key Verification. This alert might mean that there's an issue with one of your devices or your account, or that a sophisticated attacker might be attempting to eavesdrop on the conversation.
Note that contacts who have verified you on their end will see the same warnings and options whenever you disable Contact Key Verification, there's a validation issue with one of your devices, or there's a system outage.
Cover photo and screenshots by Gadget Hacks


Comments
Be the first, drop a comment!