


Apple includes a lot of helpful features for iCloud email addresses, but one of its best-kept secrets will give you total control over organizing your inbox like a pro.
So, what's the big secret?
Subaddressing, also known as plus addressing, tagged addressing, email address tagging, or, more simply put — using email tags or email variations.
Many of you probably don't realize it, but when you first created your iCloud account and picked a custom iCloud email address, that email address came with unlimited email address variations by way of subaddressing.
You may already be familiar with email subaddresses thanks to Gmail, which has supported the feature for as long as anybody can remember. Other email services that support plus email addressing include Fastmail, Microsoft Outlook, Microsoft Exchange Online, and ProtonMail.
Jump to a Section:
- How Subaddressing Works on iCloud Mail
- Why Use Subaddressing on iCloud Mail
- Creating Rules to Filter Your Subaddresses
- Method 1: On Your iPhone or iPad in Settings
- Method 2: On iCloud.com
- Throwing Away iCloud Mail Subaddresses
How Subaddressing Works on iCloud Mail
Subaddressing gives your iCloud email address dynamic, disposable recipient email addresses for your inbox using the syntax:
- your-username+tag@icloud.com
So, to create a throwaway sub-email-address, type out your username (the local part of your iCloud email address), add a plus sign (+), and type a tag, such as "news," "banking," or "forums."
This trick works with @icloud.com email addresses and the older @me.com (MobileMe) and @mac.com (.Mac) email domains.
Why Use Subaddressing on iCloud Mail
Creating variations of your @icloud.com, @me.com, and/or @mac.com email addresses gives you total control over organizing your inbox. You won't be able to send emails via your plus addresses like you can with email aliases since they're only for emails sent to you. Still, you will have control over what the email variations are, unlike when using Apple's Hide My Email feature.
Here are a few reasons why sub-addressing is so useful:
1. Organize Your Inbox
When signing up or updating your login information for accounts in news apps or on news websites, you could give them your-username+news@icloud.com, then filter iCloud Mail to show only incoming news-related emails to that address.
Some ideas:
- your-username+news@icloud.com
- your-username+shopping@icloud.com
- your-username+work@icloud.com
- your-username+banking@icloud.com
- your-username+forums@icloud.com
- your-username+hobbies@icloud.com
- your-username+movies@icloud.com
- your-username+music@icloud.com
- your-username+politics@icloud.com
- your-username+school@icloud.com
2. Find Emails from One Company
Aside from using plus addresses to consolidate like-minded emails in your iCloud Mail inbox, you can also use a different appended tag per online account. This way, you can effortlessly search for and find any incoming or archived emails from a single company that uses different sender domains or subdomains for various purposes or projects.
3. See Who's Selling Your Information
By using a different appended tag per online account, you'll also be able to tell who is selling your information the most. For instance, if you sign up for TikTok and use your-username+tiktok@icloud.com, and you all of a sudden start getting a storm of spam emails from unknown companies and scammers, you would know that TikTok sold your information or was hacked. You can then set up a rule to automatically delete all incoming emails to that subaddress.
4. Protect Your Online Accounts from Hackers
If a hacker acquires your email address, they could use it as the username for various online accounts when trying to crack passwords or perform password resets. With plus email addresses, it would be harder for the hacker to reuse the same email address across websites.
Creating Rules to Filter Your Subaddresses
You can create email routing or filtering rules for iCloud Mail directly on your iPhone or iPad or iCloud.com. As long as syncing for iCloud Mail is enabled on all your devices, your rules will sync across all your devices, including your Mac computer.
Important note about the Mail app on macOS:
The rules you create on your iOS or iPadOS or on iCloud.com will sync to your inbox in the Mail app for macOS as long as you have iCloud Mail turned on with "Sync this Mac" enabled for the Mac in your iCloud settings. However, you cannot view or edit iCloud Mail rules from the Mail app's settings on macOS. You can only create local rules that sync across your Mac computers only.
On Your iPhone or iPad in Settings
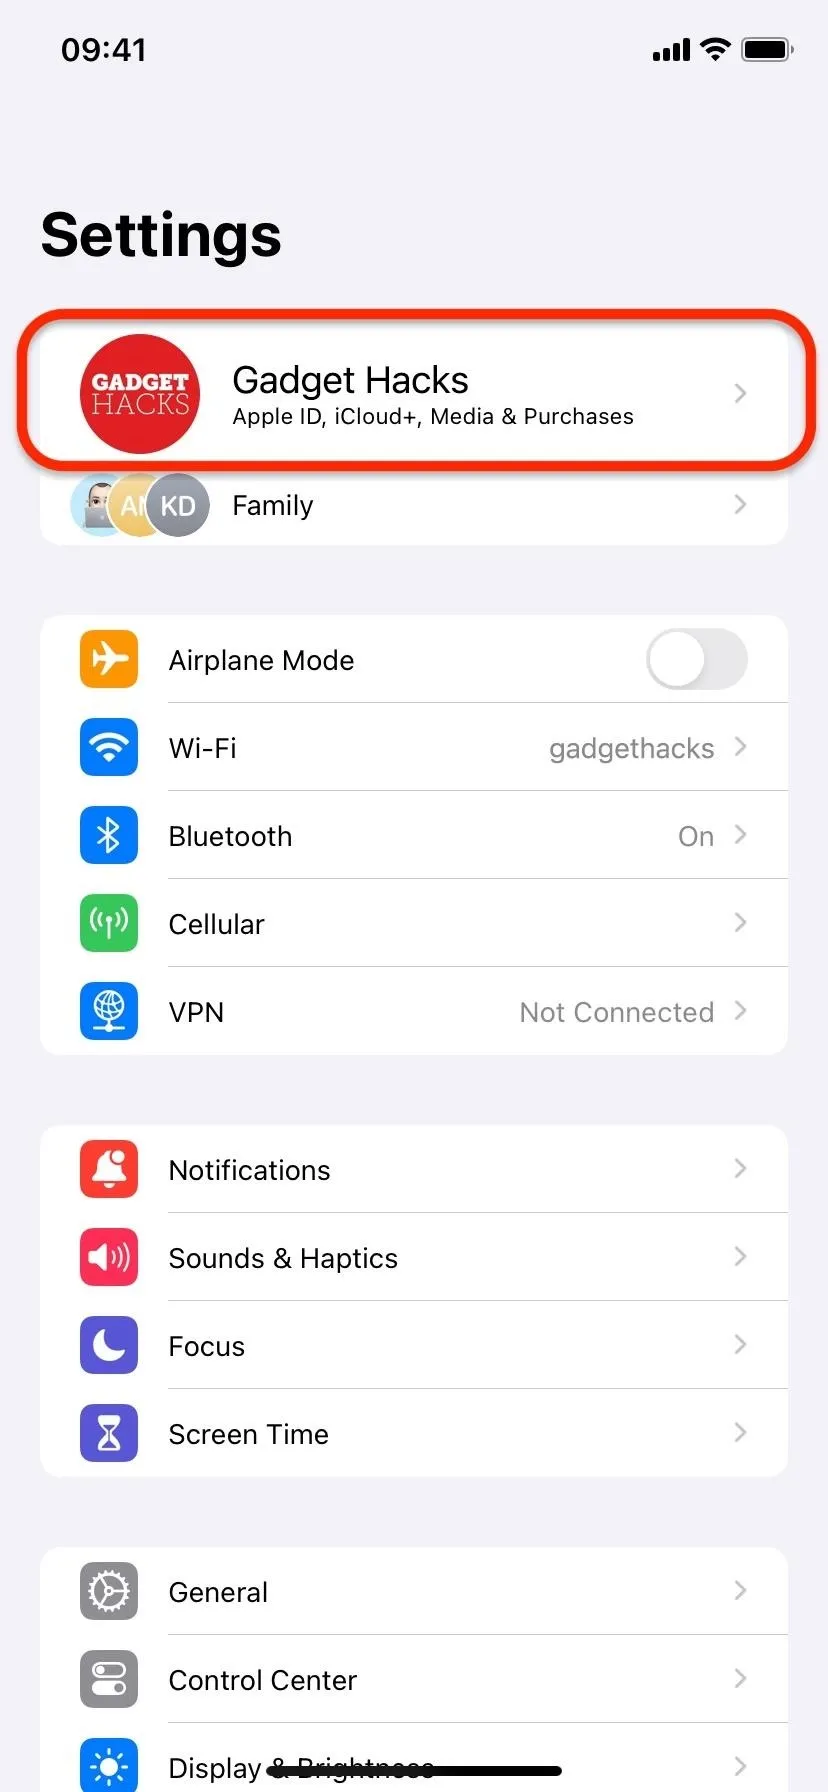
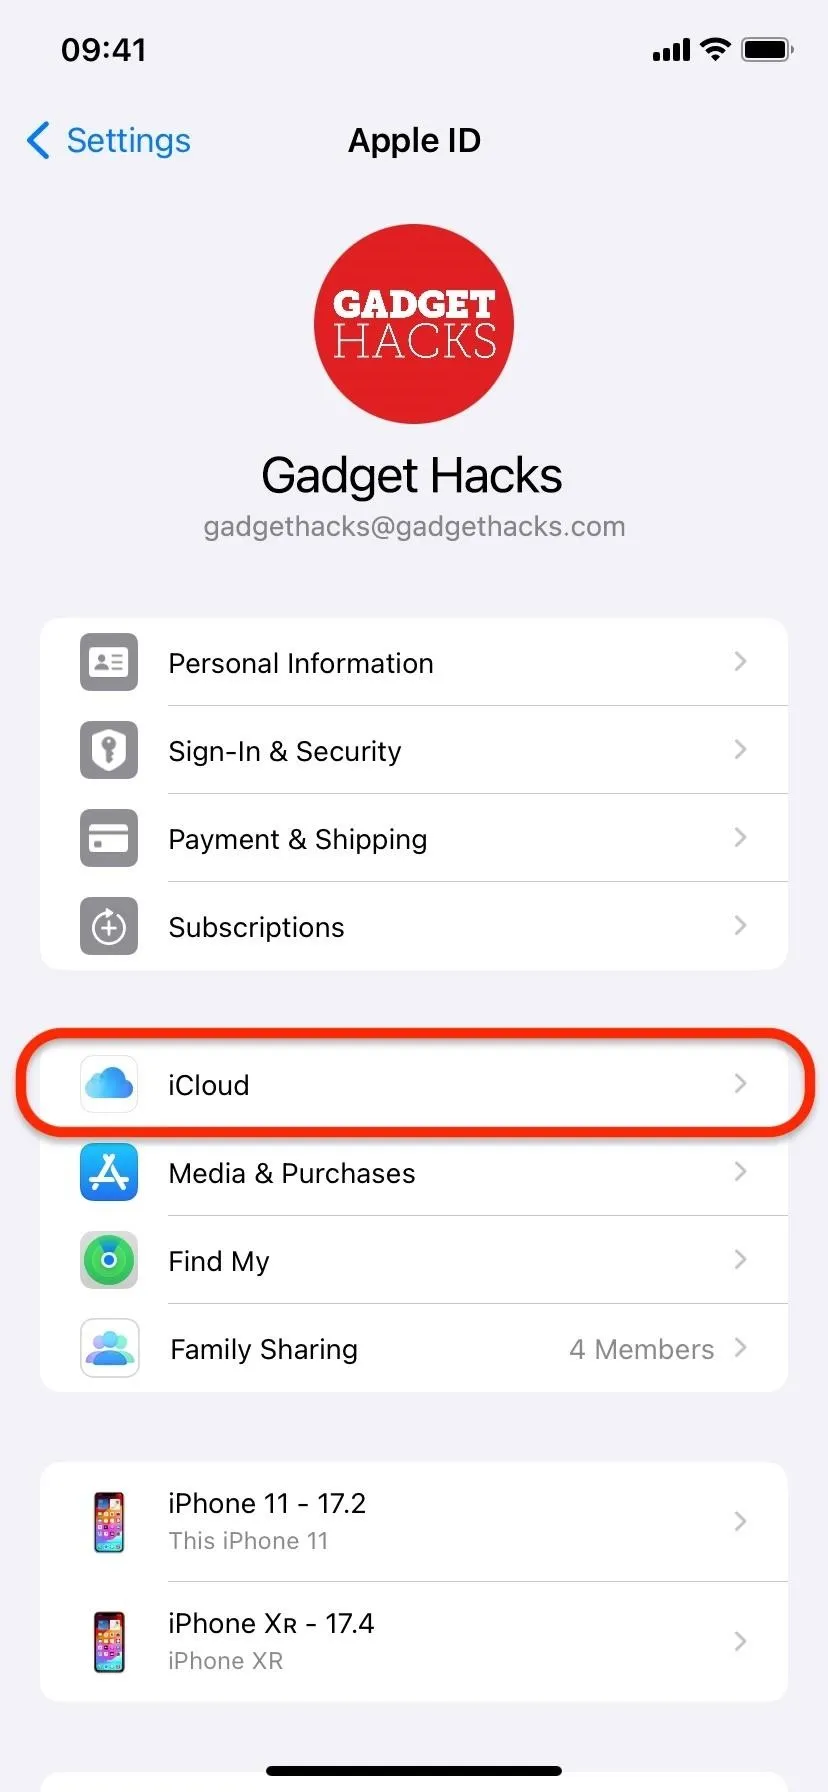
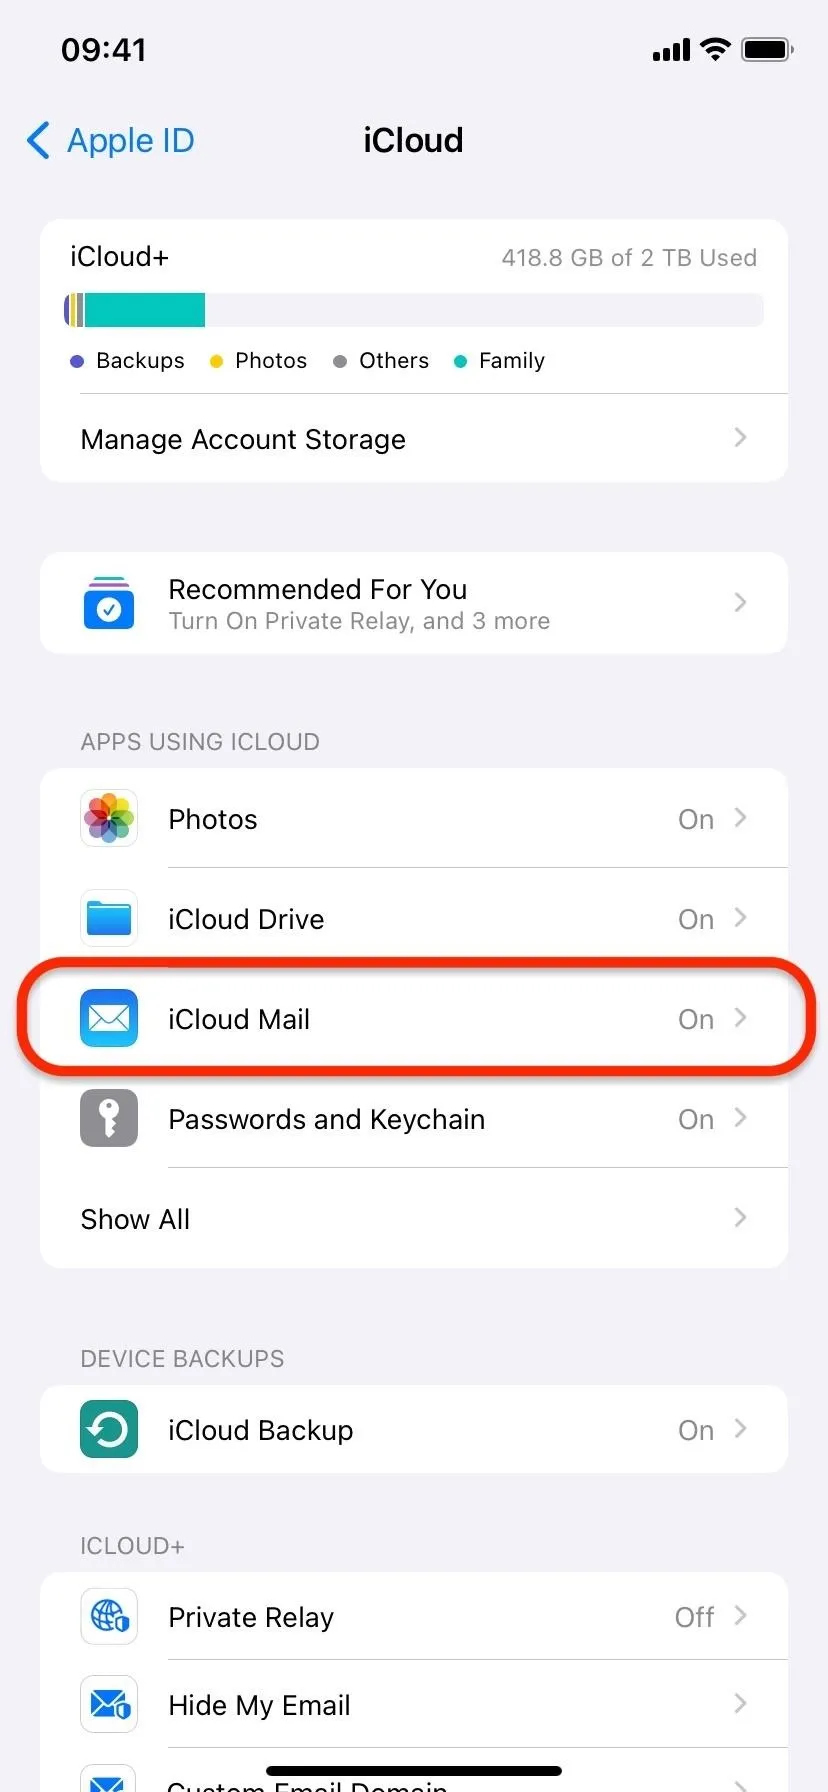
Open Settings, tap your name at the top, select "iCloud," and choose "iCloud Mail." Alternatively, you can take the long route via Settings –> Mail –> Accounts –> iCloud –> iCloud –> iCloud Mail.
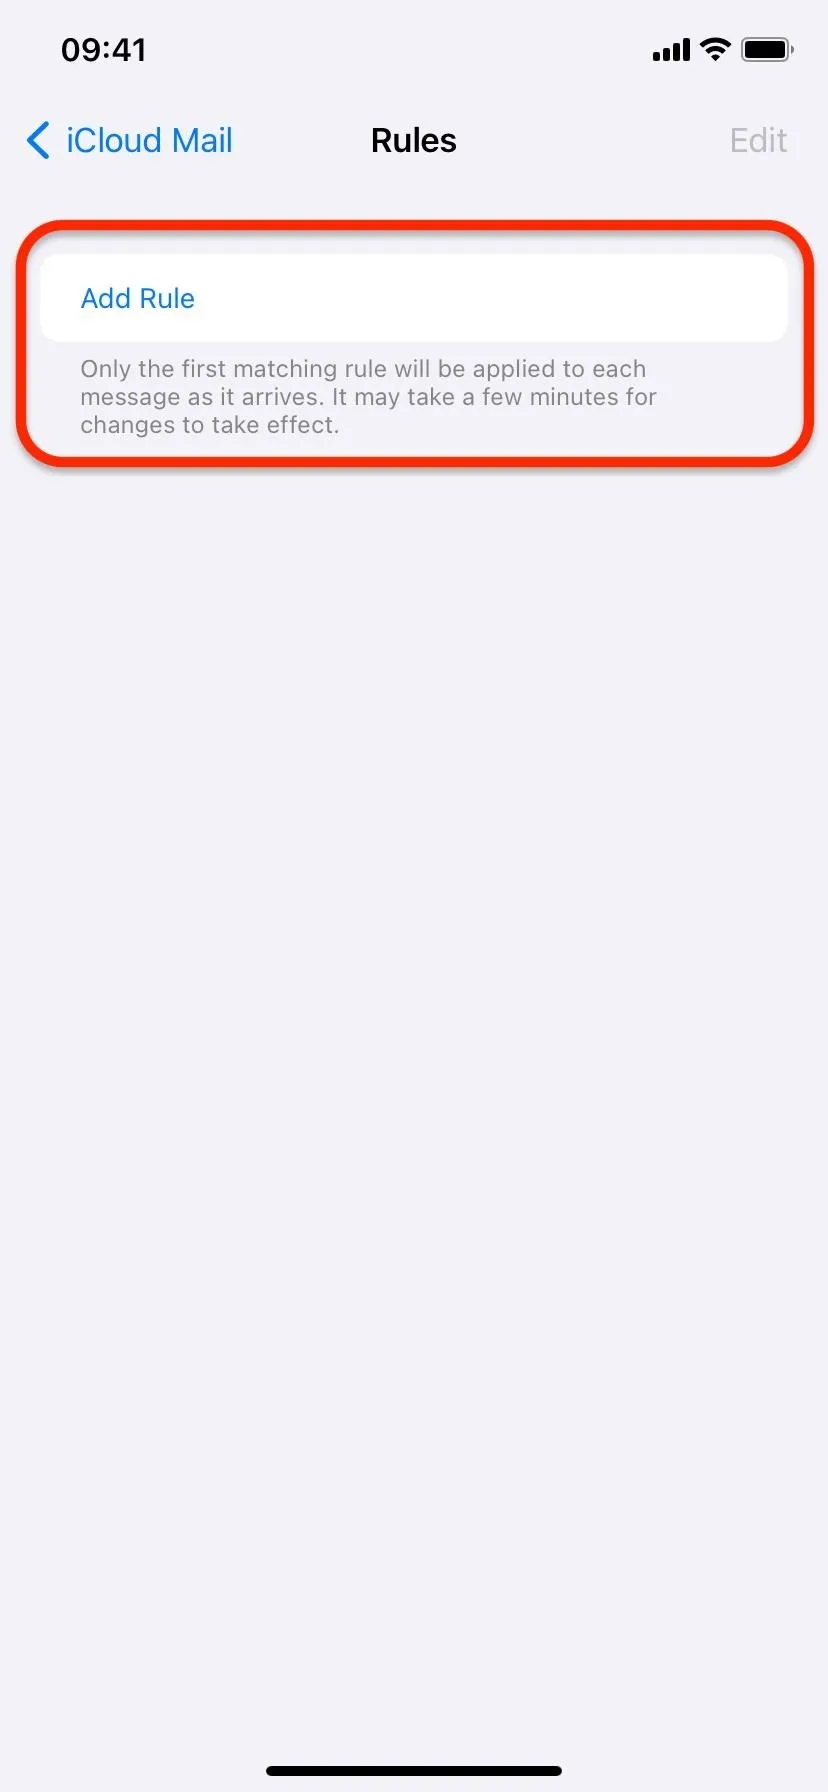
Ensure "Use on this iPhone" or "Use on this iPad" is switched on, then tap "iCloud Mail Rules," followed by "Add Rule."
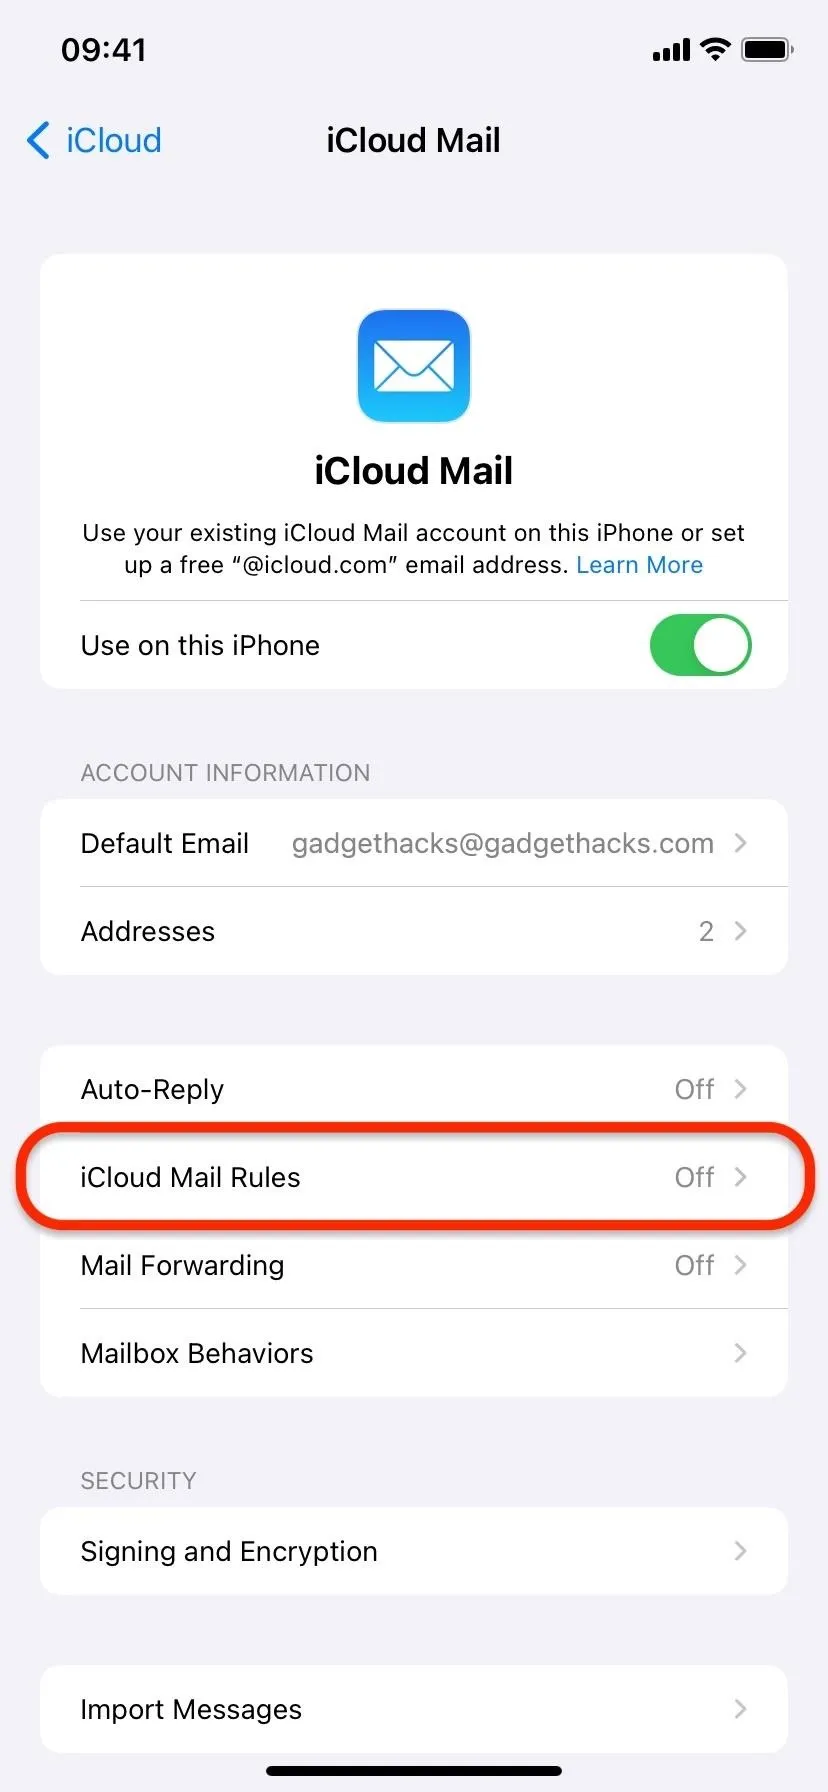
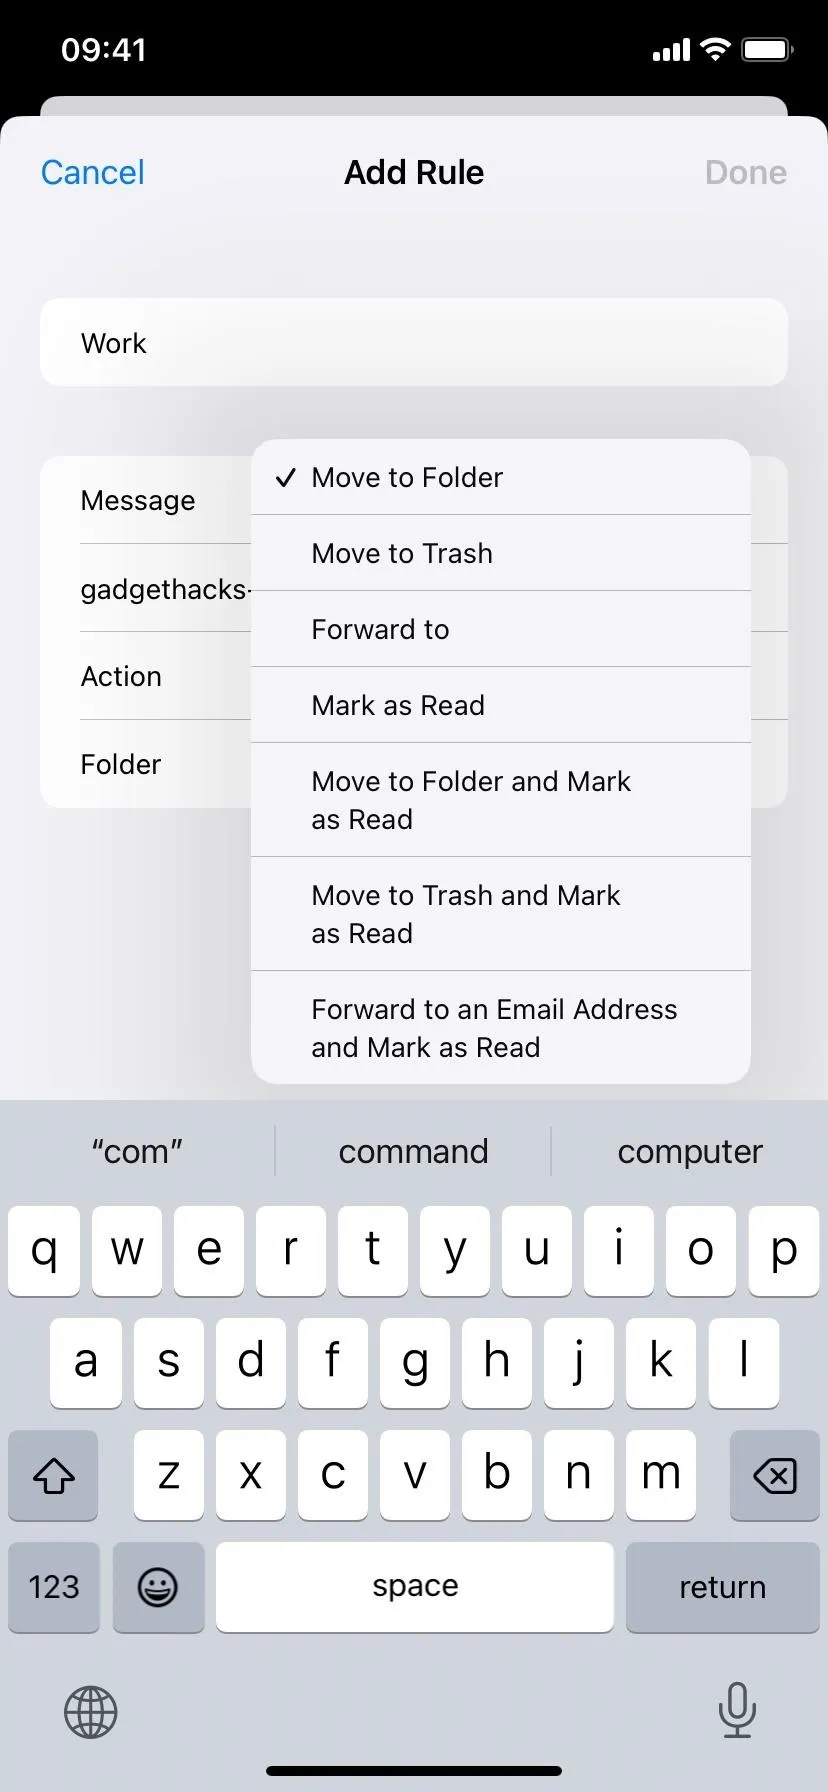
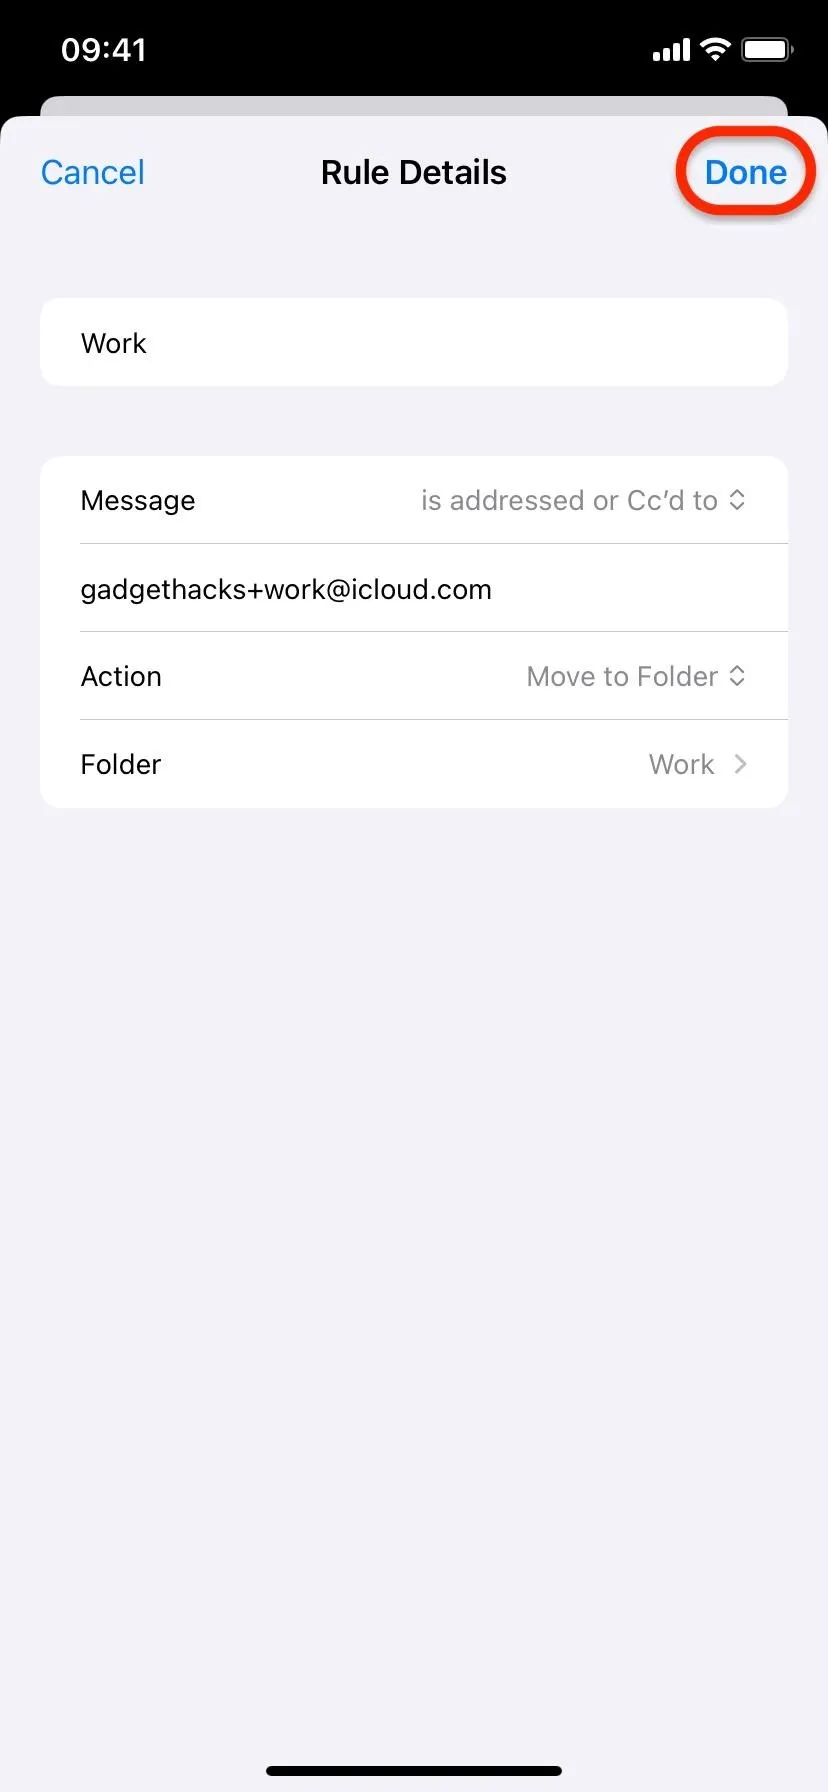
You can give the rule a name and choose either "is addressed to," "is Cc'd to," or "is addressed or Cc'd to" for the Message field. Then, add your @icloud.com, @me.com, or @mac.com email address with the appended +tag before the @ sign.
Then, choose the action, which can be:
- Move to Folder
- Move to Trash
- Forward to
- Mark as Read
- Move to Folder and Mark as Read
- Move to Trash and Mark as Read
- Forward to an Email Address and Mark as Read
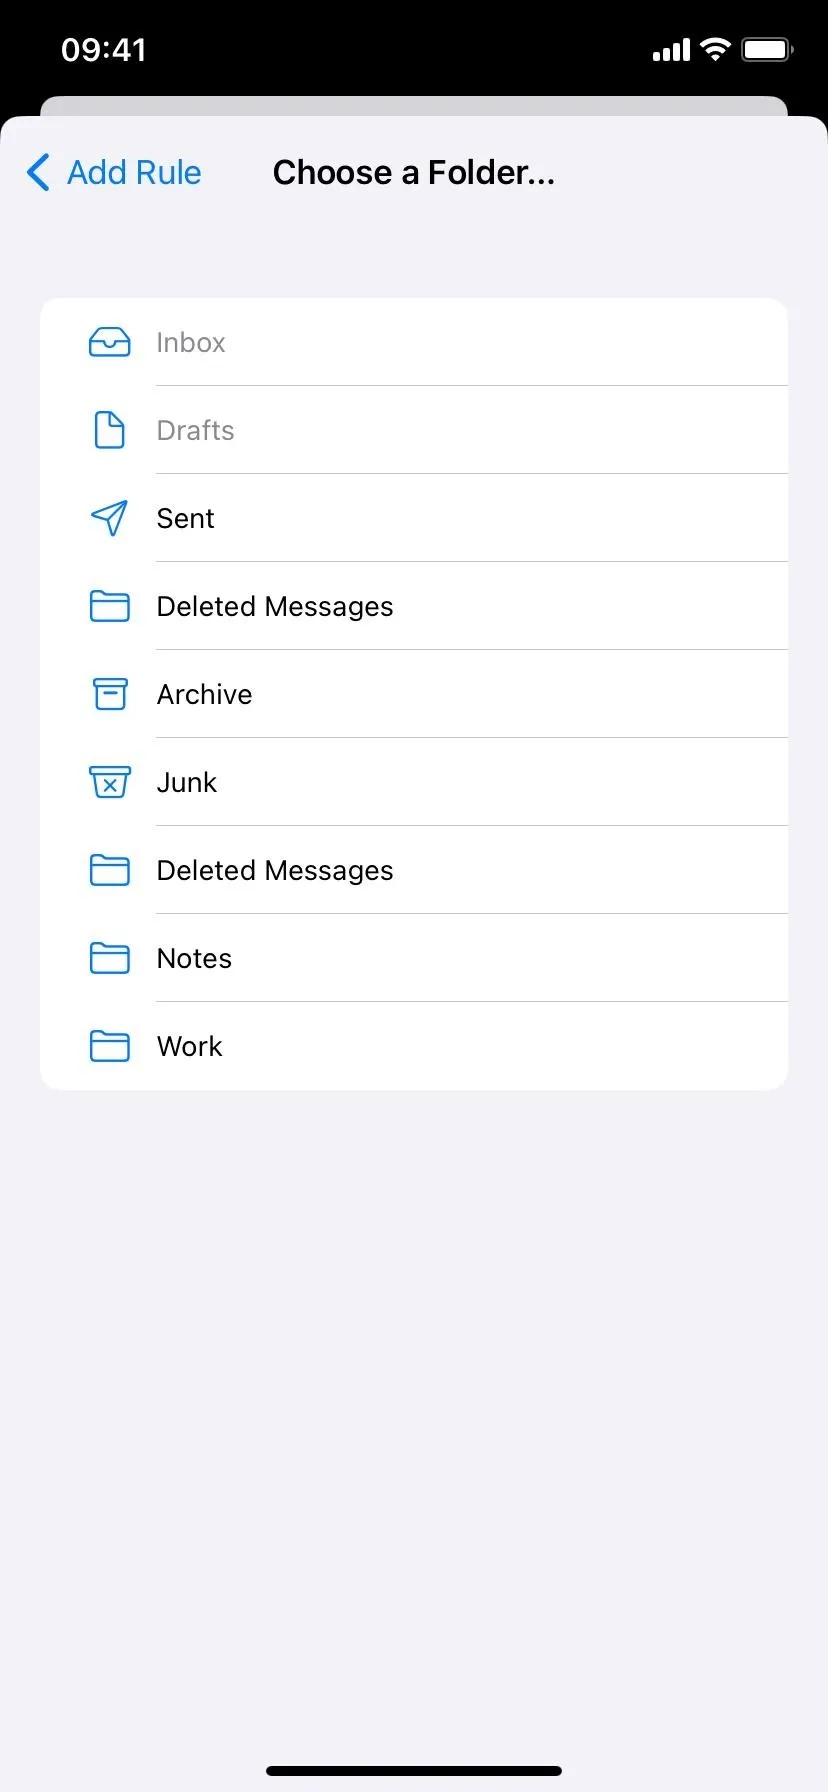
If you want to add the incoming emails to a folder but haven't created the folder yet, create the folder in Mail first. Open Mail to the main Mailboxes view, tap "Edit," tap "New Mailbox," name it, make the location on iCloud, hit "Save," and then tap "Done."

Once you've created the rule, tap "Done" to save it. You can edit it later from the iCloud Mail Rules page or on iCloud.com (see Method 2 below).

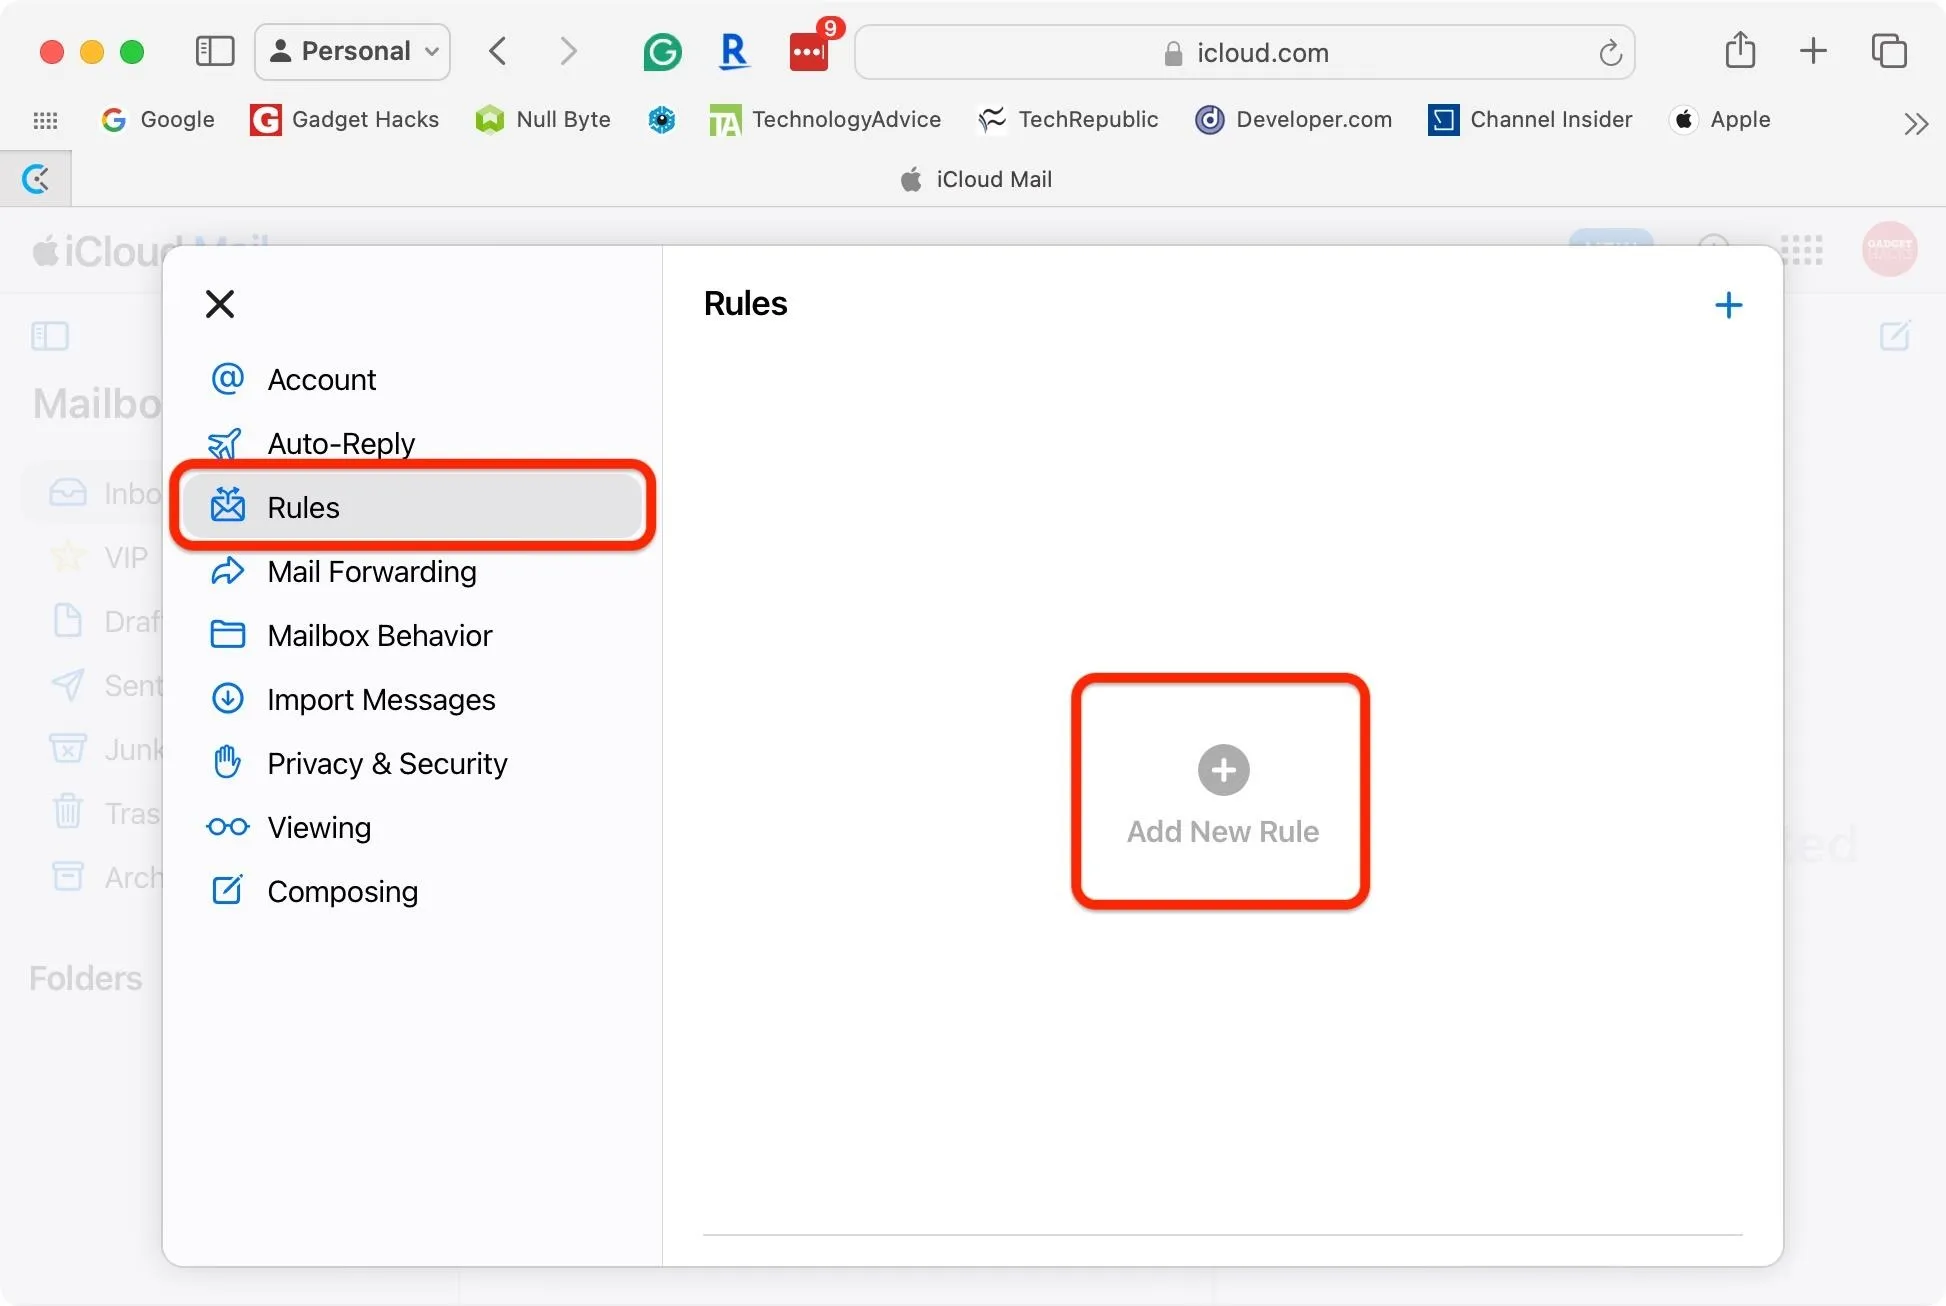
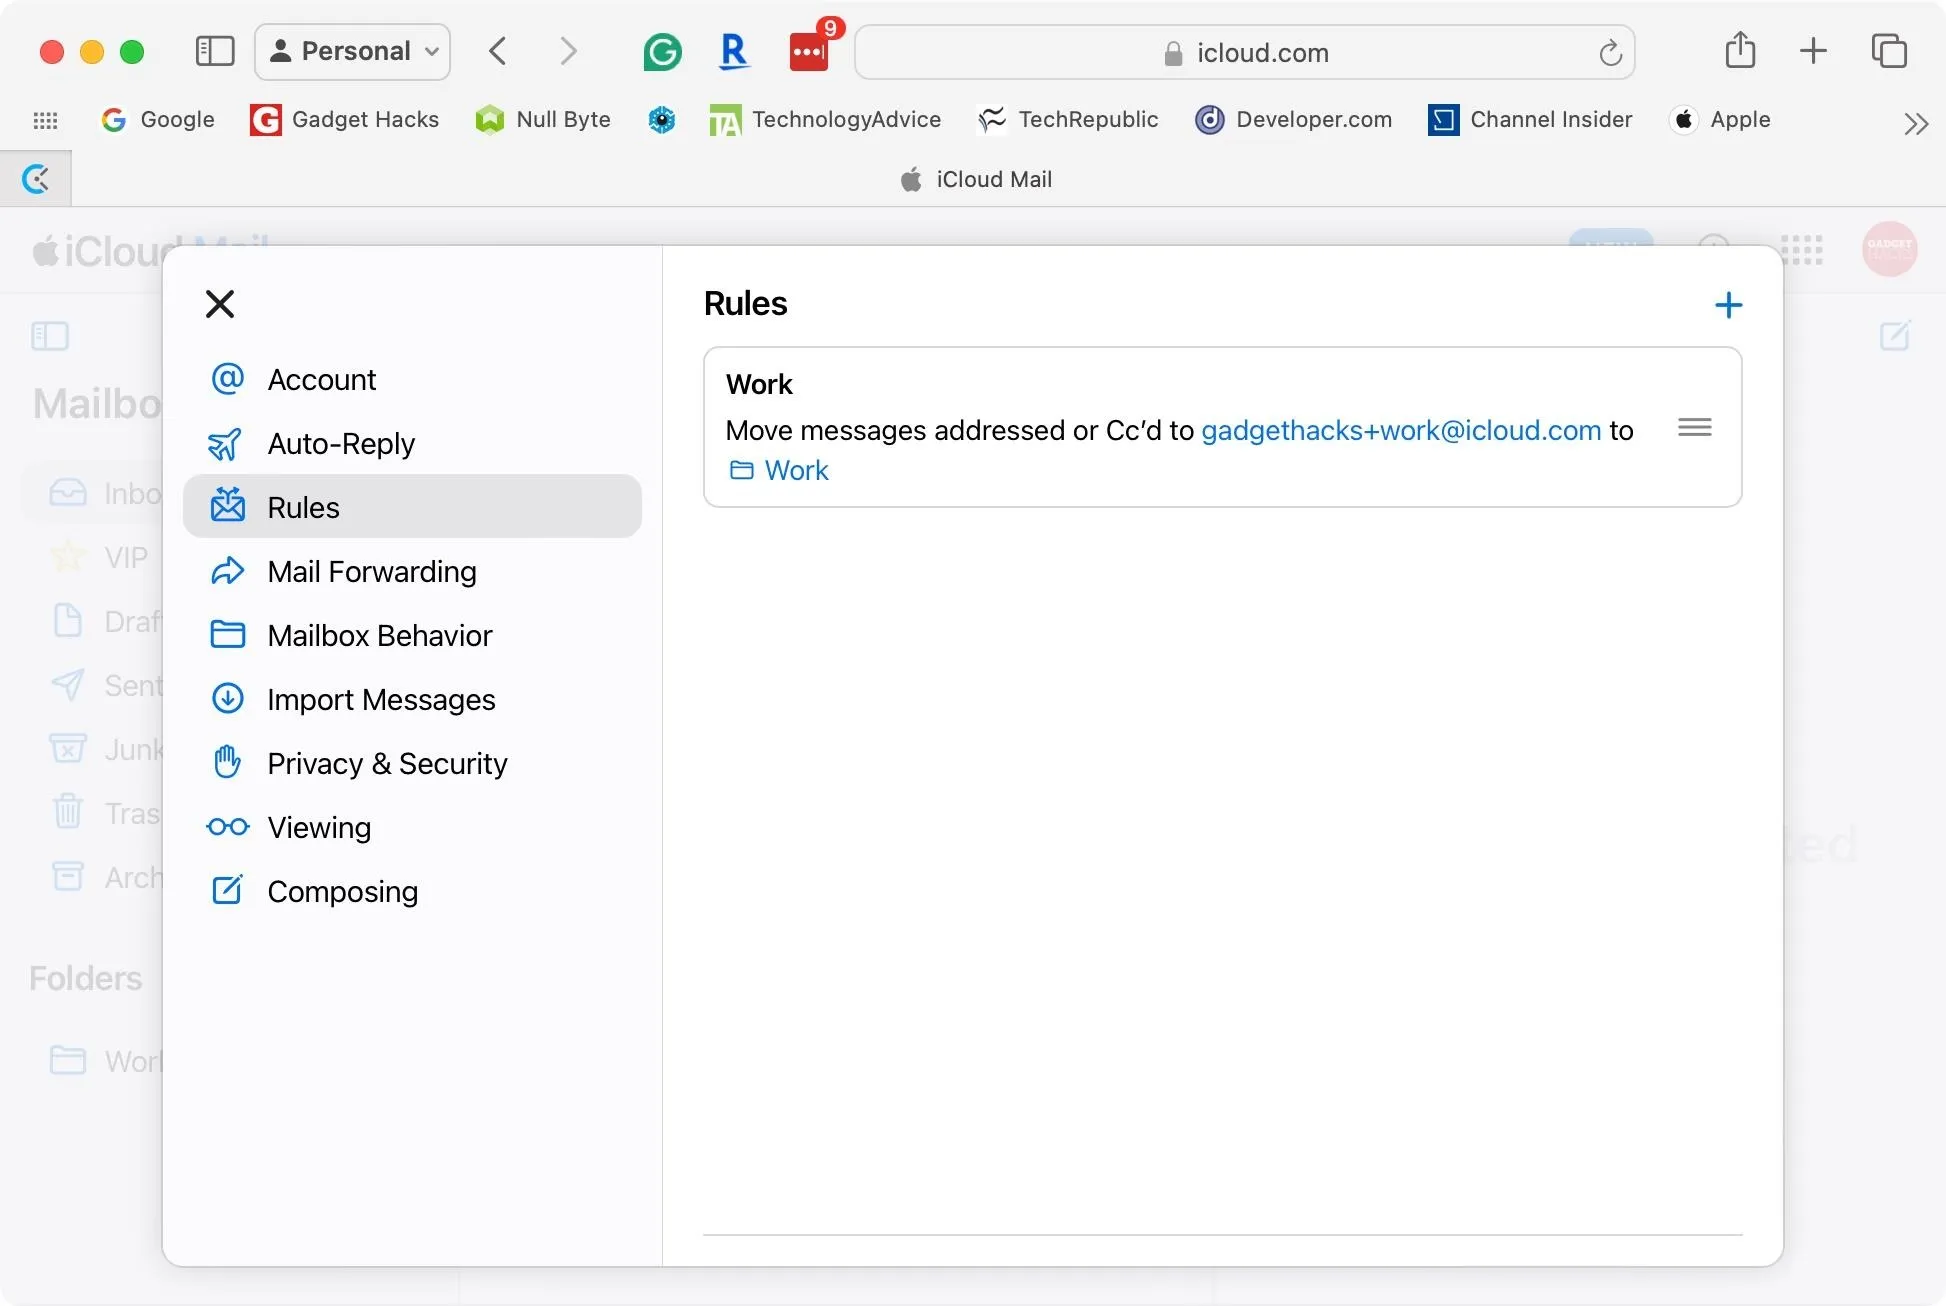
On iCloud.com
Open icloud.com/mail in a web browser on your iPhone, iPad, Mac, or another device. Log in with your Apple ID, then click the Settings icon, followed by "Settings."
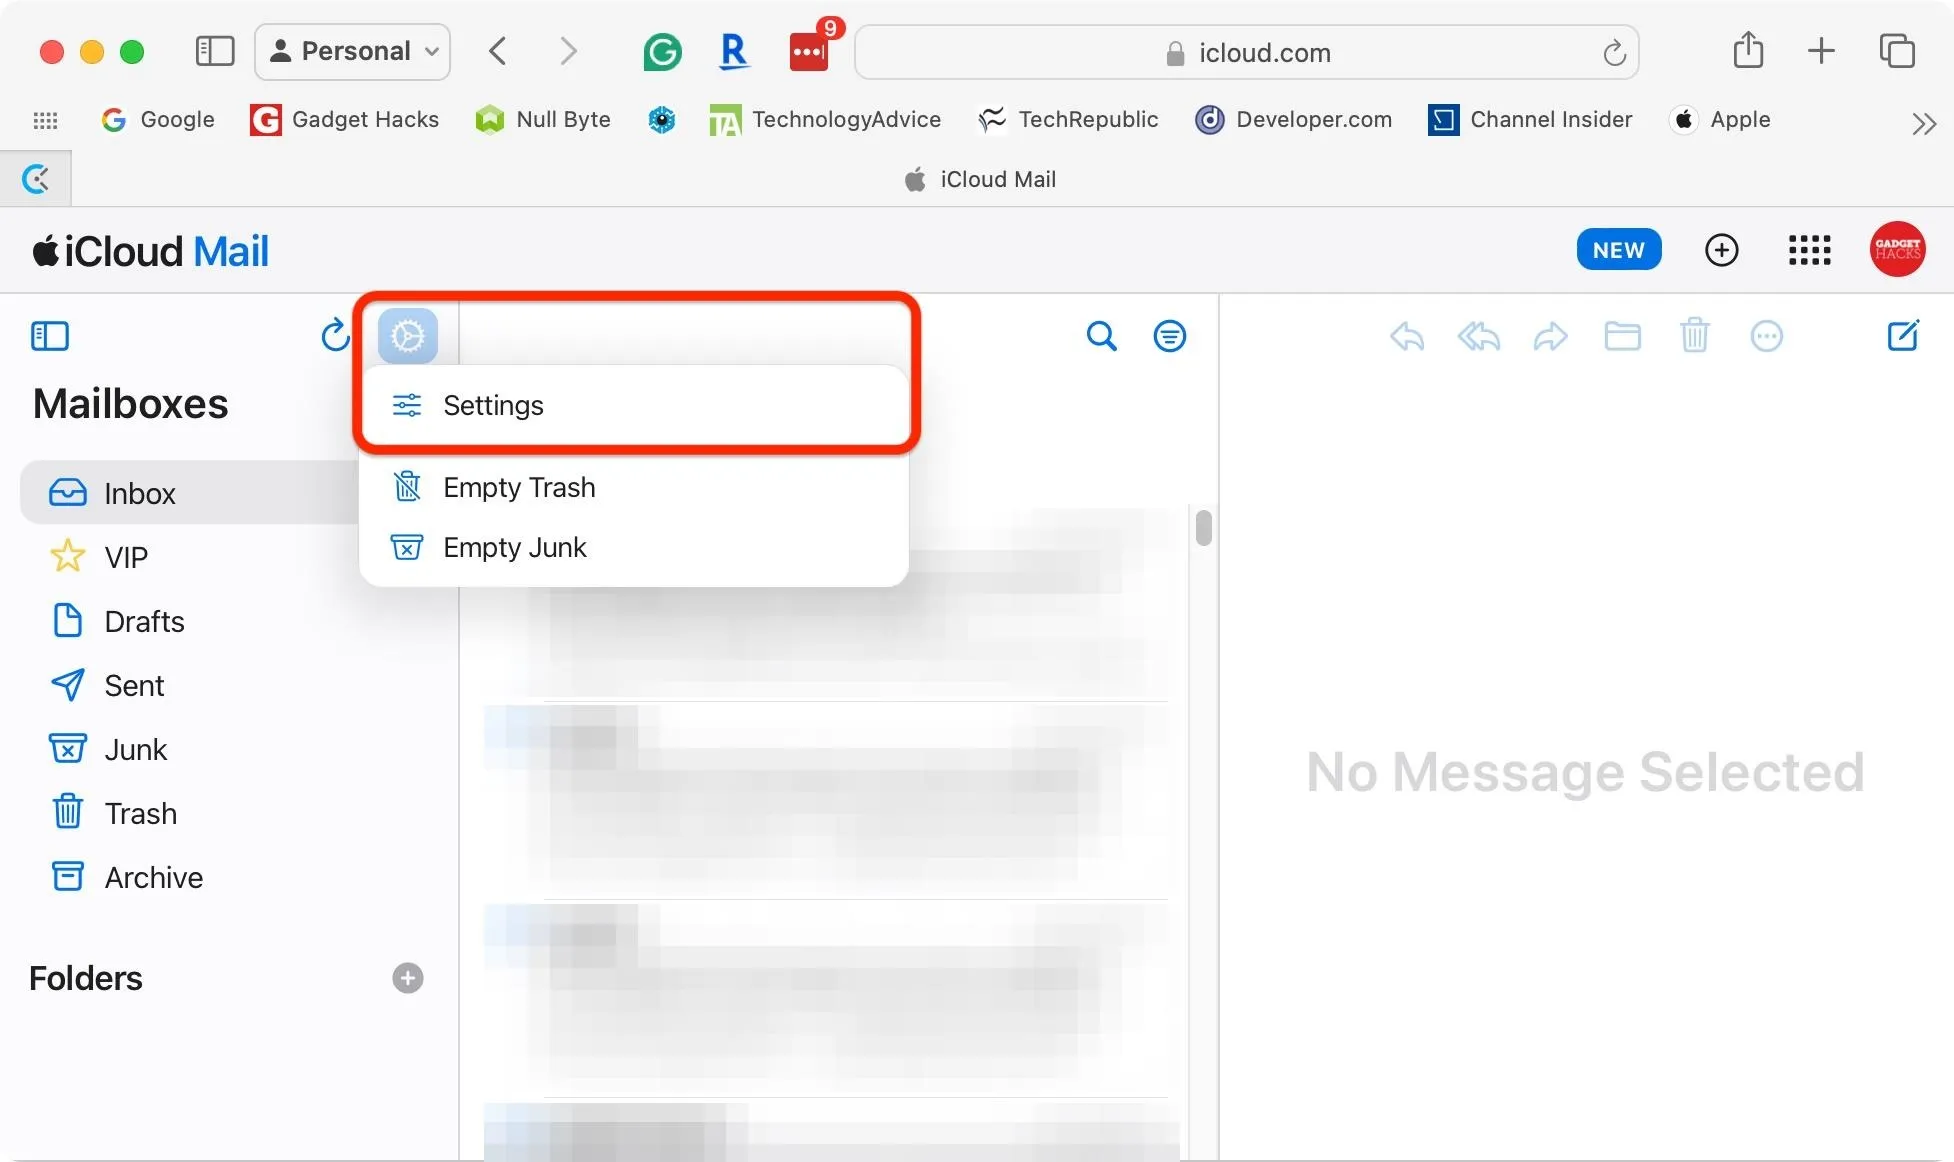
Next, open the "Rules" tab, then choose "Add New Rule" or hit the plus sign (+).
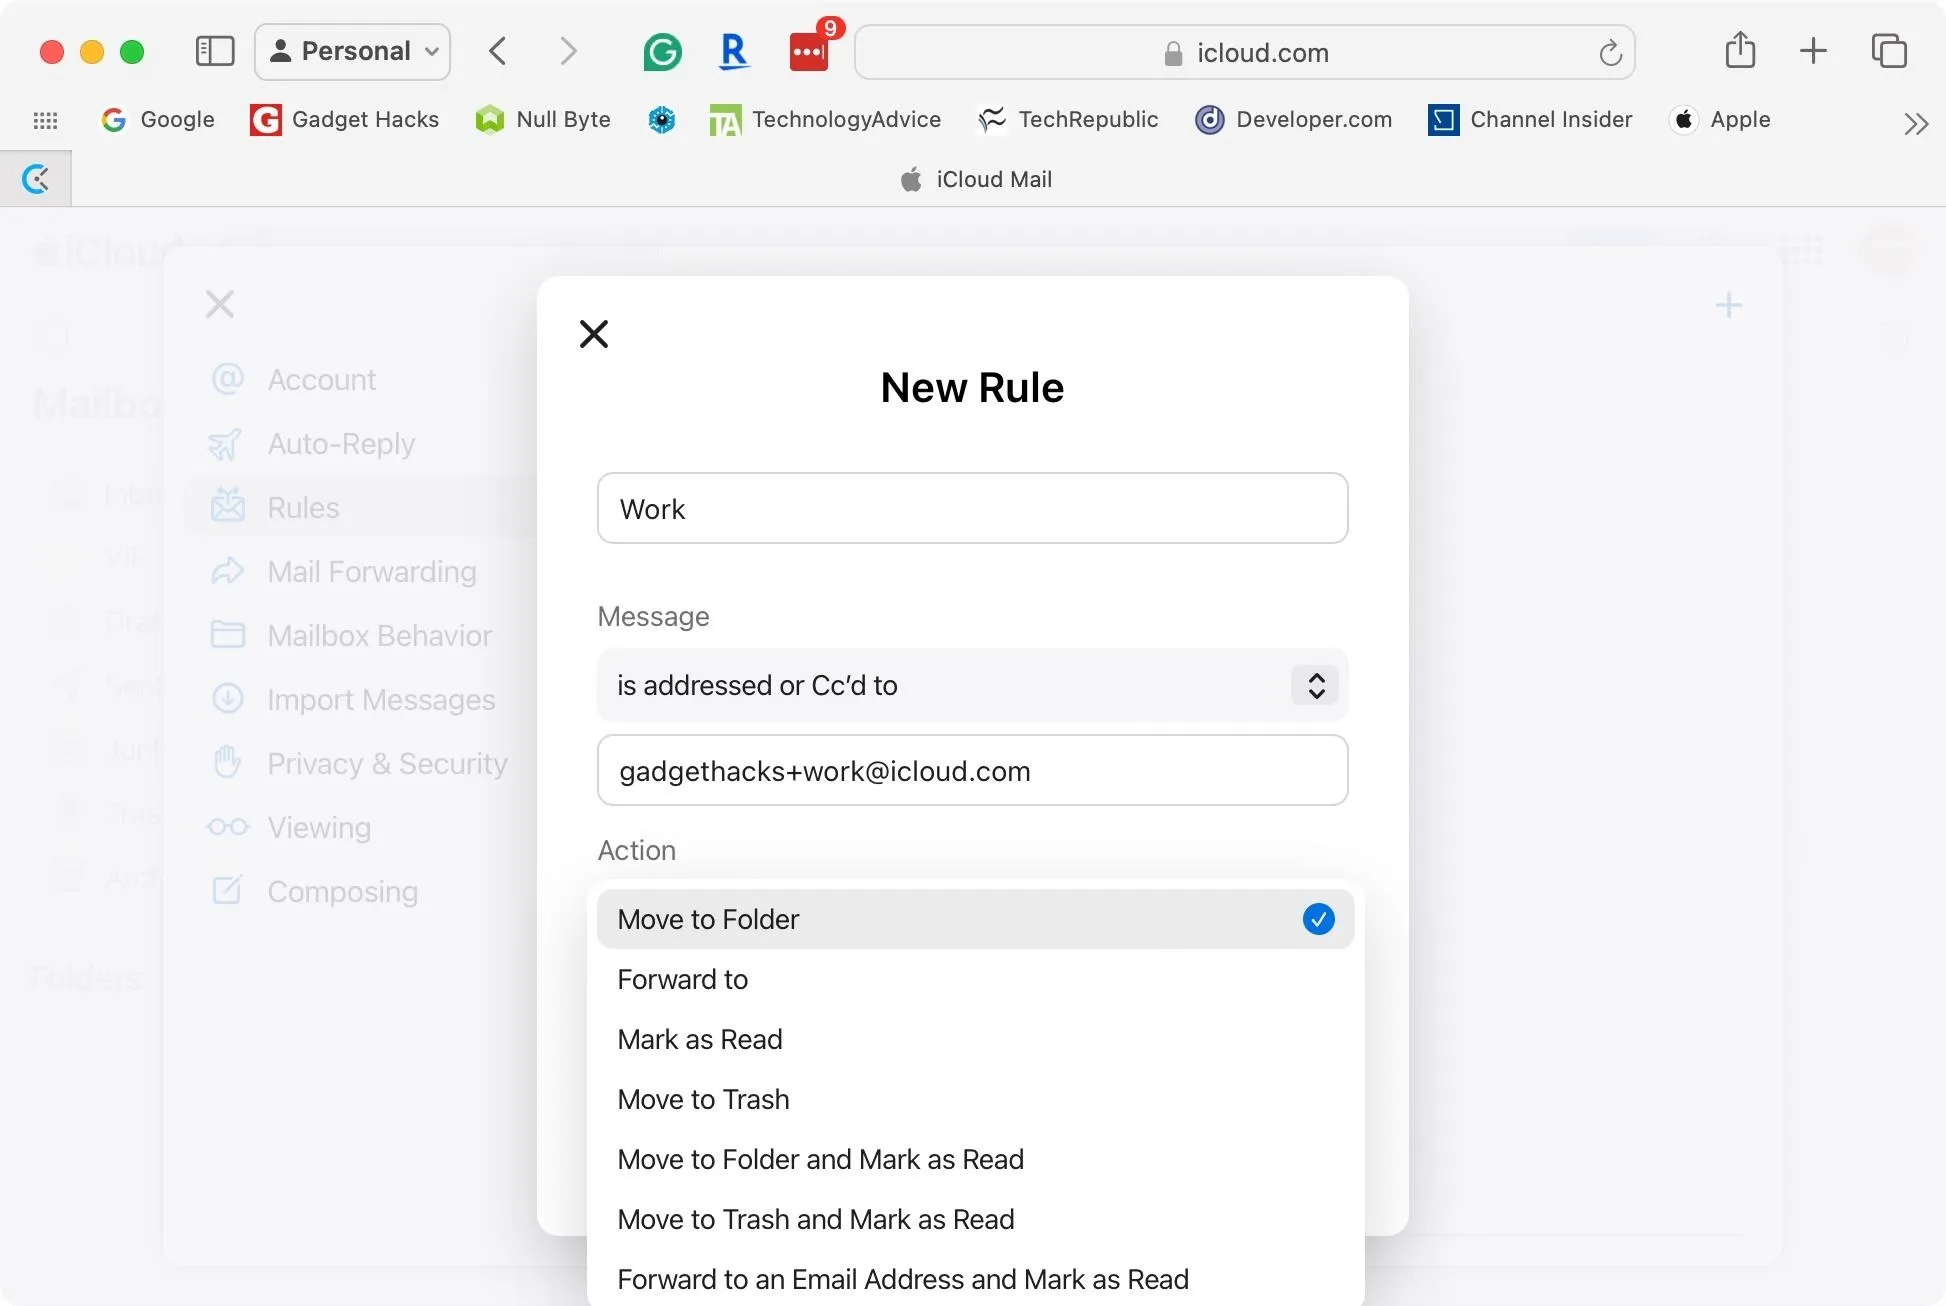
You can give the rule a name and choose either "is addressed to," "is Cc'd to," or "is addressed or Cc'd to" for the Message field. Then, add your @icloud.com, @me.com, or @mac.com email address with the appended +tag before the @ sign.
Then, choose the action, which can be:
- Move to Folder
- Move to Trash
- Forward to
- Mark as Read
- Move to Folder and Mark as Read
- Move to Trash and Mark as Read
- Forward to an Email Address and Mark as Read
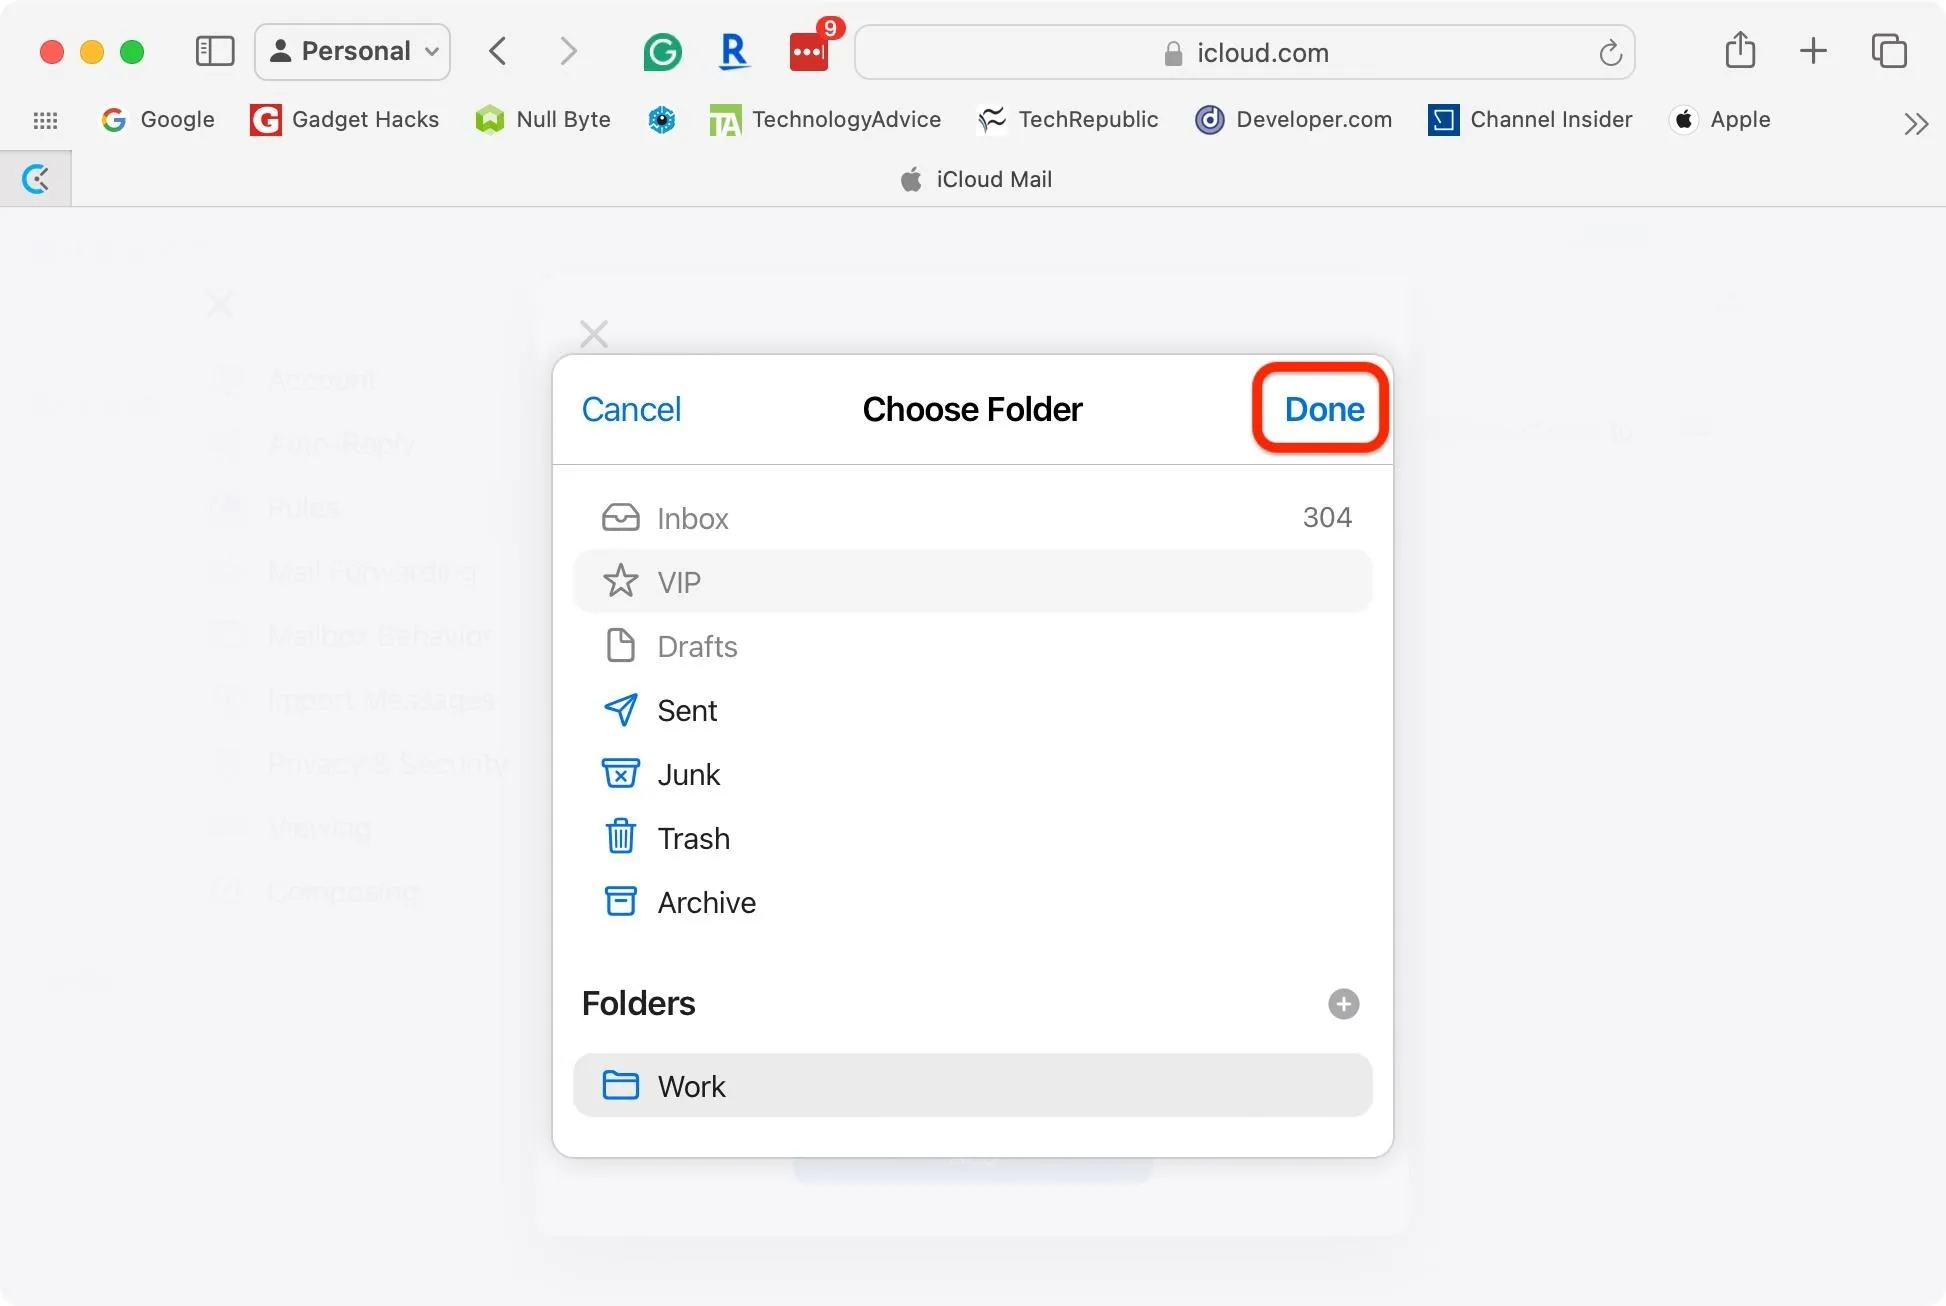
If you want to add the incoming emails to a folder but haven't created the folder yet, tap the plus sign (+) next to folders after selecting "Choose a Folder" under the Action. For some reason, you can create new folders during the folder selection process on iCloud.com but not in the iCloud Mail settings on iOS or iPadOS. After selecting a folder, hit "Done."
To save your new iCloud Mail rule, hit the "Add" button. You can edit it later on iCloud.com or from the iCloud Mail settings on iOS or iPadOS (see Method 1 above).
Throwing Away iCloud Mail Subaddresses
If you want to delete all incoming mail sent to one of your iCloud Mail subaddresses because of too much spam or another reason, you can't just delete the subaddress since it lives in perpetuity. However, you can set up a rule with the action "Move to Trash and Mark as Read" (see above) to keep it out of sight, out of mind.
Cover photo and screenshots by Justin Meyers/Gadget Hacks


Comments
Be the first, drop a comment!